Ktor: REST API for Mobile
In this tutorial, you’ll create a REST API server for mobile apps using the new Ktor framework from JetBrains. By Kevin D Moore.
Ktor is a modern framework provided by JetBrains. Written in Kotlin, it changes the way servers are built.
Instead of a configuration-heavy framework like Spring, Ktor uses a simple domain-specific language (DSL) for installing features to meet your server needs. These features include authentication, sessions, routing, web templates, JSON wrapping and more.
In this tutorial, you’ll focus on using Ktor to create REST APIs for mobile — though you can use it for the web, too. You’ll create a Ktor REST API server named TodoServer. This server will authenticate users and provide an API for users and TODOs.
Getting Started
To start, download the begin project by clicking the Download Materials button at the top or bottom of the tutorial.
Next, you’ll need IntelliJ IDEA with the Ktor plugin. IntelliJ is an integrated development environment (or IDE) also developed by JetBrains. Find IntelliJ at jetbrains.com/idea/.
To install the Ktor plugin, start IntelliJ and select IntelliJ menu ▸ Preferences on Mac or Help ▸ Settings on Windows.
Then select the Plugins section and search for Ktor. Install the plugin and restart IntelliJ.
At this point, you can continue this tutorial in one of two ways: If you want to learn how to start a new project from scratch, follow the steps below. Otherwise, open the begin project and jump to the next section.
Starting a Project in IntelliJ
To start from scratch, you’ll begin a new project in IntelliJ. Choose New ▸ New Project.

For the project type, choose Ktor. Double-check that the project type is Gradle and it uses Netty for the server type.
Next, select your features. Under Features, choose Locations, Sessions and Routing. Locations and Routing handle API routes. Sessions keeps track of the current user so you have a state associated with it. Since you’re creating a REST API, you won’t need a templating engine.
For Authentication, choose Authentication JWT – JSON Web Token – to create JSON-based access tokens. For Content Negotiation, choose GSON, a library used to serialize and deserialize Java objects to and from JSON.
Select Next.
On this screen, set the GroupId to com.raywenderlich and the ArtifactId to todoserver. Then select Next.

Set the Project name to TodoServer, and choose the directory where you want your server stored. Then select Finish to let the IDE create the project.

Now go to Build ▸ Build Project. Ensure your project builds without errors.

Finally, you’ll clean up some code you don’t need. Open Application.kt. Remove everything in the routing section, then remove MyLocation and Type. You’ll remove MySession later.
Great! You’re ready to shape your API with Ktor.
Implementing APIs
Your next step is to implement two APIs: one for handling users and one for TODOs.
Here’s how your API for users will look:
- v1/users/create (POST): Creates a new user. Passes in the email address, name and password.
- v1/users/login (POST): Logs in a user. Passes in the email address and password.
Here’s the API for TODOs:
- v1/todos (POST): Creates a new TODO. Passes in the TODO string and done (true/false).
- v1/todos (GET): Gets a list of TODOs for the current user.
Defining Routes
In Ktor, a Route defines a path to your server. This could be an API, like the one you’re creating, or your home page. Ktor uses GET/POST/PUT/DELETE/REST along with a path. For example:
get("/") {
    call.respondText("HELLO WORLD!", contentType = ContentType.Text.Plain)
}
This is a GET that responds to the string path “/” (i.e., the root path) with the text “HELLO WORLD!”
There are two different route types:
-
String Route: Uses a path in a string like:
/shopping/store/cart. - Class Route: Uses a class instead of strings. This makes it easier to read and allows you to put all the functionality of a route in a separate class.
You’ll use Class Routes in this project.
To use Class Routes, define a class and annotate it with the annotation @Location("route"). Create an extension function from Route where you’ll define your routes. You can define multiple GET/POST/DELETE-type routes in the same function.
Setting up Postgres
Ktor supports Postgres. There are several tools to run a Postgres server.
On Mac, download the Postgres app from postgresapp.com. On Windows, download your preferred tool at postgresql.org.
Once you’ve installed Postgres, create a database, which you’ll name todos for this project. To create it, run Postgres from the command line with:
psql -U postgres
Once in Postgres, create the database by typing:
create database todos;
Note that you need the semi-colon at the end.
To connect to the database, type:
\c todos
Finally, to exit press Ctrl-D. You don’t need to create the tables; the code will handle it.
Setting up Database Dependencies
To access the database you’ve just created, you’ll add all the libraries the project needs:
- Exposed: A JetBrains library you use to easily access a database.
- Hikari: Use this library to set up the configuration for the Postgres database.
- postgresql: Provides the JDBC driver, which allows the code to interact with the database.
Open gradle.properties and add the following variables:
exposed_version=0.18.1
hikaricp_version=3.3.1
postgres_version=42.2.4.jre7
This sets the versions for the libraries you need. Then open build.gradle and add the following in the dependencies section:
compile "org.jetbrains.exposed:exposed-core:$exposed_version"
compile "org.jetbrains.exposed:exposed-dao:$exposed_version"
compile "org.jetbrains.exposed:exposed-jdbc:$exposed_version"
compile "org.postgresql:postgresql:$postgres_version"
compile "com.zaxxer:HikariCP:$hikaricp_version"
In IntelliJ, open up the Gradle tab and choose sync.
Now that your databases are ready, it’s time to make sure your server can run.
Running the Server
You’ll use System.getEnv() to read in variables the server will use to connect to the proper database.
First, click the Add Configuration… button in the toolbar.
![]()
Next, click the + button in the top left. From the pop-up menu, choose Kotlin.
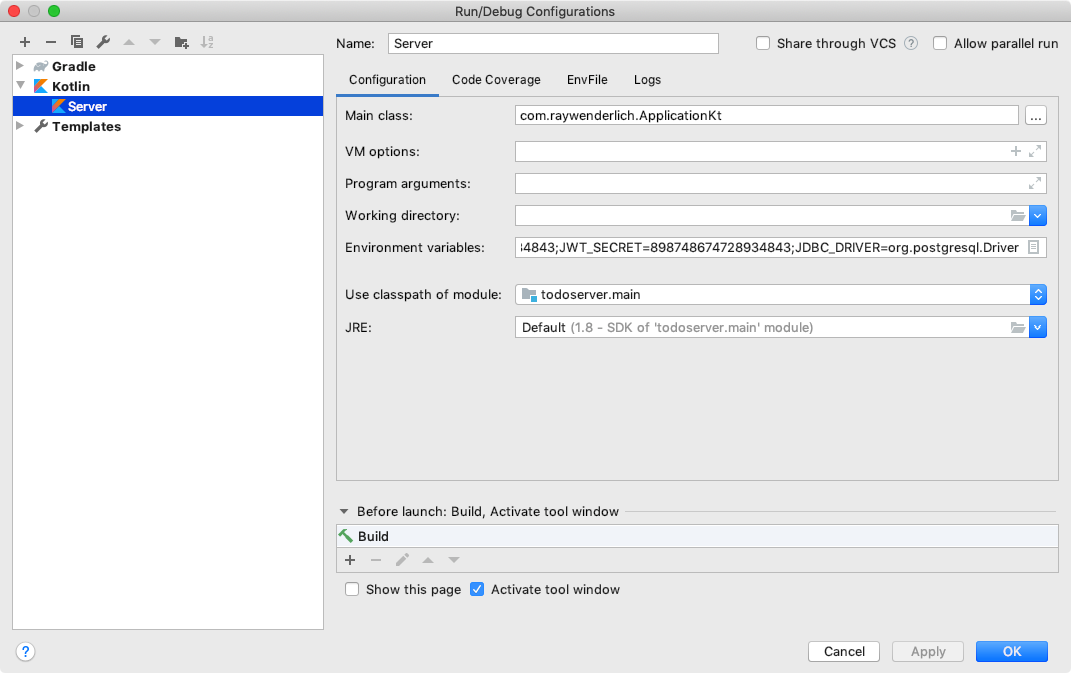
Enter Server as the Name of the configuration. Under Use classpath of Module, choose todoserver.main. In the Main class field, click on the “…” button and select ApplicationKt.
Under the Environment Variables section, click the button on the far right and add the following parameters:
JDBC_DRIVER=org.postgresql.Driver
JDBC_DATABASE_URL=jdbc:postgresql:todos?user=postgres;
SECRET_KEY=898748674728934843
JWT_SECRET=898748674728934843
Here’s what these parameters are doing:
- JDBC_DRIVER: Sets the driver for Postgres.
- JDBC_DATABASE_URL: The database connection URL.
- SECRET_KEY: Use this for hashing.
- JWT_SECRET: You’ll use this later for authentication.
Your Environment Variable screen should look like this:

Be sure there are no extra spaces around the keys or values then click OK. Now click the green run button in the toolbar to build and run. There should be no errors.
