Multiple UISplitViewController Tutorial
This UISplitViewController tutorial shows you how to build an adaptive layout note-taking app using multiple UISplitViewControllers. By Warren Burton.
An essential part of a modern iOS app is the need to adapt to the device and environment that it’s run on. An app that runs on iPad has a lot of horizontal space to play with unless it’s run in Split Screen or Slide Over column mode. Your app should adapt to all possible layouts with grace.
UISplitViewController is a very versatile component that can adapt to all trait collections with very little need for modification by the developer for simple cases. In this tutorial, you’ll learn the simple case, after which you’ll double the fun by placing a split view inside your split view, to add an extra level of hierarchy!
Getting Started
Download the starter app using the Download Materials button at the top or bottom of the page.
The project app, TreeWorld, is similar to the Notes app – there is a simple file system with folders, that can contain files. The files have text that you can edit.
Take a look around the project first. Open the TreeWorld.xcodeproj file in the TreeWorld-Starter folder. Expand the TreeWorld folder.

Model
Expand the Model Layer folder. Inside is a Core Data model with two entities:
-
Filerepresents a node in the file system. -
Contentrepresents a container for text.

Xcode automatically generates File.swift and Content.swift so that you can use them in the project.
CoreDataStack.swift is a simple Core Data setup that also saves the model when you background the app.
The model obeys these arbitrary rules:
- A folder is a
Filethat hasisFolderset totrue. - A folder never has a
Contentobject. - A folder can’t contain folders.
- A file is a
Filethat hasisFolderset tofalse. - A folder can contain any number of child files.
- A file must have a
Contentobject. - A file never has children.
FileDataSource.swift is a set of query and business logic for File objects, and it embodies the rules above.
Views
Inside the group Presentation Layer ▸ Member View Controllers is a set of pre-made view controllers and storyboards that you’ll use in this app.
EditorViewController.swift is a view to allow you to edit the Content object of a File.
FileListViewController.swift is a UITableViewController to present File objects. The FileDataSource class provides the UITableViewDataSource and UITableViewDelegate implementations to keep unnecessary logic out of the view controller.
PlaceholderViewController.swift displays a message.
You can investigate them later if you want. They are composed of familiar UIKit components and should have no surprises for you.
Inside Presentation Layer ▸ Root View Controller is RootViewController.swift. This file is where you’ll make most of the changes in this tutorial. It will act as a coordinator for all the views.
Choose the iPad Pro (9.7-inch) simulator in the target settings. Build and run.

You should see a green view appear. You’re ready to start splitting, here.

Installing the Root Split View Controller
In this section, you’ll create and install the root UISplitViewController that will exist for all layouts.
Creating a Split View Controller
Select the folder Presentation Layer ▸ View Controllers ▸ Root View Controller in the Project navigator. Add a new file with Command-N (or File ▸ New ▸ New File…).


- Select a new Swift File.
- Click Next.
- Name the file RootViewController+ViewFactory.
- Click Create.
Open RootViewController+ViewFactory.swift and add the following code:
import UIKit

extension RootViewController {
  func freshSplitViewTemplate() -> UISplitViewController {
    let split = UISplitViewController()
    split.preferredDisplayMode = .allVisible
    let navigation = UINavigationController()
    split.viewControllers = [navigation]
    return split
  }
}
Here, you instantiate a UISplitViewController and a UINavigationController. You then set the navigation controller as the primary view controller of the split.
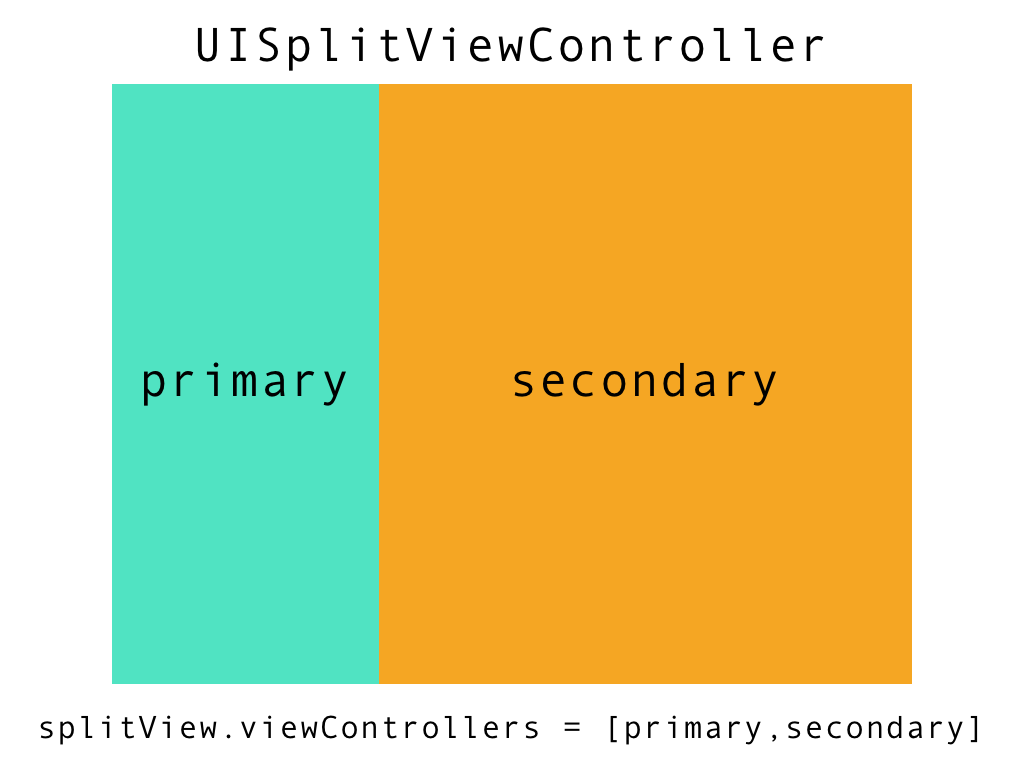
UISplitViewController has a primary and a secondary view controller. You can set and get these controllers via the viewControllers property.
To ensure both primary and secondary views are visible at the same time, you set the preferredDisplayMode property to .allVisible.
Open RootViewController.swift and add this code to the body of the main class:
let rootSplitSmallFraction: CGFloat = 0.25
let rootSplitLargeFraction: CGFloat = 0.33

lazy var rootSplitView: UISplitViewController = {
  let split = freshSplitViewTemplate()
  split.preferredPrimaryColumnWidthFraction = rootSplitLargeFraction
  split.delegate = self
  return split
}()

override func viewDidLoad() {
  super.viewDidLoad()
  installRootSplit()
}

func installRootSplit() {
  view.addSubview(rootSplitView.view)
  view.pinToInside(rootSplitView.view)
  addChild(rootSplitView)
}
Add this extension to the end of the file:
extension RootViewController: UISplitViewControllerDelegate {
  //you'll add to this later
}
In this fragment, you create a UISplitViewController and embed it within the RootViewController. You also set the primary view to take 33% of the available width.
Build and run. You should see the empty navigation bar for the primary view in the top-left. There’s not much to look at, yet.

Managing State
You now need to set up some infrastructure. The app can have three possible selection states that you want to keep track of:
- Nothing selected
- Folder selected
- File selected
Select the folder Presentation Layer ▸ View State in the Project navigator. Create a new Swift file (Command-N) and name it SelectionState.
Add this code to the file:
enum SelectionState {
  case noSelection
  case folderSelected
  case fileSelected
}
Now, create a second file in the View State folder. Name this file StateCoordinator.swift.
Add this code to the body of StateCoordinator.swift:
import UIKit

// 1
protocol StateCoordinatorDelegate: class {
  func gotoState(_ nextState: SelectionState, file: File?)
}

// 2
class StateCoordinator: NSObject {
  // 3
  private(set) var state: SelectionState = .noSelection
  private weak var delegate: StateCoordinatorDelegate?

  init(delegate: StateCoordinatorDelegate) {
    self.delegate = delegate
  }

  // 4
  private(set) var selectedFile: File? {
    didSet {
      guard let file = selectedFile else {
        state = .noSelection
        return
      }
      state = file.isFolder ? .folderSelected : .fileSelected
    }
  }

  // 5
  var selectedFolder: File? {
    guard let file = selectedFile else {
      return nil
    }
    return file.isFolder ? file : file.parent
  }
}
Reviewing step by step:
- First, you declare a delegate protocol,
StateCoordinatorDelegate, to allow another object to react to changes in theStateCoordinator. - Next, you declare the
StateCoordinatorclass. This class has the job of keeping track of the current selectedFile. The class will change to the appropriateSelectionStatewhen aFileis selected or deleted. -
StateCoordinatorhas two properties: one forSelectionStatethat is publicly read-only and the other that is a weak reference to theStateCoordinatorDelegate. - The
selectedFileproperty is publicly read-only and uses a property observer to change thestate. - The
selectedFolderproperty is computed and allows you to get the currently selected top-level folder.
Now, add this extension to the end of StateCoordinator.swift:
extension  StateCoordinator {
  func didSelectFile(_ file: File?) {
    selectedFile = file
    delegate?.gotoState(state, file: selectedFile)
  }

  func didDeleteFile(parentFolder: File?) {
    selectedFile = parentFolder
    state = .noSelection
    delegate?.gotoState(state, file: selectedFile)
  }
}
Here, you have two public APIs to allow callers to change the state in a managed way.
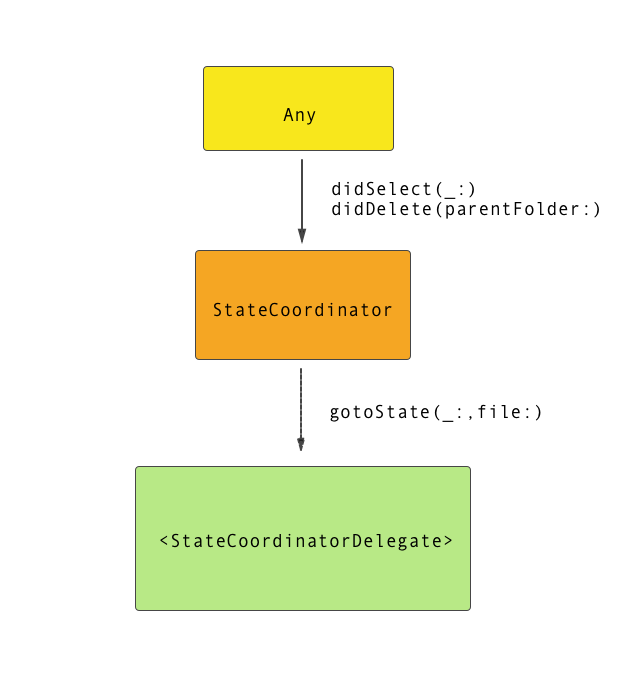
didSelectFile(_:) tells the StateCoordinator that a File was selected. This has the effect of setting the state and notifying the downstream delegate that this happened.
didDeleteFile(parentFolder:) is almost the same as didSelectFile, but it ensures that the state is set to noSelection before notifying the delegate.