Unity 4.3 2D Tutorial: Physics and Screen Sizes
Learn how to use Unity’s 2D physics engine for collision detection, and deal with different screen sizes and aspect ratios. By Chris LaPollo.
Welcome back to our Unity 4.3 2D Tutorial series!
In the first part of the series, you started making a fun game called Zombie Conga, learning the basics of Unity 4.3’s built-in 2D support along the way.
In the second part of the series, you learned how to animate the zombie and the cat using Unity’s powerful built-in animation system.
In the third part of the series, you got more practice creating Animation Clips, and learned how to control the playback of and transition between those clips.
In this fourth part of the series, you’ll learn about some common issues you may encounter while making your own games, such as 2D physics and dealing with different screen sizes and aspect ratios.
This tutorial picks up where the third part of the series left off. If you don’t already have the project from that tutorial, download it here.
Unzip the file (if you needed to download it) and open your scene by double-clicking ZombieConga/Assets/Scenes/CongaScene.unity.
With your project ready to go, let’s get physical! Or physics-le, as it were.
Getting Started
In Zombie Conga, you don’t actually need to use Unity’s built-in physics engine to write the game. Sure, you’ll need to know when the zombie collides with an enemy or a cat, but you can accomplish that with some basic math.
However, in the spirit of doing unnecessary things in the pursuit of education, this tutorial will show you how to use physics to handle Zombie Conga’s collision detection. By the time you’re done here, you’ll be better prepared to explore other physics topics on your own.
If you’ve ever used physics with 3D objects in Unity, then you already understand a lot about its 2D physics engine, too, because they are quite similar. They both rely on rigidbodies, colliders, physics materials and forces to represent an object’s state in a physics simulation.
One difference is that 2D rigidbodies can only move within the XY plane and can only rotate around the z-axis, which now makes 2D collisions a lot easier to deal with than they were before Unity 4.3 when you had to trick 3D objects into reacting only in two dimensions.
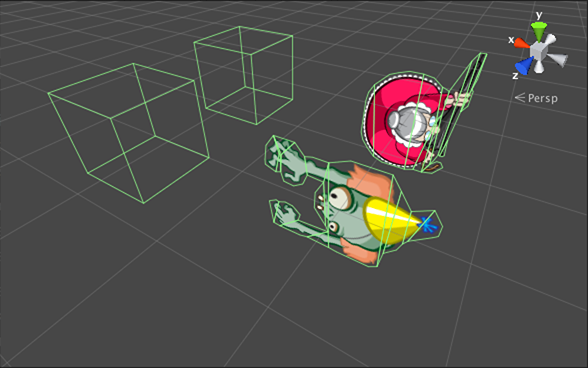
The following demonstrates this point by dropping a cube and a sprite and letting physics take over:

Another difference is that 3D colliders have a size in all three dimensions, whereas 2D colliders have an infinite z-depth. This means that 2D objects will collide with each other regardless of their positions along the z-axis.
The following image shows the colliders for two cubes and two sprites. The positions of the two cubes differ only along the z-axis, and the positions of the two sprites differ only along the z-axis. As you’d expect, the two cubes are not currently colliding, but what you might not expect is that the two sprites are colliding.
In order for the zombie to participate in physics-based collisions, it needs a collider component. In 3D you would add some subclass of Collider, such as BoxCollider or MeshCollider. When working with the 2D physics engine, you use instances of Collider2D instead of Collider, such as BoxCollider2D or CircleCollider2D.
In the zombie’s case, you’ll add what is basically the 2D equivalent of a MeshCollider, called a PolygonCollider2D.
To do so, select zombie in the Hierarchy and add the collider by choosing Component\Physics 2D\Polygon Collider 2D from Unity’s menu.
Unity automatically calculated a group of vertices that fit your sprite fairly well, which you can see highlighted in green in the Scene view, as shown below:

However, there is actually a slight problem here. The collider you created was for the first frame of animation, because that was the Sprite set on the zombie when you added the component. Unfortunately, it won’t match up with the other Sprites displayed during the zombie’s walk animation, as you can see in the images below:

In many games, this will be fine. In fact, you’d get perfectly acceptable results in Zombie Conga if you used a much simpler collider, such as a BoxCollider2D or a CircleCollider2D. But at some point you’re going to want to have collision areas that match the shape of an animating sprite, so now is a good time to learn how to do it.
Double-click ZombieController inside the Scripts folder in the Project browser to open the script in MonoDevelop.
Rather than use a single collider, you’re going to create a separate one for each frame of animation and then swap them to match the animation. Add the following instance variables to ZombieController to keep track of these colliders:
[SerializeField]
private PolygonCollider2D[] colliders;
private int currentColliderIndex = 0;
Let’s go over this line by line:
- The
[SerializeField]directive tells Unity to expose the instance variable below (colliders) in the Inspector. This allows you to make the variable private in code while still giving you access to it from Unity’s editor. -
colliderswill hold a separatePolygonCollider2Dfor each frame of animation. -
currentColliderIndexwill keep track of the index intocollidersfor the currently active collider.
Save the file (File\Save) and go back to Unity.
Select zombie in the Hierarchy. In the Inspector, expand the Colliders field in the Zombie Controller (Script) component to reveal its Size field.
This field currently contains the value zero, meaning it’s an array with no elements. You want to store a different collider for each of the zombie’s Sprites, so change this value to 4, as shown below:

Inside the Inspector, click the Polygon Collider 2D component and drag it into the Zombie Controller (Script) component, releasing it over the field labeled Element 0 in the Colliders array, as demonstrated below:

Next, change the zombie’s sprite to zombie_1 by clicking the target icon to the right of the Sprite field and double-clicking on zombie_1 in the dialog that appears, as shown below:
![]()
![]()
With this new Sprite set on the zombie, add a new Polygon Collider 2D. Check the following Spoiler if you don’t remember how.
[spoiler title=”Need help adding a collider?”]With zombie selected in the Hierarchy, add a collider by choosing Component\Physics 2D\Polygon Collider 2D from Unity’s menu.
[/spoiler]
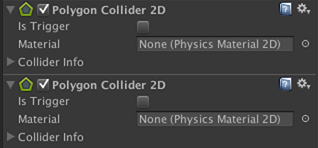
The zombie now has two colliders attached to it, as shown below:
Inside the Inspector, click the new Polygon Collider 2D component you just added and drag it into the Element 1 field in the Colliders array of the Zombie Controller (Script) component.

Repeat the previous steps to create colliders for the zombie_02 and zombie_03 Sprites and add these to the Colliders array in the Element 2 and Element 3 fields, respectively.
When you are finished, the Inspector should look like this:

Select zombie in the Hierarchy and reset its Sprite to zombie_0. Inside the Scene view, you can see that he now has colliders for each of his Sprites, but all at the same time!

This isn’t exactly what you want. Rather than have them all active at the same time, you want to activate only the collider that matches the current frame of animation. But how do you know which is the current frame?