Android Networking With Kotlin Tutorial: Getting Started
In this tutorial, you’ll get started with Android networking by creating a simple app to retrieve and display a list of GitHub repositories. By Fuad Kamal.
Network Profiling
OkHttp contains a logging interceptor. You can use it to log and debug the network requests and responses that you make with Retrofit. However, Android Studio 3.0 introduced the Android Network Profiler. It replaces the need for the OkHttp logging interceptor. Instead of running or debugging your app, click the Android Profiler icon at the top right corner in Android Studio, as highlighted in the image below.
![]()
Your app will build and run like before, but now the Android Profiler tab will also open.
Using the Network Profiler
If you don’t see the Profiler icon on the toolbar, run the app normally then go to View ▸ Tool Windows ▸ Profile to open the profiler:

The profiler displays real-time data of your app’s performance. You can toggle the feedback by either selecting the Pause button in the Profiler or pressing the space bar. What you see is a shared timeline that includes data for the CPU, memory, network and battery usage.
Exploring Network Profiler
To access the detailed profiling tools, select the corresponding graph. If you select the network graph, you will see detailed network performance from the time your app made the network request and received the response:
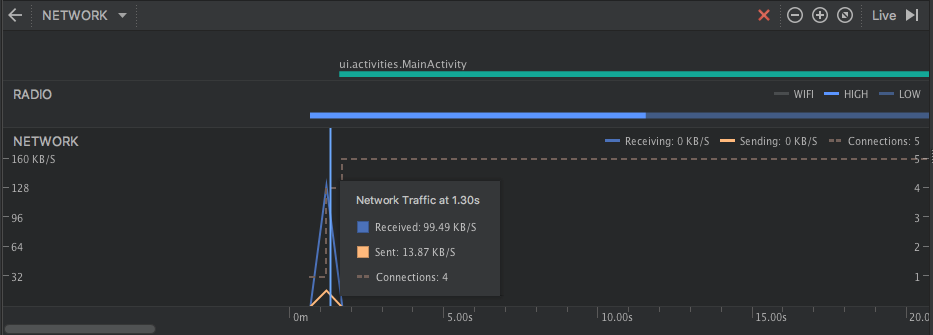
As you watch the live network data, rotate your device or emulator. Note the network traffic spike! When the device rotates, Android OS destroys and recreates the activity.
This is one reason why putting your network code directly in the UI view is not a good idea. A better solution: Make use of Android Architecture Components such as ViewModel.
The profiler sometimes has trouble when a network call occurs when your app first starts. Just in case, add a refresh button so you can refresh the data and make a second call after the app launches.
Open res/layout/activity_main.xml and update the content as follows:
<?xml version="1.0" encoding="utf-8"?>
<LinearLayout xmlns:android="http://schemas.android.com/apk/res/android"
    android:layout_width="match_parent"
    android:layout_height="match_parent"
    android:orientation="vertical">

  <androidx.recyclerview.widget.RecyclerView
      android:id="@+id/repoList"
      android:layout_width="match_parent"
      android:layout_height="0dp"
      android:layout_weight="1" />

  <Button
      android:id="@+id/refreshButton"
      android:layout_width="match_parent"
      android:layout_height="wrap_content"
      android:text="@string/refresh" />

</LinearLayout>
You’ve converted to LinearLayout and added a button to refresh the screen.
To handle the click of the button, open MainActivity.kt and go to onCreate(). Then add the following:
refreshButton.setOnClickListener {
  retrieveRepositories()
}
This adds a click listener for the refresh button at the end of the method.
Now build and run using the Profile button. After the app starts, tap the refresh button on the app screen. You’ll notice a second network call made to the GitHub API on the Android Studio profiler.
Click inside the network profiler, and drag to select the second network call. A panel will open with more details for the selected network call.

Double-click the network call. A panel will open with Overview, Response, Request and Call Stack tabs.

These tabs give you the information you need to debug any issues that may occur when calling a back-end API.
Adding Images
Time to spice things up! Complete your app by bringing in icons for each repository.
Use the Picasso library, also from Square. To use Picasso, you need to modify the app’s build.gradle file by adding the following dependency:
implementation 'com.squareup.picasso:picasso:2.71828'
Open the RepoListAdapter and populate the icon by adding the following statement at the end of bindRepo() in the ViewHolder:
Picasso.get().load(repo.owner.avataUrl).into(itemView.icon)
Build and run. It should look like:

Where to Go From Here?
Congrats! You’ve completed this tutorial on network operations in Android. Download the completed project files by clicking the Download Materials button at the top or bottom of the tutorial.
For more information on the open-source projects this tutorial uses, head to Retrofit and Picasso on GitHub.
You can also check out the following Android Developer site pages.
- Android Profiler digs deep into how to measure your app’s performance.
- Reducing Network Battery Drain discusses how to reduce device battery drain and the importance of optimizing your app’s network activity.
Explore this Android Networking video course for more details on Android networking and Retrofit. This ViewModel screencast has more details on using ViewModel.
Finally, the following resources can help you gain mastery of Kotlin’s coroutines:
- Articles: Kotlin Coroutines Tutorial for Android: Getting Started and Kotlin Coroutines Tutorial for Android: Advanced.
- Book: Kotlin Coroutines by Tutorials.
If you have any questions or comments, please join the forum discussion below!