iOS MVVM Tutorial: Refactoring from MVC
In this iOS tutorial, you’ll learn how to convert an MVC app into MVVM. In addition, you’ll learn about the components and advantages of using MVVM. By Chuck Krutsinger .
Model-View-ViewModel (MVVM) is a design pattern that’s gained traction in the iOS development community in recent years. It involves a new concept called a view model. In iOS apps, a view model is a companion object to a view controller.
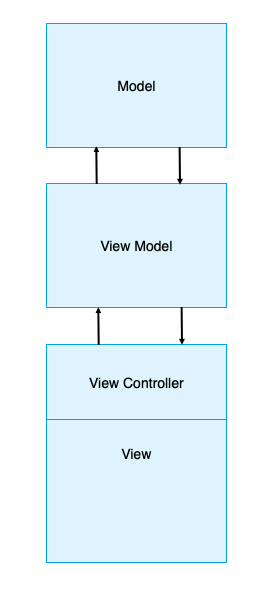
As shown above, the MVVM pattern consists of three layers:
- Model: App data that the app operates on.
- View: The user interface’s visual elements. In iOS, the view controller is inseparable from the concept of the view.
- ViewModel: Updates the model from view inputs and updates views from model outputs.
MVVM offers some advantages over Model-View-Controller, or MVC, which is the de facto approach in iOS:
- Reduced complexity: MVVM makes the view controller simpler by moving a lot of business logic out of it.
- Expressive: The view model better expresses the business logic for the view.
- Testability: A view model is much easier to test than a view controller. You end up testing business logic without having to worry about view implementations.
In this tutorial, you’ll refactor a weather app by changing its architecture from from MVC to MVVM. First you’ll move all the weather and location related logic from the view controller into the view model. Then, you’ll write unit tests for the view model to see how you can easily integrate testing into your new view model.
By the end of this tutorial, your app should allow you to select any location by name and view a weather summary of that location.
Getting Started
Start by downloading the project materials using the Download Materials button at the top or bottom of this tutorial. Then, open the begin project.
The app fetches the latest weather information from weatherbit.io and presents a summary of the current weather.
To use the Weatherbit API, you need to register for a free API key. The app won’t work until you add your own Weatherbit API key. Go to https://www.weatherbit.io/account/create to register for your key.
After you get your API key, return to Xcode.
Under Services, open WeatherbitService.swift. Then replace the value for apiKey with your new key.

Build and run.

You should see the weather for McGaheysville, VA and today’s date.
Introducing MVVM Roles and Responsibilities
Before diving into refactoring, it’s essential you understand what the view model and view controller do in the MVVM pattern.
The view controller is only responsible for altering views and passing view inputs to the view model. Consequently, you’ll remove any other logic from the view controller and move it to the view model.
In contrast, the view model is responsible for the following:
- Model inputs: Taking view inputs and updating the model.
- Model outputs: Passing model outputs to the view controller.
- Formatting: Formatting model data for display by the view controller.
Becoming Familiar With the Existing App Structure
Familiarize yourself with the app in its current MVC design. First, open Project navigator as shown here:

Under Controllers, you’ll find WeatherViewController.swift. This is the view controller you’ll refactor to remove any use of model and service types.
Under Models, you’ll find two different model objects: WeatherbitData and Location. WeatherbitData is a struct that represents the data returned by the Weatherbit API. Location is a simplified struct for location data Apple’s CLLocation service returns.
Services contains WeatherbitService.swift and LocationGeocoder.swift. As the name indicates, WeatherbitService fetches the weather data from the Weatherbit API. LocationGeocoder turns a string into a Location.
Storyboards contains LaunchScreen and Weather storyboards.
Utilities and View Models are both empty. You’ll create files for these groups during the refactor.
WeatherViewController
When refactoring, you’ll primarily focus on WeatherViewController. To understand WeatherViewController, start by examining its private properties.
// 1
private let geocoder = LocationGeocoder()
// 2
private let defaultAddress = "McGaheysville, VA"
// 3
private let dateFormatter: DateFormatter = {
  let dateFormatter = DateFormatter()
  dateFormatter.dateFormat = "EEEE, MMM d"
  return dateFormatter
}()
// 4
private let tempFormatter: NumberFormatter = {
  let tempFormatter = NumberFormatter()
  tempFormatter.numberStyle = .none
  return tempFormatter
}()
-
geocodertakes aStringinput such as Washington DC and converts it to a latitude and longitude that it sends to the weather service. -
defaultAddresssets a default address. -
DateFormatterformats the date display. - Finally,
NumberFormatterhelps present the temperature as an integer value.
Now, look at viewDidLoad():
override func viewDidLoad() {
  geocoder.geocode(addressString: defaultAddress) { [weak self] locations in
    guard
      let self = self,
      let location = locations.first
      else {
        return
      }
    self.cityLabel.text = location.name
    self.fetchWeatherForLocation(location)
  }
}
viewDidLoad() calls geocoder to convert defaultAddress into a Location. The callback uses the return location to fill in cityLabel‘s text. Then, it passes location into fetchWeatherForLocation(_:).
The last part of WeatherViewController is fetchWeatherForLocation(_:).
func fetchWeatherForLocation(_ location: Location) {
  //1
  WeatherbitService.weatherDataForLocation(
    latitude: location.latitude,
    longitude: location.longitude) { [weak self] (weatherData, error) in
    //2
    guard
      let self = self,
      let weatherData = weatherData
      else {
        return
      }
    self.dateLabel.text =
      self.dateFormatter.string(from: weatherData.date)
    self.currentIcon.image = UIImage(named: weatherData.iconName)
    let temp = self.tempFormatter.string(
      from: weatherData.currentTemp as NSNumber) ?? ""
    self.currentSummaryLabel.text =
      "\(weatherData.description) - \(temp)℉"
    self.forecastSummary.text = "\nSummary: \(weatherData.description)"
  }
}
This method only does two things:
- Calls the weather service and passes it the location’s latitude and longitude.
- Updates the views with the weather data provided by the weather service callback.
Now that you have a solid understanding of the existing app structure, it’s time to start refactoring.
Data Binding Using Box
In MVVM, you need a way to bind view model outputs to the views. To do that, you need a utility that provides a simple mechanism for binding views to output values from the view model. There are several ways to do such bindings:
- Key-Value Observing or KVO: A mechanism for using key paths to observe a property and get notifications when that property changes.
- Functional Reactive Programming or FRP: A paradigm for processing events and data as streams. Apple’s new Combine framework is its approach to FRP. RxSwift and ReactiveSwift are two popular frameworks for FRP.
- Delegation: Using delegate methods to pass notifications when values change.
- Boxing: Using property observers to notify observers that a value has changed.
In this tutorial, you’ll make use of boxing. For simple apps, a custom implementation of boxing will be more than enough.
Under Utilities, create a new Swift file. Name it Box. Then, add the following code to the file:
final class Box<T> {
  //1
  typealias Listener = (T) -> Void
  var listener: Listener?
  //2
  var value: T {
    didSet {
      listener?(value)
    }
  }
  //3
  init(_ value: T) {
    self.value = value
  }
  //4
  func bind(listener: Listener?) {
    self.listener = listener
    listener?(value)
  }
}
Here’s what the code above does:
- Each
Boxcan have aListenerthatBoxnotifies when the value changes. -
Boxhas a generic type value. ThedidSetproperty observer detects any changes and notifiesListenerof any value update. - The initializer sets
Box‘s initial value. - When a
Listenercallsbind(listener:)onBox, it becomesListenerand immediately gets notified of theBox‘s current value.