ReactiveCocoa Tutorial – The Definitive Introduction: Part 2/2
Get to grips with ReactiveCocoa in this 2-part tutorial series. Put the paradigms to one-side, and understand the practical value with work-through examples By Colin Eberhardt.
ReactiveCocoa is a framework that allows you to use Functional Reactive Programming (FRP) techniques within your iOS applications. With the first installment of this two-part ReactiveCocoa tutorial series you learned how to replace standard actions and event handling logic with signals that emit streams of events. You also learned how to transform, split and combine these signals.
In this, the second part of the series, you’re going to learn about the more advanced features of ReactiveCocoa. Including:
- The two other event types: error and completed
- Throttling
- Threading
- Continuations
- …and more!
It’s time to dive in!
Twitter Instant
The application you’re going to develop throughout this tutorial is called Twitter Instant (modeled on the Google Instant concept), a Twitter search application that updates search results in real-time as you type.
The starter project for this application includes the basic user interface and some of the more mundane code you’ll need to get you started. As with part 1, you’ll need to use CocoaPods to obtain the ReactiveCocoa framework and integrate it with your project. The starter project already includes the necessary Podfile, so open up a terminal window and execute the following command:
pod install
If it executes correctly, you should see output similar to the following:
Analyzing dependencies
Downloading dependencies
Using ReactiveCocoa (2.1.8)
Generating Pods project
Integrating client project
This should have generated a Xcode workspace, TwitterInstant.xcworkspace. Open this up in Xcode and confirm that it contains two projects:
- TwitterInstant: which is where your application logic will live
- Pods: which is where the external dependencies reside. Currently it just contains ReactiveCocoa
Build and run. The following interface will greet you:
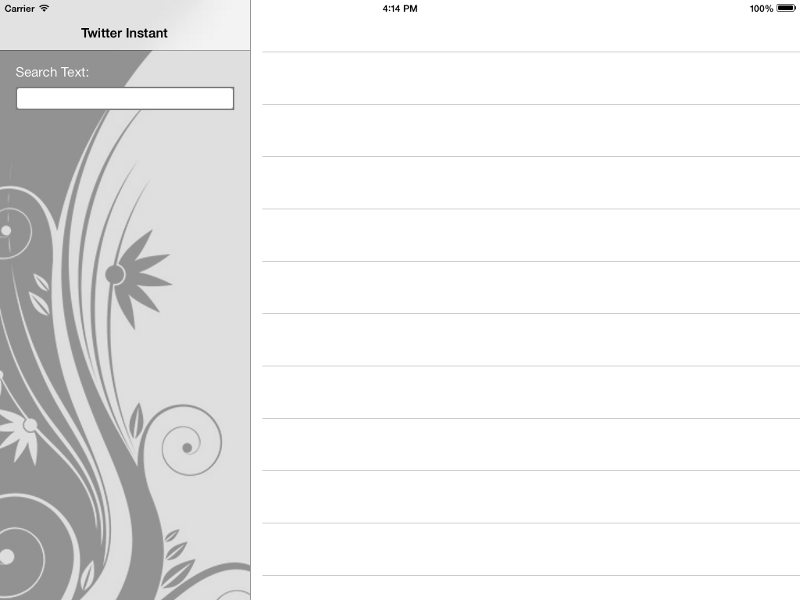
Take a moment to familiarize yourself with the application code. It is a very simple split view controller-based app. The left-hand panel is the RWSearchFormViewController, which has a few UI controls added via the storyboard, and the search text field connected to an outlet. The right-hand panel is the RWSearchResultsViewController, which is a currently just a UITableViewController subclass.
If you open up RWSearchFormViewController.m you can see the viewDidLoad method locates the results view controller and assigns it to the resultsViewController private property. The majority of your application logic is going to live within RWSearchFormViewController, and this property will supply search results to RWSearchResultsViewController.
Validating the Search Text
The first thing you’re going to do is validate the search text to ensure it’s length is greater than two characters. This should be a pleasant refresher if you completed part 1 of this series.
Within RWSearchFormViewController.m add the following method just below viewDidLoad:
- (BOOL)isValidSearchText:(NSString *)text {
  return text.length > 2;
}
This simply ensures the supplied search string is longer than two characters. With such simple logic you might be asking “Why is this a separate method in the project file?”
The current logic is simple. But what if it needed to be more complex in future? With the above example, you would only make changes in one place. Furthermore, the above makes your code more expressive and it indicates why you’re checking the length of the string. We all follow good coding practices, right?
At the top of the same file, import ReactiveCocoa:
#import <ReactiveCocoa.h>
Within the same file add the following to the end of viewDidLoad:
[[self.searchText.rac_textSignal
  map:^id(NSString *text) {
    return [self isValidSearchText:text] ?
      [UIColor whiteColor] : [UIColor yellowColor];
  }]
  subscribeNext:^(UIColor *color) {
    self.searchText.backgroundColor = color;
  }];
Wondering what that’s all about? The above code:
- Takes the search text field’s text signal
- Transforms it into a background color that indicates whether it is valid or not
- Then applies this to the text field’s
backgroundColorproperty in thesubscribeNext:block.
Build and run to observe how the text field now indicates an invalid entry with a yellow background if the current search string is too short.

Illustrated graphically, this simple reactive pipeline looks a bit like this:

The rac_textSignal emits next events containing the current text field’s text each time a change occurs. The map step transforms the text value into a color, while the subscribeNext: step takes this value and applies it to the text field background.
Of course, you do remember this from the first article, right? If not, you might want to stop right here and at least read through the exercises.
Before adding the Twitter search logic, there are a few more interesting topics to cover.
Formatting of Pipelines
When you’re delving into formatting ReactiveCocoa code, the generally accepted convention is to have each operation on a new line, and align all of the steps vertically.
In this next image, you can see the alignment of a more complex example, taken from the previous tutorial:
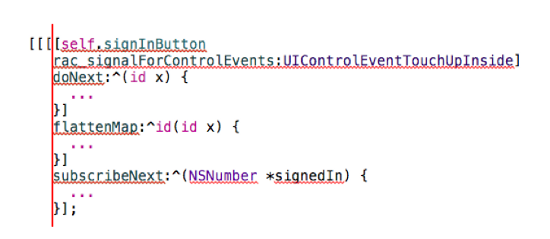
This allows you to see the operations that make up the pipeline very easily. Also, minimize the amount of code in each block; anything more than a couple of lines should be broken out into a private method.
Unfortunately, Xcode doesn’t really like this style of formatting, so you might find yourself battling with its automatic indentation logic!
Memory Management
Considering the code you added to the TwitterInstant app, are you wondering how the pipeline you just created is retained? Surely, as it is not assigned to a variable or property it will not have its reference count incremented and is doomed to destruction?
One of the design goals of ReactiveCocoa was to allow this style of programming, where pipelines can form anonymously. In all of the reactive code you’ve written so far, this should seem quite intuitive.
In order to support this model, ReactiveCocoa maintains and retains its own global set of signals. If it has one or more subscribers, then the signal is active. If all subscribers are removed, the signal can be de-allocated. For more information on how ReactiveCocoa manages this process see the Memory Management documentation.
That leaves on final question: How do you unsubscribe from a signal? After a completed or error event, a subscription removes itself automatically (you’ll learn more about this shortly). Manual removal may be accomplished via RACDisposable.
The subscription methods on RACSignal all return an instance of RACDisposable that allows you to manually remove the subscription via the dispose method. Here is a quick example using the current pipeline:
RACSignal *backgroundColorSignal =
  [self.searchText.rac_textSignal
    map:^id(NSString *text) {
      return [self isValidSearchText:text] ?
        [UIColor whiteColor] : [UIColor yellowColor];
    }];

RACDisposable *subscription =
  [backgroundColorSignal
    subscribeNext:^(UIColor *color) {
      self.searchText.backgroundColor = color;
    }];

// at some point in the future ...
[subscription dispose];
It is unlikely you’ll find yourself doing this very often, but it is worth knowing the possibility exists.
Note: As a corollary to this, if you create a pipeline but do not subscribe to it, the pipeline never executes, this includes any side-effects such as doNext: blocks.