Game Center Tutorial: How To Make A Simple Multiplayer Game with Sprite Kit: Part 1/2
Learn how to make a simple multiplayer racing game with Sprite Kit in this Game Center tutorial! By Ali Hafizji.
Create a multiplayer racing game with Sprite Kit and Game Center!

Update 2/28/14: Updated for iOS 7 and Sprite Kit.
People love to play games, whether they are casual games that are played on the bus ride home or complex ones that people spend hours on. Playing games is inherently a social activity. Players love to share their highscores, achievements and talk about the boss they defeated in the last level (I know for a fact that I do).
In this 2-part Game Center tutorial series, you’ll make a simple 2-player networked game with Sprite Kit and Game Center matchmaking.
The game you’ll be working with is very simple. It’s a racing game with a dog vs. a kid – tap as fast as you can to win!
This Game Center tutorial assumes you are already familiar with the basics of using Sprite Kit (the awesome new game engine added in iOS 7). If you are new to Sprite Kit, you might want to check out some of the other Sprite Kit tutorials on this site first.
Ready? On your mark, get set, GO!
Getting Started
This Game Center tutorial shows you how to add matchmaking and multiplayer capabilities into a simple game.
Since making the game logic itself isn’t the point of this tutorial, I’ve prepared some starter code for you that has the game without any network code.
Download the code and run the project, and you should see a screen like this:

The goal is to tap the screen as fast as you can until you reach the cat. Try it for yourself!
The game is very simple and well commented – go ahead and browse through the code and make sure you understand everything. If you get stuck on anything, check out some of our other Sprite Kit tutorials for more background information.
Enabling Game Center: Overview
At this point, you have a simple playable game, except it’s pretty boring since you’re playing all by yourself!
It would be a lot more fun to use Game Center, so you can invite friends to play with you, or use matchmaking to play with random people online.
But before you can start writing any Game Center code, you need to do two things:
- Enable Game Center for your app
- Register your app in iTunes Connect
Let’s go through each of these in turn.
Enabling Game Center for your app
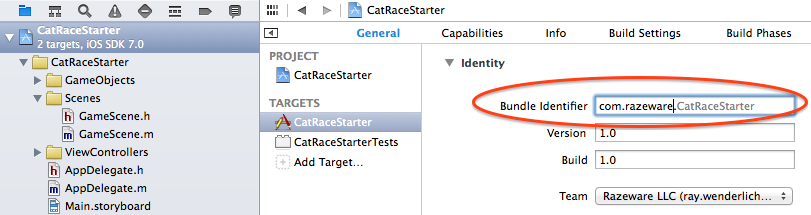
Open the project in XCode, if you haven’t already and switch to the CatRaceStarter target settings. In the general tab, change the Bundle Identifier to something unique (probably based on your name or company name), like this:
It’s also a good idea to restart Xcode at this point, as it often gets confused when you switch Bundle Identifiers like this.
Then select the Capabilities tabs on the menu bar at the top.

Next, turn the switch next to the section titled Game Center on. This is a new feature introduced in Xcode 5 which makes it extremely easy to enable Game Center for your apps.

And thats it! With just the click of a button Xcode has automatically created an App ID and provisioning profile for your app, and enabled Game Center for your app – Hurray! Next, you need to register your app with iTunes Connect and enable Game Center.
Register your app in iTunes Connect
The next step is to log on to iTunes Connect and create a new entry for your app.
Once you’re logged onto iTunes Connect, select Manage Your Applications, and then click the blue Add New App button in the upper right.
On the first screen, enter a name for your app. I’ve already taken CatRace, so you’ll need to pick something else, like CatRace [Your initials]. Then enter 201 for SKU Number (or anything else you’d like), and select the bundle ID you created earlier, similar to the screenshot below:

Click Continue, and follow the prompts to set up some basic information about your app.
Don’t worry about the exact values to put in, since it doesn’t really matter and you can change any of this later – you just need to put something. To make this process simple I’ve created a zip file that contains a dummy app icon and screenshots that you can use to upload to iTunes connect.
When you’re done, click Save, and if all works well you should be in the “Prepare for Upload” stage and will see a screen like this:

Click the blue Manage Game Center button to the upper right, and select the Enable for Single Game button, and click Done. That’s it – Game Center is enabled for your app, and you’re ready to write some code!
By the way – inside the “Manage Game Center” section, you might have noticed some options to set up Leaderboards or Achievements. I won’t be covering Leaderboards and Achievements in this tutorial, but if you are interested I’ve covered this in detail in our book iOS Games by Tutorials.
Authenticate the Local Player: Strategy
When your game starts up, the first thing you need to do is authenticate the local player. Without authentication you cannot use any of the awesome features game center provides.
You can think of this as “logging the player into Game Center.” If he’s already logged in, it will say “Welcome back!” Otherwise, it will ask for the player’s username and password.
So, our strategy to authenticate the player will be as follows:
- Create a singleton object to keep all the Game Center code in one spot.
- When the app starts it will call a method on the singleton object to authenticate the local player.
- Whenever the user is authenticated (or logs out), a “authentication changed” handler will be called.
- The callback will keep track of whether the user is currently authenticated, for use later.
Now that you’re armed with this plan, let’s try it out!