Advanced VR Mechanics With Unity and the HTC Vive – Part 2
Learn how to create a powerful, flexible, and reusable interaction system for your HTC Vive games in Unity with part 2 of this tutorial series! By Eric Van de Kerckhove.
Coding the Bow
Remove the Start() method and add this line right above the class declaration:
[ExecuteInEditMode]
This will let this script execute its method, even while you’re working in the editor. You’ll see why this can be quite handy in just a bit.
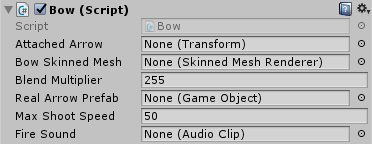
Add these variables above Update():
public Transform attachedArrow; // 1
public SkinnedMeshRenderer BowSkinnedMesh; // 2

public float blendMultiplier = 255f; // 3
public GameObject realArrowPrefab; // 4

public float maxShootSpeed = 50; // 5

public AudioClip fireSound; // 6
This is what they’ll be used for:
- A reference to the BowArrow you added as a child of the bow.
- Reference to the skinned mesh of the bow. This will be used to manipulate the blend shape of the bow.
- The distance from the arrow to the bow will be multiplied by the
blendMultiplierto get the final Bend value for the blend shape. - Reference to the RealArrow prefab which will be spawned and shot if the bow’s string has been stretched and released.
- This is the velocity the arrow that gets shot will have when the bow’s string gets stretched at its maximum length.
- The sound that will be played when an arrow gets shot.
Add the following encapsulated field below the variables:
bool IsArmed()
{
    return attachedArrow.gameObject.activeSelf;
}
This simply returns true if the arrow is enabled. It’s much easier to reference this field than to write out attachedArrow.gameObject.activeSelf each time.
Add the following to the Update() method:
float distance = Vector3.Distance(transform.position, attachedArrow.position); // 1
BowSkinnedMesh.SetBlendShapeWeight(0, Mathf.Max(0, distance * blendMultiplier)); // 2
Here’s what each of these lines do:
- Calculates the distance between the bow and the arrow.
- Sets the bow’s blend shape to the distance calculated above multiplied by
blendMultiplier.
Next, add these methods below Update():
private void Arm() // 1
{
    attachedArrow.gameObject.SetActive(true);
}

private void Disarm()
{
    BowSkinnedMesh.SetBlendShapeWeight(0, 0); // 2
    attachedArrow.position = transform.position; // 3
    attachedArrow.gameObject.SetActive(false); // 4
}
These methods handle the loading and unloading of arrows in the bow.
- Arm the bow by enabling the attached arrow, making it visible.
- Reset the bow’s bend, which makes the string snap back to a straight line.
- Reset the attached arrow’s position.
- Hide the arrow by disabling it.
Add OnTriggerEnter() below Disarm():
private void OnTriggerEnter(Collider other) // 1
{
    if (
        !IsArmed()
          && other.CompareTag("InteractionObject")
          && other.GetComponent<RealArrow>()
          && !other.GetComponent<RWVR_InteractionObject>().IsFree() // 2
    ) {
        Destroy(other.gameObject); // 3
        Arm(); // 4
    }
}
This handles what should happen when a trigger collides with the bow.
- Accept a
Collideras a parameter. This is the trigger that hit the bow. - This long if-statement returns
trueif the bow is unarmed and is hit by a RealArrow. There’s a few checks to make sure it only reacts to arrows that are held by the player. - Destroy the RealArrow.
- Arm the bow.
This code is essential to make it possible for a player to rearm the bow once the intitally loaded arrow has been shot.
The final method shoots the arrow. Add this below OnTriggerEnter():
public void ShootArrow()
{
    GameObject arrow = Instantiate(realArrowPrefab, transform.position, transform.rotation); // 1
    float distance = Vector3.Distance(transform.position, attachedArrow.position); // 2

    arrow.GetComponent<Rigidbody>().velocity = arrow.transform.forward * distance * maxShootSpeed; // 3
    AudioSource.PlayClipAtPoint(fireSound, transform.position); // 4
    GetComponent<RWVR_InteractionObject>().currentController.Vibrate(3500); // 5
    arrow.GetComponent<RealArrow>().Launch(); // 6

    Disarm(); // 7
}
This might seem like a lot of code, but it’s quite simple:
- Spawn a new RealArrow based on its prefab. Set its position and rotation equal to that of the bow.
- Calculate the distance between the bow and the attached arrow and store it in
distance. - Give the RealArrow a forward velocity based on
distance. The further the string gets pulled back, the more velocity the arrow will have. - Play the bow firing sound.
- Vibrate the controller to give tactile feedback.
- Call the RealArrow’s
Launch()method. - Disarm the bow.
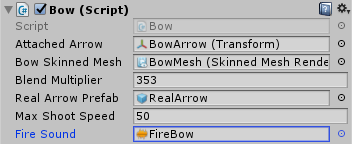
Time to set up the bow in the inspector!
Save this script and return to the editor.
Select Bow in the Hierarchy and add a Bow component.
Expand Bow to reveal its children and drag BowArrow to the Attached Arrow field.
Now drag BowMesh to the Bow Skinned Mesh field and set Blend Multiplier to 353.

Drag a RealArrow prefab from the Prefabs folder onto the Real Arrow Prefab field and drag the FireBow sound from the Sounds folder to the Fire Sound.
This is what the Bow component should look like when you’re finished:
Remember how the skinned mesh renderer affected the bow model? Move the BowArrow in the Scene view on its local Z-axis to test what the full bow bend effect looks like:
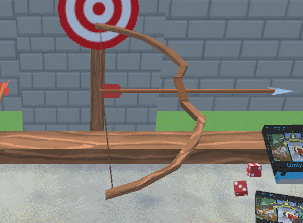
That’s pretty sweet looking!
You’ll now need to set up the RealArrow to work as intended.
Select RealArrow in the Hierarchy and add a Real Arrow component to it.
Now drag the Box Collider with Is Trigger disabled to the Pickup Collider slot.
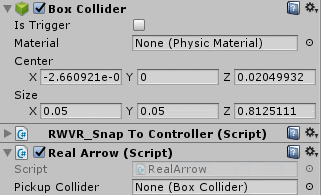
Click the Apply button at the top of the Inspector to apply this change to all RealArrow prefabs as well.
The final piece of the puzzle is the special arrow that sits in the bow.
Scripting The Arrow In The Bow
The arrow in the bow needs to be pulled back by the player in order to bend the bow, and then released to fire an arrow.
Create a new C# script inside the Scripts \ RWVR folder and name it RWVR_ArrowInBow. Open it up in a code editor and remove the Start() and Update() methods.
Make this class derive from RWVR_InteractionObject by replacing the following line:
public class RWVR_ArrowInBow : MonoBehaviour
With this:
public class RWVR_ArrowInBow : RWVR_InteractionObject
Add these variables below the class declaration:
public float minimumPosition; // 1
public float maximumPosition; // 2

private Transform attachedBow; // 3
private const float arrowCorrection = 0.3f; // 4
Here’s what they’re for:
- The minimum position on the Z-axis.
- The maximum position on the Z-axis. This is used together with the variable above to restrict the position of the arrow so it can’t be pulled too far back nor pushed into the bow.
- A reference to the Bow this arrow is attached to.
- This will be used to correct the arrow position relative to the bow later.
Add the following method below the variable declarations:
public override void Awake()
{
    base.Awake();
    attachedBow = transform.parent;
}
This calls the base class’ Awake() method to cache the transform and stores a reference to the bow in the attachedBow variable.
Add the following method to react while the player holds the trigger button:
public override void OnTriggerIsBeingPressed(RWVR_InteractionController controller) // 1
{
    base.OnTriggerIsBeingPressed(controller); // 2

    Vector3 arrowInBowSpace = attachedBow.InverseTransformPoint(controller.transform.position); // 3
    cachedTransform.localPosition = new Vector3(0, 0, arrowInBowSpace.z + arrowCorrection); // 4
}
Taking it step-by-step:
- Override
OnTriggerIsBeingPressed()and get the controller that’s interacting with this arrow as a parameter. - Call the base method. This doesn’t do anything at the moment, but it’s added for the sake of consistency.
- Get the arrow’s new position relative to the position of the bow and the controller by using
InverseTransformPoint(). This allows for the arrow to be pulled back correctly, even though the controller isn’t perfectly aligned with the bow on its local Z-axis. - Move the arrow to its new position and add the
arrowCorrectionto it on its Z-axis to get the correct value.
Now add the following method:
public override void OnTriggerWasReleased(RWVR_InteractionController controller) // 1
{
    attachedBow.GetComponent<Bow>().ShootArrow(); // 2
    currentController.Vibrate(3500); // 3
    base.OnTriggerWasReleased(controller); // 4
}
This method is called when the arrow is released.
- Override the
OnTriggerWasReleased()method and get the controller that’s interacting with this arrow as a parameter. - Shoot the arrow.
- Vibrate the controller.
- Call the base method to clear the
currentController.
Add this method below OnTriggerWasReleased():
void LateUpdate()
{
    // Limit position
    float zPos = cachedTransform.localPosition.z; // 1
    zPos = Mathf.Clamp(zPos, minimumPosition, maximumPosition); // 2
    cachedTransform.localPosition = new Vector3(0, 0, zPos); // 3

    //Limit rotation
    cachedTransform.localRotation = Quaternion.Euler(Vector3.zero); // 4

    if (currentController)
    {
        currentController.Vibrate(System.Convert.ToUInt16(500 * -zPos)); // 5
    }
}
LateUpdate() is called at the end of every frame. It’s used to limit the position and rotation of the arrow and vibrates the controller to simulate the effort needed to pull the arrow back.
- Store the Z-axis position of the arrow in
zPos. - Clamp
zPosbetween the minimum and maximum allowed position. - Reapply the position of the arrow with the clamped value.
- Limit the rotation of the arrow to
Vector3.zero. - Vibrate the controller. The more the arrow is pulled back, the more intense the vibration will be.
Save this script and return to the editor.
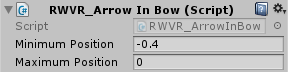
Unfold Bow in the Hierarchy and select its child BowArrow. Add a RWVR_Arrow In Bow component to it and set Minimum Position to -0.4.
Save the scene, and get your HMD and controllers ready to test out the game!
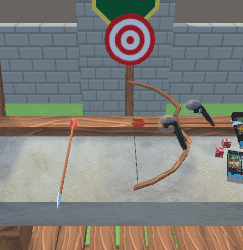
Pick up the bow with one controller and pull the arrow back with the other one.
Release the controller to shoot an arrow, and try rearming the bow by dragging an arrow from the table onto it.
The last thing you’ll create in this tutorial is a backpack (or a quiver, in this case) from which you can grab new arrows to load in the bow.
For that to work, you’ll need some new scripts.