Unity Beat ’Em Up Game Tutorial – Getting Started
Get started building your first beat ’em up game in Unity with this excerpt from our classic Beat ’Em Up Game Starter Kit, updated for Unity 2018.1! By Jonathan Simbahan.
 This is an excerpt taken from Chapter 1, “Getting Started”, of our book Beat ’Em Up Game Starter Kit – Unity, which equips you with all tools, art and instructions you’ll need to create your own addictive mobile game for Android and iOS. Enjoy!
In this tutorial, you’ll start your journey with game building in the same way you start a game — through the title screen!
You’ll be making this game in Unity, a powerful and popular game creation engine. If you don’t have Unity already, you should download and install the latest version before continuing.
As you assemble the first bits of your game’s UI, you’ll go through the basics of Unity and familiarize yourself with the Unity editor. By the end of it, you’ll be well on your way to making your very own beat ‘em up game.
What are you waiting for? You’ve got games to build and things to beat up! Get to it!
Getting Started
Start up Unity and click New. You’ll see the following window:
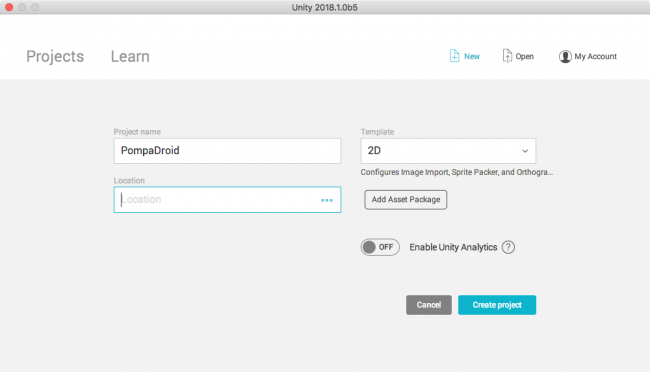
- Enter PompaDroid as the Project Name, and then select the Location to where you want to save the project.
Select 2D as the Template. Finally, click the Create Project button.
Just like that, you created your very first Unity project. Since you went with 2D settings, your images will all import as 2D sprites instead of textures.
If you feel compelled to change this, you can do so under Edit\Project Settings\Editor. It is labeled as Default Behaviour Mode.

With the Unity editor now open, first things first: you need to set the target platform.
On the menu at the top, select File\Build Settings. Select iOS in the Platform section.
At the bottom of the window, click Switch Platform, and then check Development Build.
Close the window.
You’ve just set up your game to run on iOS devices. If you prefer to build for Android, just do the same thing but select Android instead of iOS. It’s that simple to build the same game for a different platform!

Clearing Starter Files
Depending on which Unity version you are using, starting a new project may or may not include starter files for you to use. These files are not necessary for PompaDroid. If your starter project is not empty, the following steps will help you delete all of the unused assets.
Create a new scene by choosing File\New Scene in the top menu. Once a new Scene has been loaded, select all files inside the Assets folder in the Project view, and right-click Delete to remove them from the project.
Setting up the Project Folders
Now is an excellent time to think ahead and set up a system for your project files — orderly assets are easier to find.
In the Project window, right-click the Assets folder and select Create\Folder. Name this folder Scenes.
Repeat these steps and create Images, Prefabs and Scripts folders.
No surprises here — you’ll save your various assets in these folders.
Unity Crash Course
You’re at the point where it’s time for a Unity editor crash course. Unity veterans may want to skip this part.

The Unity editor comprises several windows. Except for the toolbar, all windows can be detached, docked, grouped and resized. Go ahead, try dragging and dropping things to see what you’re working with here.
Its interface allows you to create a variety of layouts that suit personal and project needs, so your layout may look unique from other developers’ layouts.
Toolbar

The toolbar contains essential tools you need for manipulating GameObjects.
Transform Tools
![]()
These tools let you manipulate the Scene view and its GameObjects. From left to right, these are:
- Grab tool: Allows you to pan around the Scene view.
- Translate tool: Used for moving GameObjects.
- Rotate tool: Allows you to rotate GameObjects.
- Scale tool: Used to scale GameObjects.
- Rect tool: Allows you to manipulate 2D elements in Unity (Sprites and UI).
- Transform tool: Allows you to move, rotate and scale using only one tool.
Transform Gizmo Toggles
![]()
Toggles are what you use to change how transform tools affect GameObjects. From left to right, these are:
- Pivot Toggle: Toggles whether transforms happen from the center of the GameObjects or around their pivot points. It’s useful when rotating GameObjects.
- World Space & Local Space Toggle: Toggles whether the transforms should work on world or local space.
Playback Buttons
![]()
These buttons allow you to run and test your game. From left to right, these are:
- Play button: Runs the current scene.
- Pause button: Pauses and resumes the game.
- Step button: Allows you to jump forward by one frame when the game is paused. It’s useful for hunting down pesky bugs.
Hierarchy

The Hierarchy is a complete list of all GameObjects in your current scene.
Scene View

The Scene view is a viewing window into the world you’re creating. You’ll be able to select, position and manipulate GameObjects here.
Project Window

The Project window, sometimes referred to as the Project browser, contains all the assets that belong to your project. You can add, delete, search, rename and move assets here.
- The left-hand side shows your project’s folder structure.
- The right-hand side shows all the assets contained in the folder you’ve selected on the left.
Game View

The Game view renders what the camera(s) sees. It’s a decent representative of the final product.
Inspector Window

The Inspector window is for viewing the GameObjects’ properties, assets and other preferences and settings.