Gradle Tips and Tricks for Android
Learn some cool tricks for working with the Gradle build system, such as autocompletion, using build-time variables, and reducing build time! By Nishant Srivastava.
Sign up/Sign in
With a free Kodeco account you can download source code, track your progress, bookmark, personalise your learner profile and more!
Create accountAlready a member of Kodeco? Sign in
Sign up/Sign in
With a free Kodeco account you can download source code, track your progress, bookmark, personalise your learner profile and more!
Create accountAlready a member of Kodeco? Sign in
Contents
Gradle Tips and Tricks for Android
35 mins
Gone are the days when you will be having a cup of coffee and browsing the Internet just after you have started the build for your Android project because it takes ages to complete — or having to fiddle with customizing your build system. The current state of build automation tools handles several aspects of building a project more efficiently than in the past. From taking care of complex tasks to making sure all tests have passed while you spend time writing new features and crushing bugs in your codebase.
Gradle is a modern build automation tool that acts as the Swiss army knife for building your Android and other projects. For Android development, you access and utilize Gradle via the Android Studio Gradle plugin.
In this tutorial, you will learn some serious Gradle-fu tricks by building a simple Gradle Playground Android app. In the process, you’ll learn:
- Autocompleting and IDE friendly dependency management using the buildSrc folder.
- APK splits for multi-platform APK generation when using the NDK.
- Passing build-time variables to your Java, Kotlin and Native code.
- Handling dependency version conflicts.
- Reducing build time.
This Gradle tips-and-tricks tutorial assumes that you know the basics of Android development and working with Gradle. If you’re new to Android Development, it’s highly recommended that you work through Beginning Android Development and Kotlin for Android to learn about the basic tools and concepts.
If you are new to the Gradle build system, also check out Gradle Tutorial for Android: Getting Started.
Other prerequisites include knowledge of using the Bash shell, the Terminal and Android Studio 3.1 or later.
Understanding Gradle
Gradle is an open-source build automation system. It uses a Groovy-based domain-specific language (DSL) instead of the common XML for declaring project configurations in other build systems in the Java ecosystem. Recently, a Kotlin-based DSL for Gradle has also become an option.
Gradle supports incremental builds, makes intelligent decisions to skip building up-to-date dependencies and makes use of caching at multiple stages. All of this makes sure build times are small, in most cases. Apart from these features, Gradle is highly customizable. It will allow you to pass flags to your code, manage dependencies, and it supports pre- and post-processing your build outputs.
Getting Started
To get started with Gradle for this tutorial, begin by downloading the materials at the top or bottom of the page using the Download materials button.
If you already have Android Studio 3.1.3 or later open, click File ▸ Import Project and select the top-level project folder you just downloaded. If not, start up Android Studio and select Open an existing Android Studio project from the Welcome screen, again choosing the top-level project folder for the starter project you just downloaded.
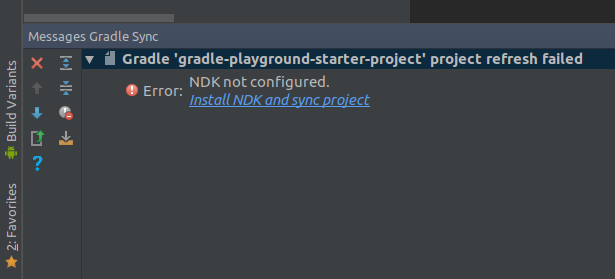
If you’ve never worked with the Android NDK before, you may be prompted to install the NDK and CMake when first opening the starter project in Android Studio. If you are, just click the links provided in associated the build panels:
Take some time to familiarize yourself with the project before you move on. Notice that the starter app already has the Kotlin language plugin setup and there is a MainActivity that contains an ImageView, a TextView and a button.
Build and run the app. You should see the following:
Native code support can be added to new projects by checking the Include C++ Support option when you create a new Android app via the Create Android Project wizard.
As of now, the Gradle Playground app only shows some basic information. You will work mostly in the app module’s build.gradle file to implement new Gradle-based features using various tips and tricks as you move forward.
Time to jump right into the playground!
Using Dependency Management
With the pace at which the Android ecosystem is moving, and with the introduction of Instant Apps and their need for multi-module projects, every Android developer spends considerable time managing multiple dependencies and their versions across various modules in the project. The common approach is to do it manually, which is very error-prone in addition to being cumbersome to maintain in the long run.
Wouldn’t it be better if you had a central location to update the dependency version and all modules inherited from it?
Gradle comes with built-in support for dependency management. There are various approaches to doing this; the most common one (and officially recommended by Google) is to use ext variables. This is a good approach but it has its drawbacks, too. For instance, you cannot use IDE autocomplete functionality to add your dependencies in the build.gradle file of individual modules. This means you are still copy-pasting between modules. Also, code navigation to the declaration of the dependency version is not supported.
It turns out that, with some Kotlin and Gradle magic, you can make this experience much better.
When you run Gradle, it checks for the existence of a directory called buildSrc. Gradle then automatically compiles and tests this code and puts it in the classpath of your build script. You don’t need to provide any further instruction.
This sounds interesting.
You will set up dependency management using Kotlin and buildSrc folder.
First, set up a folder at your root level called buildSrc. To do that:


