How to Make a Game Like Jetpack Joyride in Unity 2D – Part 2
In the second part of a three part series, you will be generating a series of endless rooms, allowing the user to fly through them. By Mark Placzek.
Creating a Room Prefab
You’ll want your Prefab to contain all the different room elements: the book case, the window, the ceiling, etc. To include all these elements as part of the same Prefab, you’ll first need to add them to a parent object.
To do this, create an Empty GameObject by choosing GameObject ▸ Create Empty. Then select this new GameObject in the Hierarchy, and make the following changes in the Inspector:
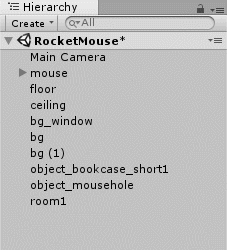
- Rename it to room1.
- Set its Position to (0, 0, 0).
This is what you should see in the Inspector:

Note: It is important to understand that room1 is placed right in the center of the scene and at the (0, 0, 0) point. This is not a coincidence.
When you add all the room parts into room1 to group them, their positions will become relative to the room1 GameObject. Later when you will want to move the whole room, it will be much easier to position it knowing that setting the position of room1 will move the room’s center to this point.
In other words, when you add objects to room1, its current position becomes the pivot point. So it is much easier if the pivot point is at the center of the group rather then somewhere else.
Move all the room parts (bg, bg (1), bg_window, ceiling, floor, object_bookcase_short1, object_mousehole) into room1, just as you did when you added the jetpack flame particle system to the mouse object.
Create a new folder named Prefabs in the RW directory in the Project browser. Open it and drag room1 from the Hierarchy directly into the Prefabs folder.

That’s it. Now you can see a Prefab named room1 containing all the room parts. To test it, try to drag the room1 Prefab into the scene. You will see how easy it is to create room duplicates using a Prefab.
Note: You can reuse this Prefab not only in this scene, but in other scenes too!

The Idea Behind the Room Generation
The idea behind the generator script is quite simple. The script has an array of rooms it can generate, a list of rooms currently generated, and two additional methods. One method checks to see if another room needs to be added, and the other method actually adds a room.
To check if a room needs to be added, the script will enumerate all existing rooms and see if there is a room ahead, farther then the screen width, to guarantee that the player never sees the end of the level.

- The screen width measurement indicates the last room of the level is still well ahead of the player, and certainly not on the screen. Therefore you don’t need to add a room yet.
- As the game proceeds, the final room reaches the screen width measure.
- A new room is added from the array of available rooms. The screen width measure ensures this all happens off screen so the player never sees the end of the level.
Adding a Script to Generate Rooms
Create a new C# Script in the RW/Scripts folder and name it GeneratorScript. Add this script to the mouse GameObject. Now the mouse should have two script components:

Open this new GeneratorScript by double clicking it in the Project view or in the Inspector.
Then add the following variables:
public GameObject[] availableRooms;
public List<GameObject> currentRooms;
private float screenWidthInPoints;
The availableRooms field will contain an array of Prefabs, which the script can generate. Currently you have only one Prefab (room1). But you can create many different room types and add them all to this array, so that the script could randomly choose which room type to generate.
The currentRooms list will store instanced rooms, so that it can check where the last room ends and if it needs to add more rooms. Once the room is behind the player character, it will remove it as well.
The screenWidthInPoints field is just required to cache the screen size in points.
Now, add the following code to the Start method:
float height = 2.0f * Camera.main.orthographicSize;
screenWidthInPoints = height * Camera.main.aspect;
Here you calculate the size of the screen in points. The screen size will be a used to help determine if you need to generate a new room, as described above.
The Method to Add a New Room
Add the following AddRoom method to your GeneratorScript:
void AddRoom(float farthestRoomEndX)
{
    //1
    int randomRoomIndex = Random.Range(0, availableRooms.Length);
    //2
    GameObject room = (GameObject)Instantiate(availableRooms[randomRoomIndex]);
    //3
    float roomWidth = room.transform.Find("floor").localScale.x;
    //4
    float roomCenter = farthestRoomEndX + roomWidth * 0.5f;
    //5
    room.transform.position = new Vector3(roomCenter, 0, 0);
    //6
    currentRooms.Add(room);
}
This method adds a new room using the farthestRoomEndX point, which is the rightmost point of the level so far. Here is a description of every line of this method:
- Picks a random index of the room type (Prefab) to generate.
- Creates a room object from the array of available rooms using the random index chosen above.
- Since the room is just an Empty GameObject containing all the room parts, you cannot simply take its size. Instead, you get the size of the floor inside the room, which is equal to the room’s width.
- In order to set the new room to its correct location, you need to calculate where its center should be. Take the furthest edge of the level so far, and add half of the new room’s width. By doing this, the new room will start exactly where the previous room ended.
- This sets the position of the room. You need to change only the x-coordinate since all rooms have the same y and z coordinates equal to zero.
- Finally, you add the room to the list of current rooms. It will be cleared in the next method, which is why you need to maintain this list.
Now take a short break; the next method is going to be a bit bigger!