Getting Started with the BLoC Pattern
See how to use the popular BLoC pattern to architect your Flutter app and manage the flow of data through your widgets using Dart streams.
Version
- Dart 2, Flutter 1.7, Android Studio 3.4

Designing the structure of an app is often one of the most heavily debated topics that arises in app development. Everyone seems to have their favorite architectural pattern with a fancy acronym.
iOS and Android Developers are well versed in Model-View-Controller (MVC), and have used this pattern as a default choice when building an app. The Model and View are separated, with the Controller sending signals between them.
Flutter, however, brings a new reactive style that is not entirely compatible with MVC. A variation of this classical pattern has emerged from the Flutter community – BLoC.
BLoC stands for Business Logic Components. The gist of BLoC is that everything in the app should be represented as stream of events: widgets submit events; other widgets will respond. BLoC sits in the middle, managing the conversation. Dart even comes with syntax for working with streams that is baked into the language!
The best part about this pattern is that you won’t need to import any plugins or learn any custom syntax. Flutter already comes with everything you need.
In this tutorial, you’re going to create an app to find restaurants using an API provided by Zomato. At the end of the tutorial the app will do the following:
- Wrap API calls with the BLoC pattern
- Search for restaurants and show the results asynchronously
- Maintain a list of favorite restaurants that can be viewed from multiple screens
Getting Started
Download the starter project using the Download Materials button and open it up with your favorite IDE. This tutorial will be using Android Studio, but you can also use Visual Studio Code if that’s your preference. Make sure to run flutter packages get
, either at the command line or when prompted by your IDE, to pull down the latest version of the http package.
The starter project contains some basic model and networking files. When you open up the project it should look like this.
There are three files for talking to Zomato.
Get a Zomato API Key
Before you build the app, you’ll need to get an API key. Go to the Zomato developer site at https://developers.zomato.com/api, create an account, and generate a new key.
Then open zomato_client.dart in the DataLayer folder and change the constant just under the class declaration:
class ZomatoClient {
final _apiKey = 'PASTE YOUR API KEY HERE';
...
Build and run the project, and it will show an empty screen.
That’s not very exciting, is it? It’s time to change that.
Let’s Bake a Layer Cake
When writing apps, whether using Flutter or some other framework, it is important to organize classes into layers. This is more of an informal convention; it’s not something concrete that can be seen in the code.
Each layer, or group of classes, is responsible for one general task. The starter project comes with a folder called the DataLayer. The data layer is responsible for the app’s models and the connections to the back-end, it knows nothing about about the UI.
Every project is slightly different, but in general, you’ll want to build something like this:
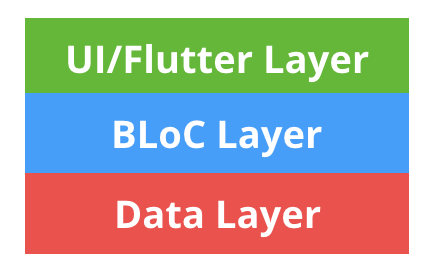
This architectural contract is not too dissimilar from classical MVC. The UI/Flutter layer can only talk to the BLoC layer. The BLoC layer sends events to the data and UI layers and processes business logic. This structure can scale nicely as the app grows.
The Anatomy of a BLoC
The BLoC Pattern is really just an interface around Dart streams:
Streams, like Futures, are provided by the dart:async
package. A stream is like a Future, but instead of returning a single value asynchronously, streams can yield multiple values over time. If a Future is a value that will be provided eventually, a stream a series of values of that will be provided sporadically over time.
The dart:async
package provides an object called StreamController. StreamControllers are manager objects that instantiate both a stream and a sink. A sink is the opposite of a stream. If a stream yields output values over time, a sink accepts input values over time.
To summarize, BLoCs are objects that process and store business logic, use sinks to accept input, and provide output via streams.
Location Screen
Before you can find some great places to eat with your app, you’ll need to tell Zomato what location you want to eat in. In this section, you’ll create a simple screen with a search field at the top and a list view to show the results.
In the lib/UI folder of the project, create a new file location_screen.dart. Add a StatelessWidget
to the file named LocationScreen
:
import 'package:flutter/material.dart';
class LocationScreen extends StatelessWidget {
@override
Widget build(BuildContext context) {
return Scaffold(
appBar: AppBar(title: Text('Where do you want to eat?')),
body: Column(
children: <Widget>[
Padding(
padding: const EdgeInsets.all(10.0),
child: TextField(
decoration: InputDecoration(
border: OutlineInputBorder(), hintText: 'Enter a location'),
onChanged: (query) { },
),
),
Expanded(
child: _buildResults(),
)
],
),
);
}
Widget _buildResults() {
return Center(child: Text('Enter a location'));
}
}
The location screen contains a TextField
in which the user will enter a location.
Create another file, main_screen.dart, that will manage the screen flow for the app, and add the following code to the file:
class MainScreen extends StatelessWidget {
@override
Widget build(BuildContext context) {
return LocationScreen();
}
}
Finally, update main.dart to return the new screen.
MaterialApp(
title: 'Restaurant Finder',
theme: ThemeData(
primarySwatch: Colors.red,
),
home: MainScreen(),
),
Build and run the app, and it should look like this:
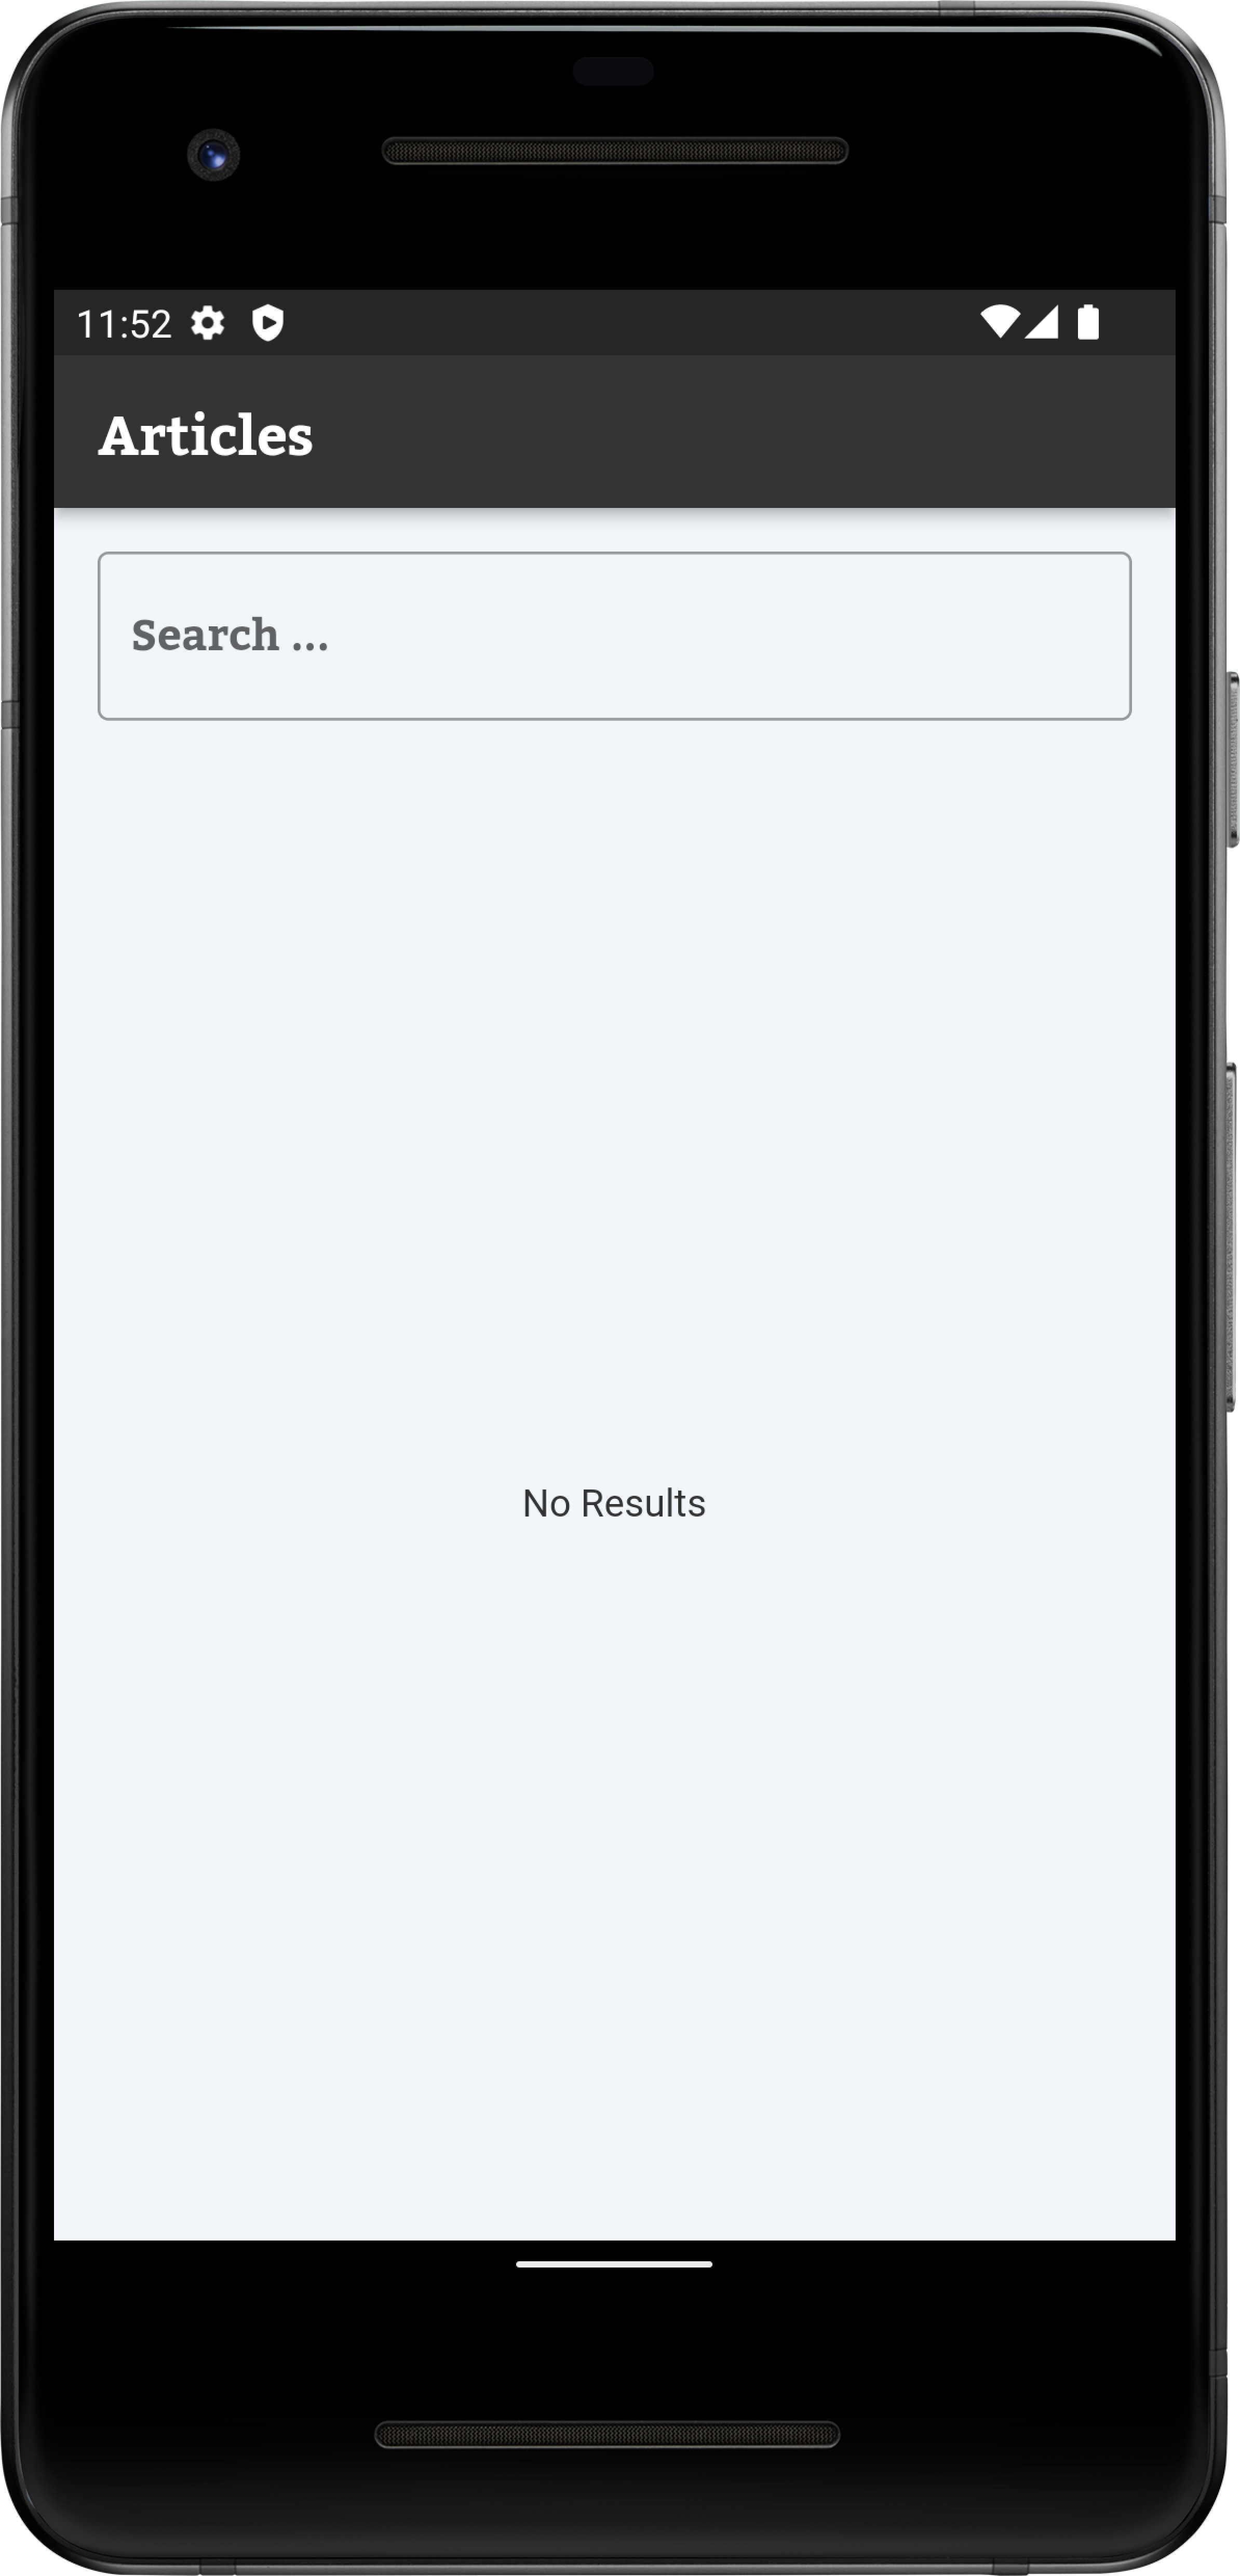
That’s better, but it still doesn’t do anything. It’s time to create some BLoCs!
Your First BLoC
Create a new directory in the lib folder named BLoC. This will be the home for all your BLoC classes.
Create a new file in that directory called bloc.dart
and add the following:
abstract class Bloc {
void dispose();
}
All of your BLoC classes will conform to this interface. The interface doesn’t do much except force you to add a dispose
method. One small caveat that needs to be kept in mind with streams is that they need to be closed when they are no longer needed, otherwise it can cause a memory leak. The dispose
method is where the app will check for this.
The first BLoC will be responsible for managing the app’s selected location.
In the BLoC directory, create a new file, location_bloc.dart, and add the following code:
class LocationBloc implements Bloc {
Location _location;
Location get selectedLocation => _location;
// 1
final _locationController = StreamController<Location>();
// 2
Stream<Location> get locationStream => _locationController.stream;
// 3
void selectLocation(Location location) {
_location = location;
_locationController.sink.add(location);
}
// 4
@override
void dispose() {
_locationController.close();
}
}
When importing the base class using option+return, select the second option – Import library package:restaurant_finder/BLoC/bloc.dart.
Use option+return for all the errors until everything is imported.
The code in LocationBloc
does the following:
- Here a private
StreamController
is declared that will manage the stream and sink for this BLoC.StreamController
s use generics to tell the type system what kind of object will be emitted from the stream. - This line exposes a public getter to the
StreamController
’s stream. - This function represents the input for the BLoC. A
Location
model object will be provided as parameter that is cached in the object’s private_location
property and then added to sink for the stream. - Finally, in clean up method, the
StreamController
is closed when this object is deallocated. If you do not do this, the IDE will complain that theStreamController
is leaking.
Now that your first BLoC is completed, you’ll next create one that finds locations.
Your Second BLoC
Create a new file in the BLoC folder named location_query_bloc.dart and add the following:
class LocationQueryBloc implements Bloc {
final _controller = StreamController<List<Location>>();
final _client = ZomatoClient();
Stream<List<Location>> get locationStream => _controller.stream;
void submitQuery(String query) async {
// 1
final results = await _client.fetchLocations(query);
_controller.sink.add(results);
}
@override
void dispose() {
_controller.close();
}
}
Here at //1
, in the BLoC’s input, the method accepts a string and uses the ZomatoClient
class from the starter project to fetch locations from the API. This uses Dart’s async
/await
syntax to make the code a bit cleaner. The results are then published to the stream.
This BLoC is almost the same the as the last one except that instead of just storing and reporting locations, this one encapsulates an API call.
Injecting BLoCs into the Widget Tree
Now that you have two BLoCs set up, you need a way to inject them into Flutter’s widget tree. It’s become a Flutter convention to call these types of widgets providers. A provider is a widget that stores data and well, “provides” it to all its children.
Normally this would be a job for InheritedWidget
, but because BLoCs need to be disposed, the StatefulWidget
will provide the same service. The syntax is a bit more complex, but the result is the same.
Create a new file in BLoC named bloc_provider.dart, and add the following:
// 1
class BlocProvider<T extends Bloc> extends StatefulWidget {
final Widget child;
final T bloc;
const BlocProvider({Key key, @required this.bloc, @required this.child})
: super(key: key);
// 2
static T of<T extends Bloc>(BuildContext context) {
final type = _providerType<BlocProvider<T>>();
final BlocProvider<T> provider = findAncestorWidgetOfExactType(type);
return provider.bloc;
}
// 3
static Type _providerType<T>() => T;
@override
State createState() => _BlocProviderState();
}
class _BlocProviderState extends State<BlocProvider> {
// 4
@override
Widget build(BuildContext context) => widget.child;
// 5
@override
void dispose() {
widget.bloc.dispose();
super.dispose();
}
}
In the above:
-
BlocProvider
is a generic class. The generic typeT
is scoped to be an object that implements theBloc
interface. This means that the provider can only store BLoC objects. - The
of
method allows widgets to retrieve theBlocProvider
from a descendant in the widget tree with the current build context. This is a very common pattern in Flutter. - This is some trampolining to get a reference to the generic type.
- The widget’s
build
method is a passthrough to the widget’s child. This widget will not render anything. - Finally, the only reason why the provider inherits from
StatefulWidget
is to get access to thedispose
method. When this widget is removed from the tree, Flutter will call the dispose method, which will in turn, close the stream.
Wire up the Location Screen
Now that you have your BLoC layer completed for finding locations, its time put the layer to use.
First, in main.dart, place a Location BLoC above the material app to store the app’s state. The easiest way to do this is hit option+return (Alt+Enter on PC) while your cursor is over the MaterialApp, which will bring up the Flutter widget menu. Select Wrap with a new widget.
Wrap with a BlocProvider
of type LocationBloc
and create a LocationBloc
in the bloc
property.
return BlocProvider<LocationBloc>(
bloc: LocationBloc(),
child: MaterialApp(
title: 'Restaurant Finder',
theme: ThemeData(
primarySwatch: Colors.red,
),
home: MainScreen(),
),
);
Adding widgets above the material app is a great way to add data that needs to be accessed from multiple screens.
In the main screen of main_screen.dart you’ll want to do something similar. Hit option+return over the LocationScreen
widget, only this time select ‘Wrap with StreamBuilder’. Update the code to look like this.
return StreamBuilder<Location>(
// 1
stream: BlocProvider.of<LocationBloc>(context).locationStream,
builder: (context, snapshot) {
final location = snapshot.data;
// 2
if (location == null) {
return LocationScreen();
}
// This will be changed this later
return Container();
},
);
StreamBuilder
s are the secret sauce to make the BLoC pattern very tasty. These widgets will automatically listen for events from the stream. When a new event is received, the builder closure will be executed, updating the widget tree. With StreamBuilder
and the BLoC pattern, there is no need to call setState() once in this entire tutorial.
In the above code:
- For the
stream
property, use theof
method to retrieve theLocationBloc
and add its stream to thisStreamBuilder
. - Initially the stream has no data, which is perfectly normal. If there isn’t any data in your stream, the app will return a
LocationScreen
. Otherwise, return just blank container for now.
Next, update the location screen in location_screen.dart to use the LocationQueryBloc
you created earlier. Don’t forget to use the IDE’s widget wrapping tools to make it easier to update the code.
@override
Widget build(BuildContext context) {
// 1
final bloc = LocationQueryBloc();
// 2
return BlocProvider<LocationQueryBloc>(
bloc: bloc,
child: Scaffold(
appBar: AppBar(title: Text('Where do you want to eat?')),
body: Column(
children: <Widget>[
Padding(
padding: const EdgeInsets.all(10.0),
child: TextField(
decoration: InputDecoration(
border: OutlineInputBorder(), hintText: 'Enter a location'),
// 3
onChanged: (query) => bloc.submitQuery(query),
),
),
// 4
Expanded(
child: _buildResults(bloc),
)
],
),
),
);
}
Here:
- First, the app instantiates a new
LocationQueryBloc
at the top of the build method. - The BLoC is then stored in a
BlocProvider
, which will manage its lifecycle. - Update the
TextField
’sonChanged
closure to submit the text to theLocationQueryBloc
. This will kick off the chain of calling Zomato and then emit the found locations to the stream. - Pass the bloc to the
_buildResults
method.
Add a boolean field to LocationScreen
to track whether the screen is a full screen dialog, along with a contact LocationScreen
:
class LocationScreen extends StatelessWidget {
final bool isFullScreenDialog;
const LocationScreen({Key key, this.isFullScreenDialog = false})
: super(key: key);
...
The boolean is just a simple flag (that defaults to false) which will be used later to update the navigation behavior when a location is tapped.
Now update the _buildResults
method to add a stream builder and show the results in a list. You can use the ‘Wrap with StreamBuilder’ command to update the code faster.
Widget _buildResults(LocationQueryBloc bloc) {
return StreamBuilder<List<Location>>(
stream: bloc.locationStream,
builder: (context, snapshot) {
// 1
final results = snapshot.data;
if (results == null) {
return Center(child: Text('Enter a location'));
}
if (results.isEmpty) {
return Center(child: Text('No Results'));
}
return _buildSearchResults(results);
},
);
}
Widget _buildSearchResults(List<Location> results) {
// 2
return ListView.separated(
itemCount: results.length,
separatorBuilder: (BuildContext context, int index) => Divider(),
itemBuilder: (context, index) {
final location = results[index];
return ListTile(
title: Text(location.title),
onTap: () {
// 3
final locationBloc = BlocProvider.of<LocationBloc>(context);
locationBloc.selectLocation(location);
if (isFullScreenDialog) {
Navigator.of(context).pop();
}
},
);
},
);
}
In the above code:
- There are three conditions that could be returned from the stream. There could have no data, which means the user hasn’t typed anything. There could be an empty list, which means Zomato couldn’t find what you were looking for. Finally, there can be a full list of restaurants, which means everything was cooked to perfection.
- This is the happy path, where the app shows the list of locations. This function behaves just like normal declarative Flutter code.
- In the
onTap
closure, the app retrieves theLocationBloc
that is living at the root of the tree and tells it that the user has selected a location. Tapping on a tile will cause the whole screen to go black for now.
Go ahead and build and run. The app should now be getting location results from Zomato and showing them in a list.
Nice! That’s some real progress.
Restaurant Screen
The second screen of the app will show a list of restaurants based on a search query. It will also have its own BLoC objects to manage state.
Create a new file restaurant_bloc.dart in the BLoC folder with the following code:
class RestaurantBloc implements Bloc {
final Location location;
final _client = ZomatoClient();
final _controller = StreamController<List<Restaurant>>();
Stream<List<Restaurant>> get stream => _controller.stream;
RestaurantBloc(this.location);
void submitQuery(String query) async {
final results = await _client.fetchRestaurants(location, query);
_controller.sink.add(results);
}
@override
void dispose() {
_controller.close();
}
}
It’s almost the same as LocationQueryBloc
! The only difference is the API and the data type that is being returned.
Now create restaurant_screen.dart in the UI folder to put the new BLoC to use:
class RestaurantScreen extends StatelessWidget {
final Location location;
const RestaurantScreen({Key key, @required this.location}) : super(key: key);
@override
Widget build(BuildContext context) {
return Scaffold(
appBar: AppBar(
title: Text(location.title),
),
body: _buildSearch(context),
);
}
Widget _buildSearch(BuildContext context) {
final bloc = RestaurantBloc(location);
return BlocProvider<RestaurantBloc>(
bloc: bloc,
child: Column(
children: <Widget>[
Padding(
padding: const EdgeInsets.all(10.0),
child: TextField(
decoration: InputDecoration(
border: OutlineInputBorder(),
hintText: 'What do you want to eat?'),
onChanged: (query) => bloc.submitQuery(query),
),
),
Expanded(
child: _buildStreamBuilder(bloc),
)
],
),
);
}
Widget _buildStreamBuilder(RestaurantBloc bloc) {
return StreamBuilder(
stream: bloc.stream,
builder: (context, snapshot) {
final results = snapshot.data;
if (results == null) {
return Center(child: Text('Enter a restaurant name or cuisine type'));
}
if (results.isEmpty) {
return Center(child: Text('No Results'));
}
return _buildSearchResults(results);
},
);
}
Widget _buildSearchResults(List<Restaurant> results) {
return ListView.separated(
itemCount: results.length,
separatorBuilder: (context, index) => Divider(),
itemBuilder: (context, index) {
final restaurant = results[index];
return RestaurantTile(restaurant: restaurant);
},
);
}
}
Add a separate restaurant_tile.dart file to show the details for these restaurants:
class RestaurantTile extends StatelessWidget {
const RestaurantTile({
Key key,
@required this.restaurant,
}) : super(key: key);
final Restaurant restaurant;
@override
Widget build(BuildContext context) {
return ListTile(
leading: ImageContainer(width: 50, height: 50, url: restaurant.thumbUrl),
title: Text(restaurant.name),
trailing: Icon(Icons.keyboard_arrow_right),
);
}
}
This code should look very similar to the location screen. It’s almost identical. The only difference is that it is showing restaurants instead of locations.
Modify MainScreen
in main_screen.dart to now return a restaurant screen when it receives a location.
builder: (context, snapshot) {
final location = snapshot.data;
if (location == null) {
return LocationScreen();
}
return RestaurantScreen(location: location);
},
Hot restart the app. After you select a location, a list of restaurants should now start appearing when you enter a search on what to eat:
Looks delicious. Who’s ready to eat cake?
Favoriting Restaurants
So far, the BLoC pattern has been used to manage user input, but it can be used for so much more. Let’s say the user want to keep track of their favorite restaurants and show those in a separate list. That too can be solved with the BLoC pattern.
In the BLoC folder, create a new file favorite_bloc.dart
for a BLoC to store this list:
class FavoriteBloc implements Bloc {
var _restaurants = <Restaurant>[];
List<Restaurant> get favorites => _restaurants;
// 1
final _controller = StreamController<List<Restaurant>>.broadcast();
Stream<List<Restaurant>> get favoritesStream => _controller.stream;
void toggleRestaurant(Restaurant restaurant) {
if (_restaurants.contains(restaurant)) {
_restaurants.remove(restaurant);
} else {
_restaurants.add(restaurant);
}
_controller.sink.add(_restaurants);
}
@override
void dispose() {
_controller.close();
}
}
At // 1
, this BLoC uses a Broadcast StreamController
instead of a regular StreamController
. Broadcast streams allow multiple listeners, whereas regular streams only allow one. For the previous two blocs, multiple streams weren’t needed since there was only a one-to-one relationship. For the favoriting feature, the app needs to listen to the stream in two places, so broadcast is required.
This BLoC needs to be accessible from multiple screens, which means it needs to be placed above the navigator. Update main.dart to add one more widget, wrapping the MaterialApp
in main.dart in yet another provider.
return BlocProvider<LocationBloc>(
bloc: LocationBloc(),
child: BlocProvider<FavoriteBloc>(
bloc: FavoriteBloc(),
child: MaterialApp(
title: 'Restaurant Finder',
theme: ThemeData(
primarySwatch: Colors.red,
),
home: MainScreen(),
),
),
);
Next, create a file in the UI folder called favorite_screen.dart. This widget will show the list of favorited restaurants:
class FavoriteScreen extends StatelessWidget {
@override
Widget build(BuildContext context) {
final bloc = BlocProvider.of<FavoriteBloc>(context);
return Scaffold(
appBar: AppBar(
title: Text('Favorites'),
),
body: StreamBuilder<List<Restaurant>>(
stream: bloc.favoritesStream,
// 1
initialData: bloc.favorites,
builder: (context, snapshot) {
// 2
List<Restaurant> favorites =
(snapshot.connectionState == ConnectionState.waiting)
? bloc.favorites
: snapshot.data;
if (favorites == null || favorites.isEmpty) {
return Center(child: Text('No Favorites'));
}
return ListView.separated(
itemCount: favorites.length,
separatorBuilder: (context, index) => Divider(),
itemBuilder: (context, index) {
final restaurant = favorites[index];
return RestaurantTile(restaurant: restaurant);
},
);
},
),
);
}
}
In this widget:
- This adds some initial data to the
StreamBuilder
.StreamBuilder
s will immediately fire their builder closure, even if there is no data. Instead of repainting the screen unnecessarily, this allows Flutter to make sure the snapshot always has data. - Here the app checks the state of the stream and if it hasn’t connected yet, uses the explicit list of favorite restaurants instead of a new event from stream.
Now update the restaurant screen build
method to add an action that pushes this screen onto the navigation stack.
@override
Widget build(BuildContext context) {
return Scaffold(
appBar: AppBar(
title: Text(location.title),
actions: <Widget>[
IconButton(
icon: Icon(Icons.favorite_border),
onPressed: () => Navigator.of(context)
.push(MaterialPageRoute(builder: (_) => FavoriteScreen())),
)
],
),
body: _buildSearch(context),
);
}
You’ll need one more screen where restaurants can be favored.
Create restaurant_details_screen.dart in the UI folder. The majority of this screen is static layout code:
class RestaurantDetailsScreen extends StatelessWidget {
final Restaurant restaurant;
const RestaurantDetailsScreen({Key key, this.restaurant}) : super(key: key);
@override
Widget build(BuildContext context) {
final textTheme = Theme.of(context).textTheme;
return Scaffold(
appBar: AppBar(title: Text(restaurant.name)),
body: Column(
crossAxisAlignment: CrossAxisAlignment.start,
children: <Widget>[
_buildBanner(),
Padding(
padding: const EdgeInsets.all(8.0),
child: Column(
crossAxisAlignment: CrossAxisAlignment.start,
children: <Widget>[
Text(
restaurant.cuisines,
style: textTheme.subtitle.copyWith(fontSize: 18),
),
Text(
restaurant.address,
style: TextStyle(fontSize: 18, fontWeight: FontWeight.w100),
),
],
),
),
_buildDetails(context),
_buildFavoriteButton(context)
],
),
);
}
Widget _buildBanner() {
return ImageContainer(
height: 200,
url: restaurant.imageUrl,
);
}
Widget _buildDetails(BuildContext context) {
final style = TextStyle(fontSize: 16);
return Padding(
padding: EdgeInsets.only(left: 10),
child: Row(
mainAxisAlignment: MainAxisAlignment.start,
children: <Widget>[
Text(
'Price: ${restaurant.priceDisplay}',
style: style,
),
SizedBox(width: 40),
Text(
'Rating: ${restaurant.rating.average}',
style: style,
),
],
),
);
}
// 1
Widget _buildFavoriteButton(BuildContext context) {
final bloc = BlocProvider.of<FavoriteBloc>(context);
return StreamBuilder<List<Restaurant>>(
stream: bloc.favoritesStream,
initialData: bloc.favorites,
builder: (context, snapshot) {
List<Restaurant> favorites =
(snapshot.connectionState == ConnectionState.waiting)
? bloc.favorites
: snapshot.data;
bool isFavorite = favorites.contains(restaurant);
return FlatButton.icon(
// 2
onPressed: () => bloc.toggleRestaurant(restaurant),
textColor: isFavorite ? Theme.of(context).accentColor : null,
icon: Icon(isFavorite ? Icons.favorite : Icons.favorite_border),
label: Text('Favorite'),
);
},
);
}
}
In this code:
- The widget uses the favorites stream to determine if this restaurant is favorited and then renders the appropriate widget.
- The
toggleRestaurant
function inFavoriteBloc
is written so that the UI doesn’t need to know the state of the restaurant. It just adds it if it’s not in the list or removes it if it is.
Wire up the new screen by adding an onTap
closure in restaurant_tile.dart.
onTap: () {
Navigator.of(context).push(
MaterialPageRoute(
builder: (context) =>
RestaurantDetailsScreen(restaurant: restaurant),
),
);
},
Build and run the app and try it out.
Users should be able to favorite, un-favorite and view their lists. They can even remove restaurants from the favorite screen with no extra code needed. That’s the power of streams in action!
Updating Locations
What if the user wants to change the location they are searching for? Right now, if you want to change your location, the app has to be restarted.
Because you’ve already set up the app to work as a series of streams, adding this feature should be trivial. Maybe even a cherry on a top of your cake!
On the restaurant screen, add a floating action button that will present the location screen as a modal:
...
body: _buildSearch(context),
floatingActionButton: FloatingActionButton(
child: Icon(Icons.edit_location),
onPressed: () => Navigator.of(context).push(MaterialPageRoute(
builder: (context) => LocationScreen(
// 1
isFullScreenDialog: true,
),
fullscreenDialog: true)),
),
);
}
At // 1
, you’re setting the isFullScreenDialog
value you added earlier to the location screen to true
.
Earlier, in the ListTile
you setup for LocationScreen
, you added an onTap
closure to consume the flag.
onTap: () {
final locationBloc = BlocProvider.of<LocationBloc>(context);
locationBloc.selectLocation(location);
if (isFullScreenDialog) {
Navigator.of(context).pop();
}
},
The reason why you needed to do that is to remove the location screen if it’s being presented modally. If this code isn’t there, when the ListTile
is tapped, nothing will happen. The location stream will update, but the UI won’t be able to respond.
Go ahead and build and run the app one last time. You’ll now have a floating action button that, when pressed, presents the location screen modally:
Where to Go from Here?
Congratulations on mastering the BLoC Pattern. BLoC is a simple but powerful pattern to tame app state as it flies up and down the widget tree.
You can find the final sample project in the Download Materials for the tutorial. If you want to run the final project, be sure to first add your API key to zomato_client.dart.
Some other architectural patterns worth looking into are:
- Provider – https://pub.dev/packages/provider
- Scoped Model – https://pub.dev/packages/scoped_model
- RxDart – https://pub.dev/packages/rxdart
- Redux – https://pub.dev/packages/redux
Also check out the official documentation on streams, and a Google IO talk about the BLoC Pattern.
I hope you enjoyed this Flutter BLoC tutorial. As always, feel free to let me know if you have any questions or comments below!
Comments