
Kotlin Coroutines Tutorial for Android: Getting Started
In this Kotlin coroutines tutorial, you’ll learn how to write asynchronous code just as naturally as your normal, synchronous code. By Luka Kordić.
Asynchronous programming is very important for modern apps. Using it increases the amount of work your app can perform in parallel. This, in turn, allows you to run heavy-duty tasks in the background, away from the UI thread. By doing so, you avoid UI freezes and provide a fluid experience for your users.
The Android ecosystem has several mechanisms developers can choose from when it comes to asynchronous programming: IntentService, Handlers, Executors, RxJava and ListenableFutures, to name a few. But it’s difficult to pick the most appropriate one to use. Some mechanisms have a steep learning curve. Others require a ton of boilerplate code to implement and aren’t that concise or intuitive to use. Asynchronous programming is complex enough on its own, so developers naturally look for the simplest solution to help reduce the complexity. Meet Kotlin Coroutines!
Why Use Kotlin Coroutines?
Kotlin Coroutines are great because they’re easy to start with. Their biggest advantage over the other solutions is that they allow you to write your asynchronous code sequentially. This makes the code so much easier to understand. While easy to start with, they’re quite powerful and offer the tools to tackle almost every problem related to concurrency or threading that you might encounter while building modern Android apps.
Throughout this tutorial, you’ll develop a photo editing app, Snowy. It allows you to download an image and then apply a snow filter to it. To download the images and process them, you’ll need to perform asynchronous tasks.
Along the way, you’ll learn:
- About different parts of the Coroutine API.
- How to create your own Kotlin Coroutines.
- How to execute multiple tasks in parallel.
- Exception handling with Kotlin Coroutines.
Getting Started
To start, download the materials for this tutorial by clicking Download materials at the top or bottom of the tutorial. Then, open the starter project in Android Studio Electric Eel or later, and look through its content.

You’ll see:
-
model package with
Tutorialmodel, which has four properties: the tutorial’sname, thedescriptionand two URLs for images. -
utils package with
SnowFilter, which has a function calledapplySnowEffect.applySnowEffecttakes aBitmapas an argument and returns a processedBitmapwith a snow filter. -
MainActivity, which hosts four tabs: Kotlin, Android, RxKotlin and Kitura. -
TutorialFragment, which shows details of different tutorials. -
TutorialPagerAdapter: AFragmentStateAdapterto set up the tabs andViewPager.
Build and run the starter project.

You’ll see four tabs with their names. Each tab contains a title, description and a placeholder image. You’ll replace the placeholder with an image downloaded from the internet soon. Before doing that, you need to add Kotlin Coroutines to the project and learn some basic concepts. You’ll do that in the next section.
Adding Kotlin Coroutines Support
Before you can create Kotlin Coroutines, you have to add the dependencies to your Android project. Navigate to the app module’s build.gradle file, and add the following two lines inside the dependencies block:
implementation 'org.jetbrains.kotlinx:kotlinx-coroutines-core:1.6.4'
implementation 'org.jetbrains.kotlinx:kotlinx-coroutines-android:1.6.4'
Even though Kotlin has native support for coroutines, you need to add these two dependencies when working on Android. This is because the built-in language support provides only low-level primitives. The library contains all the higher-level APIs that you’ll work with.
Introduction to Kotlin Coroutines
A coroutine is a mechanism similar to a thread. Even though they’re similar to threads, coroutines are much cheaper to create. That’s why they’re often referred to as “lightweight threads”, and that’s why you can easily create many coroutines without any memory overhead. You can also think of a coroutine as a computation or a piece of work that can be paused — suspended at a certain point and then resumed at a later point in time.
You’re probably aware that a piece of code can be blocking or non-blocking. Kotlin Coroutines bring a new concept of suspension into the mix. In the next section, you’ll see how suspending behavior differs from blocking behavior.
Suspending vs. Blocking
Suspension and blocking may sound similar, but they’re actually quite different concepts. It’s always easier to explain things using images, so check out the one below:

A blocking call to a function means that the thread the function is running in won’t be able to do anything else until the function completes. Following up, this means that if you make a blocking function call on the main thread, you effectively freeze the UI. Until that blocking call finishes, the user will see a static screen and won’t be able to interact with the app. If left in this state for five seconds or more, the app will crash with the ANR (Application Not Responding) error.
On the other hand, suspending functions have a special ability to pause their execution and resume it at a later time. To make a function suspendable, you must add the suspend modifier before the function.
suspend fun myFirstSuspendingFunction() {...}
One important thing to know is that suspending functions can only be called from inside a coroutine or from other suspending functions. That’s because they suspend the coroutine — not a thread — they’re running in. This process of suspending leaves the current thread free to do other work until the suspend function returns a result. See the image below to get a better understanding of the concept.
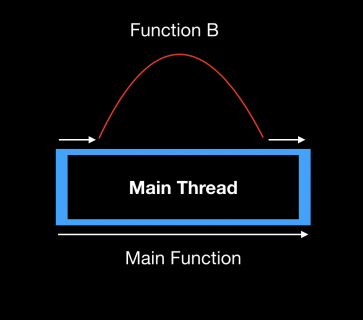
In the example above, Function B does some work and suspends on the main thread. While it’s suspended, the main thread isn’t blocked and is free to execute normally. Function B simply resumes its execution once it’s ready to do so. In the next section, you’ll see how to use the power of suspend functions and coroutines to download an image.