How to Make a Game Like Jetpack Joyride using LevelHelper and SpriteHelper [Cocos2D Edition] – Part 3
This is a post by special contributor Bogdan Vladu, an iOS application developer and aspiring game developer living in Bucharest, Romania. Update 1/9/2013: This tutorial is now deprecated. We now have a newer, updated version of this tutorial, check it out! Welcome back to our Jetpack Joyride tutorial series! In this tutorial series, we are […] By .
Tweaking Gameplay
Our game is looking good so far, but there are still a number of problems.
The first of these problems is that if you touch the screen after the mouse dies, he starts flying around like he’s been resurrected! Although “Zombie Mouse” might make for a popular game on the App Store, this is not the effect we’re going for ;]
Let’s put a stop to this zombie behavior before it gets out of hand! Just add the following check to the beginning of ccTouchesBegan:
if(playerIsDead)
    return;
The only thing we’re doing differently here is testing to see if the player is dead. If they are, then we do nothing.
If we run the game now, the zombie behavior won’t occur anymore. But there are other issues.
For example, in my level there are places where the player can’t get past a laser because it’s active, but he can’t go under it because there’s a cat in the way. Your level may have similar problems.
It’s time to play-test the level and make any necessary modifications to be sure it’s possible for the player to successfully finish the game.
Open up LevelHelper with our level03 level, and drag the cats, dogs and laser sprites as necessary so that the player has a way through. (But don’t make it too easy!)
Make sure to save the level!
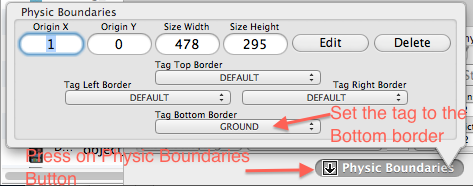
Since we’re modifying the level anyway, let’s create a way to know when the player touches the ground. To do this we’ll define a new tag and add that tag to the bottom border of the physic boundary. Click the Define Tag button (as we did in Part Two) and add the tag “GROUND.”

Now that we have this new tag, let’s assign it to the bottom part of the Physic Boundary shape.
To do this click the Physic Boundaries button.
Save your level in LevelHelper.
We still have to define the collision callback between the player and the ground. Add the following at the end of setupCollisionHandling method:
[lh registerPreCollisionCallbackBetweenTagA:PLAYER andTagB:GROUND idListener:self selListener:@selector(mouseGroundCollision:)];
Define the mouseGroundCollision method somewhere above the setupCollisionHandling method, as follows:
-(void)mouseGroundCollision:(LHContactInfo*)contact
{

    if(playerIsDead)
        return;

    if(playerWasFlying)
    {
        [[SimpleAudioEngine sharedEngine] playEffect:@"ground.wav"];

        [player startAnimationNamed:@"mouseFall"
                     endObserverObj:self
                     endObserverSel:@selector(fallAnimHasEnded:animName:)
          shouldObserverLoopForever:FALSE];

    }
    playerWasFlying = false;
}
We test if the player is dead so we can return if they are. We then test if the player was flying when they touched the ground. If they were, we play landing sound.
Then we start the mouseFall animation, but we start it using a notification. That way when the animation ends, we get notified so that we can set another animation on the player sprite.
So let’s define the method that gets called when the mouseFall animation ends. Add it above mouseGroundCollision, as follows:
-(void) fallAnimHasEnded:(LHSprite*)spr animName:(NSString*)animName
{
    [player startAnimationNamed:@"mouseRun"];
}
This new method takes as arguments the sprite that had the animation and the animation name. It then starts the animation “mouseRun” on the player sprite the normal way.
Playing the game now, it looks like we have almost everything in place. But there is still one thing we need to fix!
You may have noticed that if we run the game now, coins taken from the level don’t reappear when the parallax restarts. We hid them, remember, after player collisions, so we need to add a way to make them visible again when the parallax starts over.
Inside the retrieveRequiredObjects method declaration, add the following line, after you’ve taken the pointer to the parallax node:
-(void) retrieveRequiredObjects
{
    // existing lines
    paralaxNode = [lh paralaxNodeWithUniqueName:@"Parallax_1"];
    NSAssert(paralaxNode!=nil, @"Couldn't find the parallax!");

    // add this new line
    [paralaxNode registerSpriteHasMovedToEndListener:self
        selector:@selector(spriteInParallaxHasReset:)];

    // rest of code...
This new method registers on the parallax another new method (spriteInParallaxHasReset) that will be called whenever a sprite in the parallax is reset to the back of the parallax. This method gets called when the sprite exits the view.
Define spriteInParallaxHasReset before the retrieveRequiredObjects declaration:
-(void) spriteInParallaxHasReset:(LHSprite*)sprite
{
    if(COIN == [sprite tag]){
        [sprite setVisible:YES];
    }
}
Here we test the tag of the sprite that was reset by the parallax, and if it’s tagged as a COIN we make it visible again.
Compile and run your game, and see how long you can play without dying! :]

Where to Go From Here?
If you’ve followed along this far, you should have a smoothly-functioning game that is very similar to Jetpack Joyride! It’s not quite complete (that happens in for Part Four), but very close, with animations, collisions, sounds, and correct gameplay.
In case you need it, here is an example project that includes all of the code for this tutorial series up to this point.
In the fourth and final part of this tutorial series, we’ll increase the difficulty of the game by making some of the lasers rotate. But we’ll also add another point-scoring opportunity in the form of bunnies running through the level that the player can kill, and display the score as it increases.
Finally, as the crowning touch for our game, we’ll create a second scene in SpriteHelper and add it to our level as a background, so that the user will be able to look through the windows at the “outside” world.
Until then, feel free to participate in forum discussion both below and on the LevelHelper site.

This is a post by special contributor Bogdan Vladu, an iOS application developer and aspiring game developer living in Bucharest, Romania.