PaintCode Tutorial: Bezier Paths
In the third and final part of our PaintCode tutorial series, learn how to create dynamic, movable arrows with curved bezier paths! By Felipe Laso-Marsetti.
Adding Frames to the Bezier Arrow
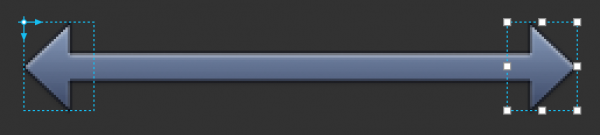
Click the Frame tool, and drag a frame around the left arrowhead. You’ll find that you won’t be able to start from the origin since this ends up dragging/moving the origin point. Instead, drag out a larger frame and then set its properties as follows:
- X: 0
- Y: 0
- Width: 30
- Height: 38
This locks each of the points in the left arrowhead in place relative to the frame.
Click the Frame icon again, and drag a frame around the right arrowhead. Then set its properties as follows:
- X: 170
- Y: 0
- Width: 30
- Height: 38
Save your document and then click on the right frame (not the shape!) and try dragging it downwards. The right arrowhead should move down with the frame, but the left arrowhead will stay in place, while the connecting line curves nicely to connect them, as shown in the screenshot below:

Now try to stretch the arrow horizontally; you’ll notice the arrow stretches nicely without deforming the arrowheads, as demonstrated below:
If you drag the frame for an arrowhead really far down, you’ll notice that the arrow flattens out or even starts to twist. This looks pretty unpolished — but fortunately, it’s easy to fix.
Double-click the shape to bring up its points for edit, and click on the point shown in the image below:
![]()
Drag the point’s handle a little further to the right while holding down Shift to snap the point to the horizontal axis.
Do the same with the other three points, dragging the horizontal handle further into the body of the arrow.
Here’s the resulting curvier arrow:
![]()
Save your work — you’re done with the PaintCode portion of this tutorial. Now you’re all set to use your dynamic bezier arrows in your app!
Adding the Bezier Arrow to Your App
Open up your project open in Xcode. In the Project Navigator, expand the Classes > Views folder, right-click the Views folder, and select New File…. Use the iOS\Cocoa Touch\Objective-C class template, name the class BezierView, and make it a subclass of UIView.
Open BezierView.m, delete the initWithFrame: implementation, and uncomment drawRect: so that the file looks like this:
#import "BezierView.h"

@implementation BezierView

- (void)drawRect:(CGRect)rect
{
    // Drawing code
}

@end
In the previous parts of this series you created a subclass and immediately put the drawing code inside drawRect:. This time, the control is a bit more complex, as you need to handle the touch interactions for moving the arrow heads.
UIResponder will be used to handle the touch events; as well, you’ll need a custom initializer for the arrow which takes as arguments the coordinates of the left and right arrow tips and a completion handler. The completion handler will be called when the user stops dragging the right arrow head.
Therefore, you’ll need to set up some supporting code before you can implement the code generated by PaintCode.
Open up BezierView.h and add the following line directly below the #import line:
typedef void(^BezierViewReleaseHandler)(CGPoint releasePoint);
This is a typedef for a block. A block of this type will be called when the user stops dragging the right arrow head. The block has the final position of the right arrow tip as a parameter so that the containing view controller knows where the right arrow tip was placed.
Now, add the following code between the @interface and @end lines:
-(id)initWithLeftArrowTipPoint:(CGPoint)leftArrowTip
            rightArrowTipPoint:(CGPoint)rightArrowTip
                releaseHandler:(BezierViewReleaseHandler)releaseHandler;
This declares the custom initializer for the arrow object. The two CGPoint variables indicate the initial position of the left and right arrow heads. The release handler will be called when the user stops dragging the right arrow head.
Open up BezierView.m and add the following constant definitions to the top of the file, directly below the #import line:
#define kArrowFrameHeight       38.0
#define kArrowFrameHeightHalf   19.0
#define kArrowFrameWidth        30.0
#define kArrowFrameWidthHalf    15.0
If you look at the PaintCode document for your dynamic arrow and select one of the arrow frames, you will see that it is 30 points wide and 38 points high. These constants prevent hardcoding these values in your app’s code. If you eventually change the size of the arrowhead frames, all you have to do is change the above constants.
Next, add the following enum to BezierView.m, directly below the constants you added in the previous step:
typedef enum {
    TouchStateInvalid,
    TouchStateRightArrow
} TouchStates;
Since you only support dragging the right arrowhead, the possible states are either TouchStateRightArrow, to indicate that the user has tapped within the right arrowhead’s frame, or TouchStateInvalid, to indicate that the user has tapped elsewhere.
Now add the following class extension to BezierView.m, directly below the enum you added in the previous step:
@interface BezierView () {
    CGFloat _initialLeftArrowTipY;
    CGPoint _initialOrigin;
    CGPoint _leftArrowTip;
    CGPoint _rightArrowTip;
    TouchStates _touchState;
}

@property (copy, nonatomic) BezierViewReleaseHandler releaseHandler;

@end
The variables above store the initial Y position of the left arrow tip, the initial origin frame, the left and right arrow tip positions, and the current touch state of the view.
Block references always need to be copied when they are stored in a variable. So there code also has a property to store the release handler received via the custom initializer.
Speaking of the custom initializer, now would be a great time to implement it!
Add the code below to BezierView.m:
-(id)initWithLeftArrowTipPoint:(CGPoint)leftArrowTip
            rightArrowTipPoint:(CGPoint)rightArrowTip
                releaseHandler:(BezierViewReleaseHandler)releaseHandler {
    // 1
    CGFloat xPosition = leftArrowTip.x;
    CGFloat yPosition = leftArrowTip.y >= rightArrowTip.y ? rightArrowTip.y : leftArrowTip.y;
    yPosition = yPosition - kArrowFrameHeightHalf;

    // 2
    CGFloat width = fabsf(rightArrowTip.x - leftArrowTip.x);
    CGFloat height = fabsf(rightArrowTip.y - leftArrowTip.y) + kArrowFrameHeight;

    CGRect frame = CGRectMake(xPosition, yPosition, width, height);

    if (self = [super initWithFrame:frame]) {
        // 3
        CGFloat leftYPosition = leftArrowTip.y >= rightArrowTip.y ? height - kArrowFrameHeightHalf : kArrowFrameHeightHalf;
        CGFloat rightYPosition = rightArrowTip.y >= leftArrowTip.y ? height - kArrowFrameHeightHalf : kArrowFrameHeightHalf;

        // 4
        _initialLeftArrowTipY = leftArrowTip.y;
        _initialOrigin = self.frame.origin;
        _leftArrowTip = CGPointMake(0, leftYPosition);
        _rightArrowTip = CGPointMake(width, rightYPosition);

        // 5
        _touchState = TouchStateInvalid;
        self.releaseHandler = releaseHandler;

        self.backgroundColor = [UIColor clearColor];
    }

    return self;
}
Take a minute to walk through the numbered comments one by one:
- Store the initial X position of the
leftArrowTipparameter in a local variable calledxPosition. Then do the same for the Y position — except this time check to see which arrowhead is higher on the screen. Take that arrowhead’s Y position and subtract half of the arrow frame’s height. This gives you the Y position of the frame itself, instead of the arrowhead’s Y position. - Calculate the width and height of the frame by getting the absolute value between each arrowhead’s initial X and Y position. Then use these X and Y values, as well as the width and height, to create and store the view frame in a variable.
- If the super class’
initWithFrame:call was successful, then proceed with initialization by determining the left and right arrowhead Y coordinates. This is done with a ternary operator which again depends on which arrowhead is higher on the screen. - Set some initial values including the initial Y position of the left arrow tip, the initial origin of the view, the left arrow tip position and the right arrow tip position.
- Set the initial touch state to invalid and store the release handler. Finally, clear the view’s background color and return a reference to the created instance.