OpenGL ES Particle System Tutorial: Part 1/3
Learn how to develop a particle system using OpenGL ES 2.0 and GLKit! This three-part tutorial covers point sprites, particle effects, and game integration. By Ricardo Rendon Cepeda.
Designing Your Particle System
Now that GLKViewController is set up, it’s time to design your particle system. But first, you need to think about how you want your particle system to behave.
Particle systems usually simulate natural phenomena, such as explosions, dust clouds, rain or fire. They can also help optimize the calculations required when rendering large numbers of identical objects. These particle systems can lead to highly complex models, with incredibly sophisticated and exciting physics and mathematics flying around…

…okay, we’ll leave that advanced stuff to the film and gaming experts! :]
This OpenGL ES particle system tutorial won’t require anything as complicated as that, but it still uses a bit of basic math to create the beautiful Polar Rose as shown below:
8-Petal Rose, from Wikipedia
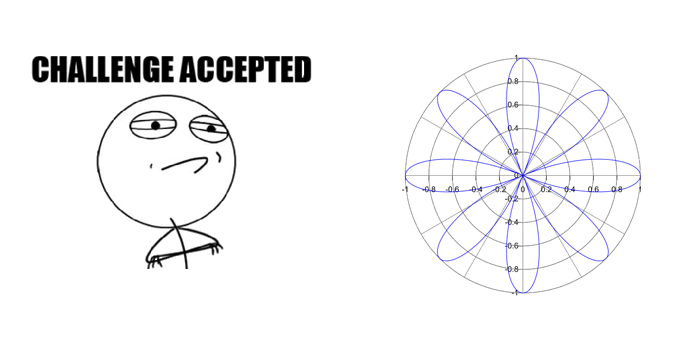
The general equation for these curves can be expressed as:
r = cos(kθ)
This is the polar form of the equation — which is where the name “polar rose” comes from. In this tutorial, you’ll be using the alternative cartesian form:
x = cos(kθ)sin(θ)y = cos(kθ)cos(θ)
In both polar and coordinate forms, k is a constant and θ (called “theta”) is a variable angle. Pop quiz — can you tell which is controlled by the emitter, and which is controlled by the individual particle?
[spoiler title=”Emitter or Particles?”]
k: emitter
θ: particles
Remember that k is a constant, so the emitter stores it and uses it for all particles in the system.
θ is a variable, and each particle in the system will have its own unique angle.
[/spoiler]
Okay, that’s the end of the math lesson. Time to build your particle system!
Note: Don’t worry if you don’t understand the math in the above section – you’ll still be able to follow along with the tutorial. However, if you’d like to learn more about htis, check out our Trigonometry for Game Programming series!
Implementing Your Particle System
Go to File\New\File…, choose the iOS\C and C++\Header File template, and click Next. Name the new header file EmitterTemplate.h and click Create.
Replace the contents of EmitterTemplate.h with the following:
#define NUM_PARTICLES 360

typedef struct Particle
{
    float       theta;
}
Particle;

typedef struct Emitter
{
    Particle    particles[NUM_PARTICLES];
    int         k;
}
Emitter;

Emitter emitter = {0.0f};
Here, you create a particle-emitter template using the basic C-style header file implementation. NUM_PARTICLES defines the number of particles generated by the emitter. 360 is an ideal choice in this situation as it allows θ to cycle through 0-359 degrees around the origin.
The Particle structure contains the individual θ for each particle, while the Emitter structure contains all the particles along with the system’s constant k.
Note: While the particle system in this tutorial only has a single emitter, particle systems in general are not limited to just one emitter. You can have any number of emitters in your system — you’re only limited by your hardware!
Open MainViewController.m and import your emitter by adding the following code:
#import "EmitterTemplate.h"
Next, add the following methods to MainViewController.m, just above @end:
- (void)loadParticles
{
    for(int i=0; i<NUM_PARTICLES; i++)
    {
        // Assign each particle its theta value (in radians)
        emitter.particles[i].theta = GLKMathDegreesToRadians(i);
    }
}

- (void)loadEmitter
{
    emitter.k = 4.0f;   // Constant k
}
The loadParticles method above sets the theta angles on the particles. Each particle gets a value from 0-359. The loadEmitter method simply sets the value of the emitter constant k on the emitter.
Now add the following code to MainViewController.m at the end of viewDidLoad:
// Load Particle System
[self loadParticles];
[self loadEmitter];
Your loader methods will then be called to set up your particle system when the view loads.
Your particle system is now all set up — however, it won't draw anything on the screen at this point. The next section discusses the vertex and shaders that will bring your particles to life!
Adding Vertex and Fragment Shaders
Shaders are the essence of programmable graphics; they give you full control of your final rendered scene using GLSL (OpenGL Shading Language) programming.
Here's a quick refresher on vertex and fragment shaders, taken from the tutorial OpenGL ES 2.0 for iPhone:
- Vertex shaders are programs that get called once per vertex in your scene. So if you are rendering a simple scene with a single rectangle, with one vertex at each corner, this would be called at least four times. (The actual number can vary for implementation-dependent reasons. It could be as high as six.) Its job is to perform some calculations such as lighting, geometry transforms, etc., figure out the final position of the vertex, and also pass on some data to the fragment shader.
- Fragment shaders are programs that get called once per pixel (sort of) in your scene. So if you’re rendering the same simple scene with a single rectangle, it will be called at least once for each pixel that the rectangle covers. Fragment shaders can also perform lighting calculations, etc., but their most important job is to set the final color for the pixel.
For the sake of completeness, here's a quick explanation on the difference between fragments and pixels:
- A pixel is simply the smallest measured unit of an image or screen.
- The graphics pipeline produces fragments which are then converted (or not) to actual pixels, depending on their visibility, depth, stencil, colour, etc.
Note: It's important to realize that fragment shaders are called many times when rendering a scene. Imagine a single rectangle with 4 vertices. If the rectangle was very small, say about 32x32 pixels, the vertex shader would be called roughly 4 times. However, the fragment shader would be called 1024 times — once for each pixel in the rectangle.
Now imagine rendering the pixels of a 3D view that covers the entire screen. On an iPhone 5, that's 1136 x 640 pixels, resulting in 727,040 separate calls to the fragment shader. And shaders are called for...Every. Single. Frame. Plus, if there are transparent objects in your view, some shaders will need to run more than once per frame.
The moral of this story? Be careful when writing shaders, because inefficient shaders are a fast track to a slow app!
Enough theory — time to get started writing the shaders for your particle system.
Go to File\New\File..., choose the iOS\Other\Empty template, and click Next. Name the new file Emitter.vsh, uncheck the box next to your GLParticles1 target, and click Create, as shown in the screenshot below:

Repeat this process, but name this second file Emitter.fsh.
These files will be read by OpenGL ES 2.0 as strings, so the filename extension doesn’t really matter. However, it’s good practice to use .vsh for vertex shaders and .fsh for fragment shaders to help keep things organized.