How To Build a Monkey Jump Game Using Cocos2d 2.X, PhysicsEditor & TexturePacker – Part 1
Learn how to make a fun 2D physics game called Monkey Jump in this 3-part tutorial series covering Physics Editor, Texture Packer, and Cocos2D. By .
A Little Magic: Creating Shapes with the Tracer
Creating shapes by hand isn’t always fun. So let’s use the magic wand tool and let PhysicsEditor do the work for you!
Drop the following objects onto the left pane: backpack, banana, bananabunch, canteen, hat, pineapple, and statue.

Select the backpack, and click the magic wand icon on the tool bar. This will open a new window, the tracer. The tracer shows the current shape with an overlay of the traced shape.

The most important setting is the Tolerance. This value tells the tracer how exactly the polygon should match the shape. It directly influences the number of vertices the polygon will have. For example, setting the Tolerance to 20 will result in a 5-vertex polygon that no longer fits the shape; setting it to 1 creates a perfectly-matching polygon with 39 vertices.
Not enough vertexes

Too many vertexes

Good trace

Set the Tolerance to 5, which gives you an acceptable match with about 15 vertices (the exact amount sometimes varies with the starting point of the tracer). That’s fine! Click OK to get back to the main screen. If you want you can fine-tune the shape, but don’t be too finicky!
Now set the backpack’s parameters. Set the Density to 5.00, the Restitution to 0.10 (so that the backpack bounces a little bit) and the Friction to 0.5. You might want to play around with these parameters later to get a better feel for how they work.
In the collisions section, tick the Cat. box next to bad_objects and make sure no other categories are selected. Also enable collision with all other objects by making sure all the Mask boxes are ticked.
Drag the anchor point (the blue circle with the cross inside) to the center of the backpack shape. Alternatively, you can set the anchor point to the exact center of the shape by setting the Relative anchor point values in the right sidebar to 0.5 and 0.5.

Now that you know how to create shapes, either by hand or using the tracer, go ahead and do the remaining ones yourself! Use the parameters indicted in the table below. And don’t forget to drag the anchor point for each shape to the position indicated in the images below.

Last But Not Least: the Monkey
There’s one shape you have left to create, and that’s because it’s the most complex. Your monkey consists of quite a few animation phases (fourteen total):

The first idea that comes to mind is to add a collision polygon for each animation frame to make a perfect match for each phase of the animation. But this would be a bad idea.
First of all, the frequent exchange of fixtures would consume a good deal of CPU power. But the bigger problem is that with each new shape, the mass of the monkey would change!
This is because Box2d calculates mass based on a polygon’s area and density. If you change the polygon, the monkey will gain or lose weight! And this will lead to the physics simulation behaving erratically.
The solution is to make only one shape for the monkey, which you will try to make as good a fit as possible. To begin, drag one of the monkey shapes onto PhysicsEditor (for example, walk\right_1.png will do fine). Then double click the shape in Physics Editor, and rename it to monkey.

Now click the “+” button shown in the screenshot above and add the other images for the monkey (you can just select all the pngs in the monkey folder). The files will show up in the combo box and you can switch between them to look at them at a glance.
Start the tracer by clicking on the magic wand icon. What you see now is that the shape does not fit the monkey anymore. This is exactly what you want.

The tracer is now in animation tracing mode. You can switch between two frame modes: intersection and union. Intersection creates the polygon only from the parts that are covered by all sprites, whereas union uses the parts that are covered by any sprite. Choose intersection.
The slider allows you to browse through the animation phases and see how the shape fits the different phases.
If you want, you can add one of these shapes to the monkey as a temporary estimate. This will help you make your own shapes that fit the monkey’s animation frames. Or you can just click Cancel to dismiss the dialog and build it yourself – it’s up to you.
Here is what you have to build:

Sometimes polygon shapes don’t slide smoothly over other polygons and stick to each other. This is why you’re building the monkey from circle shapes.
The other reason is that using circles results in faster collision detection. The math to check if a point is inside a circle is much simpler than that for testing for a point inside a polygon. So you’ll save CPU power. You’ll delete the tracer shape after the other parts are set up.
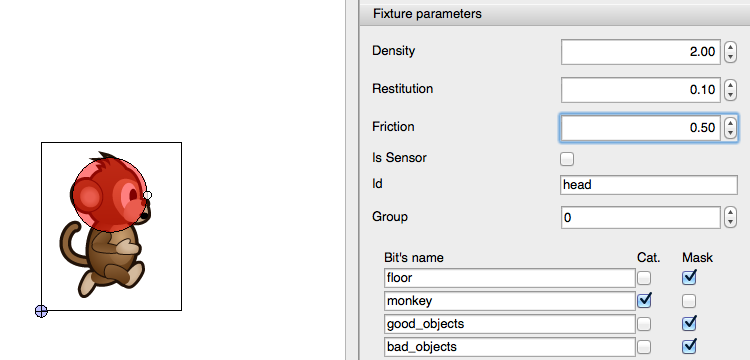
First build the head of the monkey. Use a circle shape and make it as big as the traced version. The head must be treated differently from the other body parts, since you want the monkey to get hurt when objects land on his head from above.
To distinguish the head from the other parts, set the Id to head. Set the head’s category to monkey, and make sure it collides with good_objects, bad_objects, and floor. Set the density to 2.0, the restitution to 0.1, and the friction to 0.5.
Next build the body of the monkey from two circles, one covering the torso and one the legs. For both, set the Id to body. Set the body’s category to monkey, and make sure it collides with good_objects, bad_objects and floor. Set the body’s density to 2.0, its restitution to 0.1, and its friction to 0.5.
Cycle through the different animation phases by selecting the different images from the Filename combo box. Check if the circles fit all phases. It doesn’t have to be a perfect fit, and you can come back to PhysicsEditor any time you want to tweak the collision set.
If you added the polygon from the tracer earlier, delete the polygon created with the tracer now.
During the game you need to check if there are objects to the left or right to trigger the push animation. To do this, place two sensors on the left and right sides of the monkey.
Sensors are fixtures that don’t interact with other bodies and simply report collisions. So to make a fixture a sensor, select each sensor shape and check IsSensor.
Set the Id to push_left for the left sensor and push_right for the right one. For each shape, set the category to monkey, and make sure it collides with bad_objects only – you don’t want the monkey push the floor and the bananas away!
Make the monkey shape fit all animation phases
One last thing to do: save and click Publish! When asked for a location, store the file in the Resources folder of the project as shapes.plist.
That’s it for now in PhysicsEditor. Next you move to Xcode and start coding your game!