Intro To Object-Oriented Design: Part 2/2
This tutorial series will teach you the basics of object-oriented design. In this final part: polymorphism, factory methods, and singletons.
Version
- Other, Other, Other

Update note: Check out the latest version of this tutorial, updated for iOS 8 and Swift! Intro to Object-Oriented Design in Swift.
In Part 1 of this tutorial, you learned the basics of object-oriented design: objects, inheritance, and the model-view-controller pattern. You created the beginnings of a simple application called Vehicles to help you gain a better understanding of these concepts.
Here in the second part, you’re going to learn about Polymorphism and a couple of other key patterns in Object-Oriented programming: The Class Factory Method and the Singleton Instance.
If you completed the previous tutorial, great! You can either pick up where you left off with your previous project. However, if you want to jump right into things, you can download the completed project from Part 1 to get started.
Polymorphism
The general definition of Polymorphism comes from its Greek roots – “Poly” means many, and “Morph” means forms.
The computer-science specific definition, pulled from the Free Online Dictionary of Computing, is:
A variable that may refer to objects whose class is not known at compile time and which respond at run time according to the actual class of the object to which they refer.
The combination of these definitions boils down to “the ability of an object to be more than one thing at a time.” Sounds like your average iOS developer, doesn’t it? ;]
There are several subtypes of polymorphism that are used within Objective-C, but two key ones you’ll see often are the Decorator pattern and the Adapter pattern.
The Decorator Pattern
From Apple’s Cocoa Fundamentals guide’s section on Cocoa Design Patterns:
The Decorator design pattern attaches additional responsibilities to an object dynamically. Decorators provide a flexible alternative to subclassing for extending functionality. As does subclassing, adaptation of the Decorator pattern allows you to incorporate new behavior without modifying existing code. Decorators wrap an object of the class whose behavior they extend.
The primary example of the Decorator pattern in Objective-C is the use of Categories.
Categories are a special kind of class in iOS that allow you to add additional methods to classes without having to subclass or alter the original class. They’re primarily used for adding methods to the stock UIKit components that come with iOS.
The difference between a category and a subclass is pretty simple: A category allows you to add new methods, but not override existing methods. You can’t add new properties or instance variables to categories – you can only use existing ones. If you want to add a new property or instance variable, you’ll need to create a subclass and use the power of inheritance to create your additional properties and methods.
But what if you don’t need to do that? What if you just want to create a simple way to encapsulate something you have to do repeatedly with a particular UIKit object? In this case, a category is the perfect solution.
In your tutorial app, you’re going to add a convenience method to UIAlertView to do away with performing the alloc-init-show
dance for simple alerts over and over again in your code.
Implementing the Decorator Pattern
Go to File\New\File\Cocoa Touch, and select Objective-C Category:
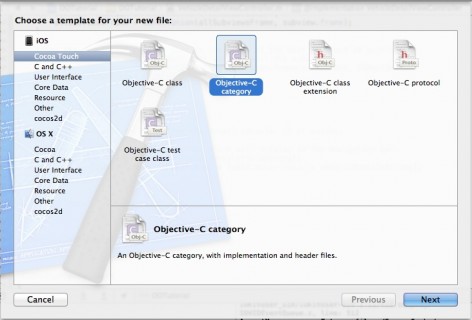
Add the category name as Convenience as a category on UIAlertView:
Once you’ve created the files, you can see by their filenames the syntax Xcode uses to indicate that a file is a category, as shown below:
The [Component]+[Category Name] format indicates both the original class being decorated and what the category itself does. It’s completely acceptable to use multiple categories on the same class in the same application; this makes it easier to reuse categories in other applications.
Creating a method on a category is very similar to creating a method on a normal class. Since you’re going to be creating a new instance of UIAlertView rather than working with an existing instance, open up UIAlertView+Convenience.h and add the following class declaration for your method after the @interface
line:
// Shows a UIAlertView with the given title and message, and an OK button to dismiss it.
+ (void)showSimpleAlertWithTitle:(NSString *)title andMessage:(NSString *)message;
Then, open UIAlertView+Convenience.m and add the method implementation:
+ (void)showSimpleAlertWithTitle:(NSString *)title andMessage:(NSString *)message
{
UIAlertView *simpleAlert = [[UIAlertView alloc] initWithTitle:title
message:message
delegate:nil
cancelButtonTitle:@"OK"
otherButtonTitles:nil];
[simpleAlert show];
}
You’re not doing anything revolutionary here — you’re just combining a bunch of the boilerplate code you’d write over and over and over to show a simple alert view with a single button to dismiss it.
Next, open VehicleDetailViewController.m and add the following import:
#import "UIAlertView+Convenience.h"
Towards the bottom of the file, you’ll find several IBAction
methods with just TODO
comments in the method body. Update goForward
, goBackward
, stopMoving
, and makeNoise
as shown below to use your new category:
-(IBAction)goForward
{
[UIAlertView showSimpleAlertWithTitle:@"Go Forward" andMessage:[self.detailVehicle goForward]];
}
-(IBAction)goBackward
{
[UIAlertView showSimpleAlertWithTitle:@"Go Backward" andMessage:[self.detailVehicle goBackward]];
}
-(IBAction)stopMoving
{
[UIAlertView showSimpleAlertWithTitle:@"Stop Moving" andMessage:[self.detailVehicle stopMoving]];
}
-(IBAction)makeNoise
{
[UIAlertView showSimpleAlertWithTitle:@"Make Some Noise!" andMessage:[self.detailVehicle makeNoise]];
}
Build and run your application; after selecting a vehicle, press any button except the “Turn…” button, and you’ll see the appropriate message for each instance of a Vehicle. For example, if you press the “Make Some Noise!” button for various Vehicles, you’ll see the following:
But what if you need to do something a bit more complicated – something that requires getting information from the UIAlertView that you’ve shown? This is where the Adapter pattern and its use of delegation comes in handy.
The Adapter Pattern
Again from the Cocoa Fundamentals Guide:
The Adapter design pattern converts the interface of a class into another interface that clients expect. Adapter lets classes work together that couldn’t otherwise because of incompatible interfaces. It decouples the client from the class of the targeted object.
Protocols are the primary example of the Adapter pattern in Objective-C. This designates a number of methods that can be implemented by any class. They’re most often used for DataSource
and Delegate
methods, but can also be used to help two unrelated classes communicate with each other.
The advantage of this pattern is that as long as a class declares that it conforms to the protocol, it really doesn’t matter whether it’s a model, a view, or a controller. It simply needs to know what is happening in the other class, and will implement any required methods needed to know about this.
In order to help figure out how many degrees the user wants to turn a vehicle, you’ll take advantage of the UIAlertViewDelegate protocol to get the information the user enters into a UIAlertView.
Implementing the Adapter Pattern
Open VehicleDetailViewController.h and declare that it conforms to the UIAlertViewDelegate protocol by adding that protocol’s name in angle brackets, as so:
@interface VehicleDetailViewController : UIViewController <UIAlertViewDelegate>
If you were to translate the above line into English, it would read: “This is a VehicleDetailViewController, which is a subclass of UIViewController and conforms to the UIAlertViewDelegate protocol.” If a class conforms to multiple protocols, you can list them all in the angle brackets separated by commas.
You’ll use all this to implement a mechanism that figures out how many degrees the user wants to turn their Vehicle.
Open VehicleDetailViewController.m and replace turn
with the following implementation:
-(IBAction)turn
{
//Create an alert view with a single text input to capture the number of degrees
//to turn your vehicle. Set this class as the delegate so one of the delegate methods
//can retrieve what the user entered.
UIAlertView *turnEntryAlertView = [[UIAlertView alloc] initWithTitle:@"Turn" message:@"Enter number of degrees to turn:" delegate:self cancelButtonTitle:@"Cancel" otherButtonTitles:@"Go!", nil];
turnEntryAlertView.alertViewStyle = UIAlertViewStylePlainTextInput;
[[turnEntryAlertView textFieldAtIndex:0] setKeyboardType:UIKeyboardTypeNumberPad];
[turnEntryAlertView show];
}
The method creates a UIAlertView with a text input that will prompt the user for a numeric value.
Next, you’ll need to add a delegate method for the UIAlertView instance to call back after the user enters a number. Add the following method:
#pragma mark - UIAlertViewDelegate method
-(void)alertView:(UIAlertView *)alertView clickedButtonAtIndex:(NSInteger)buttonIndex
{
//Note: Only one alert view will actually declare this class its delegate, so we can
// proceed without double-checking the alert view instance. If you have more than
// one alert view using the same class as its delegate, make sure you check which
// UIAlertView object is calling this delegate method.
if (buttonIndex != alertView.cancelButtonIndex) {
//Get the text the user input in the text field
NSString *degrees = [[alertView textFieldAtIndex:0] text];
//Convert it from a string to an integer
NSInteger degreesInt = [degrees integerValue];
//Use the simple alert view to display the information for turning.
[UIAlertView showSimpleAlertWithTitle:@"Turn" andMessage:[self.detailVehicle turn:degreesInt]];
} //else the user has cancelled, and we don't need to do anything.
}
The above code implements a selected UIAlertViewDelegate method so you can detect when a button is clicked.
Build and run your project; select a Vehicle from the list, tap the Turn button and enter a number of degrees to turn, like so:
If you hit Cancel, nothing will happen since you’ve set your delegate to ignore that index. However, if you hit Go!, the first UIAlertView disappears and the following UIAlertView will appear:
Your application is now functionally complete. However, what if you want to make your code a little more elegant so it’s easier to maintain and add to it later? It’s time to learn about two more object-oriented design patterns to make your coding life easier!
Additional Object-Oriented Patterns
While there are a ton of great patterns you can use with Object-Oriented programming (in fact, Eli Ganem has written an entire tutorial full of them), there are two that are quite useful in your Vehicles app’s context: the Class Factory Method and the Singleton Instance.
Both of these patterns are used extensively in iOS development, and understanding what they do under the hood will help you understand the design of the code you’ll encounter as an iOS developer.
Class Factory Methods
The concept of a Class Factory method is to return an instantiated object of a particular class with as much data pre-populated as possible. One of the obvious benefits of using a factory method rather than calling alloc/init
and setting properties, is that your code can be much shorter.
In this way, you’re using one method to create an object and set all its properties rather than one method to create the object, then writing multiple lines to set all the properties. However there are also two less-obvious benefits to this technique.
One, it forces anyone using your class to provide exactly the information you need in order to create a fully functioning instance of your object. As you created the various objects in this tutorial, you may have noticed that it was easy to miss a property or two. With a factory method, you are forced to be conscious of exactly what information you are and are not providing about the object you want to create.
Two, and admittedly much less of a problem with ARC code, which is pretty much anything written since iOS 5, is that factory methods will return autoreleased objects, freeing the caller from having to release them later. You likely won’t need to worry about this issue unless you’re supporting old code, but it’s a good thing to be aware of.
Implementing the Vehicle Class Factory Method
Open Vehicle.h and declare the following class factory method which accepts parameters representing all of the basic properties of a vehicle:
//Factory Method
+ (instancetype)vehicleWithBrandName:(NSString *)brandName modelName:(NSString *)modelName modelYear:(NSInteger)modelYear powerSource:(NSString *)powerSource wheels:(NSInteger)numberOfWheels;
The instancetype
type is a slightly safer version of id
. Whereas an id
parameter or return type can accept any subclass of NSObject, instancetype
as a method signature tells you that you are definitely receiving an instance of the class or subclass of the class where the instance is being initialized.
Note: Read up on the details of instancetype
over on NSHipster
One other thing to note with factory methods and inheritance: since they return a fully instantiated object, you have to be careful about how you use them in superclasses, as they return a particular class of object.
Go to Vehicle.m and add the following implementation of the factory method:
#pragma mark - Factory method
+ (instancetype)vehicleWithBrandName:(NSString *)brandName modelName:(NSString *)modelName modelYear:(NSInteger)modelYear powerSource:(NSString *)powerSource wheels:(NSInteger)numberOfWheels;
{
//Use self in the superclass to ensure you're getting the proper return type for each of the subclasses.
Vehicle *newVehicle = [[self alloc] init];
//Set the provided values to the appropriate instance variables.
newVehicle.brandName = brandName;
newVehicle.modelName = modelName;
newVehicle.modelYear = modelYear;
newVehicle.powerSource = powerSource;
newVehicle.numberOfWheels = numberOfWheels;
//Return the newly created instance.
return newVehicle;
}
The factory method here initializes the object and sets up the properties. Since Vehicle has subclasses, you need to make sure you’re using [[self alloc] init]
rather than [[Vehicle alloc] init]
. That way, subclasses like Car can also use this inherited factory method to get Car objects back rather than Vehicle objects.
Note: Quality Coding has a great article How to Botch Your Objective-C Factory Method, that goes into a lot more depth on this subject.
Implementing the Car Class Factory Method
Go to Car.h and declare the following factory method:
//Factory Method
+(Car *)carWithBrandName:(NSString *)brandName modelName:(NSString *)modelName modelYear:(NSInteger)modelYear powerSource:(NSString *)powerSource numberOfDoors:(NSInteger)numberOfDoors convertible:(BOOL)isConvertible hatchback:(BOOL)isHatchback sunroof:(BOOL)hasSunroof;
Since you need all the information for the Vehicle other than the number of wheels, you’ve added parameters to your method for all the other Vehicle data along with the Car-specific properties.
Go to Car.m and replace init
with the following implementation of the factory method:
#pragma mark - Factory Method
+(Car *)carWithBrandName:(NSString *)brandName modelName:(NSString *)modelName modelYear:(NSInteger)modelYear powerSource:(NSString *)powerSource numberOfDoors:(NSInteger)numberOfDoors convertible:(BOOL)isConvertible hatchback:(BOOL)isHatchback sunroof:(BOOL)hasSunroof
{
//Create the car object using the superclass factory method.
Car *newCar = [Car vehicleWithBrandName:brandName modelName:modelName modelYear:modelYear powerSource:powerSource wheels:4];
//Set the car-specific properties using the passed-in variables.
newCar.numberOfDoors = numberOfDoors;
newCar.isConvertible = isConvertible;
newCar.isHatchback = isHatchback;
newCar.hasSunroof = hasSunroof;
//Return the fully instantiated Car object.
return newCar;
}
Note that as a general rule of thumb, you don’t have to choose between an init
method and a factory method; however, in this case you’re not going to be using the init
method directly and the factory method now does everything your custom init
method used to do. It makes sense at this point to get rid of the old code since you won’t be needing it anymore.
Next, go into VehicleListTableViewController.m and update the setupVehicleArray
method to use the new factory method on each of the Car objects you’re creating, as follows:
//Create a car.
Car *mustang = [Car carWithBrandName:@"Ford" modelName:@"Mustang" modelYear:1968
powerSource:@"gas engine" numberOfDoors:2 convertible:YES hatchback:NO sunroof:NO];
//Add it to the array
[self.vehicles addObject:mustang];
//Create another car.
Car *outback = [Car carWithBrandName:@"Subaru" modelName:@"Outback" modelYear:1999
powerSource:@"gas engine" numberOfDoors:5 convertible:NO hatchback:YES sunroof:NO];
//Add it to the array.
[self.vehicles addObject:outback];
//Create another car
Car *prius = [Car carWithBrandName:@"Toyota" modelName:@"Prius" modelYear:2007
powerSource:@"hybrid engine" numberOfDoors:5 convertible:YES hatchback:YES sunroof:YES];
//Add it to the array.
[self.vehicles addObject:prius];
Build and run your application; everything looks the same as it did before, but you know that underneath the hood you’re using far less code to creating your Vehicle array. You can now take this same pattern and apply it to the Motorcycle and Truck classes.
Implementing the Motorcycle Class Factory Method
In Motorcycle.h, add the following new declaration of the factory method
//Factory Method
+(Motorcycle *)motorcycleWithBrandName:(NSString *)brandName modelName:(NSString *)modelName modelYear:(NSInteger)modelYear engineNoise:(NSString *)engineNoise;
In this case, you’re adding the specific parameters for creating a new instance of Motorcycles.
Now open up Motorcycle.m and replace the init
method with your factory method’s implementation, as below:
#pragma mark - Factory Method
+(Motorcycle *)motorcycleWithBrandName:(NSString *)brandName modelName:(NSString *)modelName modelYear:(NSInteger)modelYear engineNoise:(NSString *)engineNoise
{
//Create a new instance of the motorcycle with the basic properties by calling the Factory
//method on the superclass.
Motorcycle *newMotorcycle = [Motorcycle vehicleWithBrandName:brandName modelName:modelName modelYear:modelYear powerSource:@"gas engine" wheels:2];
//Set the Motorcycle-specific properties.
newMotorcycle.engineNoise = engineNoise;
return newMotorcycle;
}
Implementing the Truck Class Factory Method
Open Truck.h and add the following factory method declaration:
//Factory Method
+(Truck *)truckWithBrandName:(NSString *)brandName modelName:(NSString *)modelName modelYear:(NSInteger)modelYear powerSource:(NSString *)powerSource wheels:(NSInteger)numberOfWheels cargoCapacityCubicFeet:(NSInteger)cargoCapacityCubicFeet;
Just as before, you’re including parameters that are specific to your new Vehicle instance — in this case, Truck.
Open Truck.m, and add the following factory method implementation (in this case, there isn’t an existing init
to replace):
#pragma mark - Factory Method
+(Truck *)truckWithBrandName:(NSString *)brandName modelName:(NSString *)modelName modelYear:(NSInteger)modelYear powerSource:(NSString *)powerSource wheels:(NSInteger)numberOfWheels cargoCapacityCubicFeet:(NSInteger)cargoCapacityCubicFeet
{
//Create a new instance using the superclass's factory method.
Truck *newTruck = [Truck vehicleWithBrandName:brandName modelName:modelName modelYear:modelYear powerSource:powerSource wheels:numberOfWheels];
newTruck.cargoCapacityCubicFeet = cargoCapacityCubicFeet;
//Return the newly created truck instance.
return newTruck;
}
Now that you’ve created your factory methods for Motorcycle and Truck, head back to VehicleDetailsViewController.m and update your code to use these new factory methods as shown below:
//Add a motorcycle
Motorcycle *harley = [Motorcycle motorcycleWithBrandName:@"Harley-Davidson"
modelName:@"Softail" modelYear:1979 engineNoise:@"Vrrrrrrrroooooooooom!"];
//Add it to the array.
[self.vehicles addObject:harley];
//Add another motorcycle
Motorcycle *kawasaki = [Motorcycle motorcycleWithBrandName:@"Kawasaki"
modelName:@"Ninja" modelYear:2005 engineNoise:@"Neeeeeeeeeeeeeeeeow!"];
//Add it to the array
[self.vehicles addObject:kawasaki];
//Create a truck
Truck *silverado = [Truck truckWithBrandName:@"Chevrolet" modelName:@"Silverado"
modelYear:2011 powerSource:@"gas engine" wheels:4 cargoCapacityCubicFeet:53];
[self.vehicles addObject:silverado];
//Create another truck
Truck *eighteenWheeler = [Truck truckWithBrandName:@"Peterbilt" modelName:@"579"
modelYear:2013 powerSource:@"diesel engine" wheels:18 cargoCapacityCubicFeet:408];
[self.vehicles addObject:eighteenWheeler];
Build and run your application; again, everything works exactly the same on the surface. However, you’ve shortened and simplified your code under the hood and moved often-repeated code into reusable factory methods.
Factory methods add a level of convenience and guard against the possibility of inadvertently leaving off a required property. You’ll see them in common places such as NSString’s stringWithFormat:
or UIButton’s buttonWithType:
– and now you’ve added them to your own vehicle class and subclasses!
The Singleton Pattern
One very specific, very useful type of Class Factory method is the Singleton. This ensures that a particular instance of a class is only initialized once.
This is great for items that need to only have a single instance — for instance, the UIApplication singleton sharedApplication
— or for those classes that are expensive to initialize, or which store small amounts of data which need to be accessed and updated throughout your app.
In the case of your Vehicles app, you can see there’s one piece of data that might need to be accessed and updated all over the place: your list of Vehicles. The list also violates MVC rules by letting VehicleListTableViewController manage its creation and existence. By moving the list of vehicles into its own singleton class, you gain a lot of flexibility for the future.
Go to File\New\File\Objective-C Class and create a subclass of NSObject called VehicleList. Open VehicleList.h and add the following class method declaration for the singleton instance along with a property to store the array of vehicles under the @interface
line:
//The list of vehicles.
@property (nonatomic, strong) NSArray *vehicles;
//Singleton Instance
+ (VehicleList *)sharedInstance;
Next, open VehicleList.m and add the following implementation of the singleton factory method:
+ (VehicleList *)sharedInstance
{
//Declare a static instance variable
static VehicleList *_vehicleList = nil;
//Create a token that facilitates only creating this item once.
static dispatch_once_t onceToken;
//Use Grand Central Dispatch to create a single instance and do any initial setup only once.
dispatch_once(&onceToken, ^{
//These are only invoked the onceToken has never been used before.
_vehicleList = [[VehicleList alloc] init];
_vehicleList.vehicles = [VehicleList initialVehicleList];
});
//Returns the shared instance variable.
return _vehicleList;
}
Notice that you’re declaring the _vehicleList
instance variable and onceToken
GCD token as static
variables. This means that the variable exists for the entire lifetime of the program. This helps with creating a singleton in two ways:
- Instead of checking the null/not null status of the
_vehicleList
instance variable, GCD can more quickly test whether theonceToken
has been executed or not in order to decide whether it needs to create the_vehicleList
instance. Using GCD to perform this check is also thread-safe, sincedispatch_once
ensures that when it’s called from multiple threads, each thread will finish before the next one is allowed to try and create the instance. - You can’t accidentally overwrite the
_vehicleList
instance. Since static variables can only be initialized once, if someone accidentally adds another[[VehicleList alloc] init]
call once the_vehicleList
variable has an initialized object, it won’t have any effect on your existing VehicleList object.
Next, you need to move your vehicle creation over from the VehicleListTableViewController to the VehicleList class.
First, import the Car, Motorcycle, and Truck classes at the top of VehicleList.m:
#import "Car.h"
#import "Motorcycle.h"
#import "Truck.h"
Next, add the following class method to VehicleList.m:
+ (NSArray *)initialVehicleList
{
//Initialize mutable array.
NSMutableArray *vehicles = [NSMutableArray array];
//Create a car.
Car *mustang = [Car carWithBrandName:@"Ford" modelName:@"Mustang" modelYear:1968
powerSource:@"gas engine" numberOfDoors:2 convertible:YES hatchback:NO sunroof:NO];
//Add it to the array
[vehicles addObject:mustang];
//Create another car.
Car *outback = [Car carWithBrandName:@"Subaru" modelName:@"Outback" modelYear:1999
powerSource:@"gas engine" numberOfDoors:5 convertible:NO hatchback:YES sunroof:NO];
//Add it to the array.
[vehicles addObject:outback];
//Create another car
Car *prius = [Car carWithBrandName:@"Toyota" modelName:@"Prius" modelYear:2007
powerSource:@"hybrid engine" numberOfDoors:5 convertible:YES hatchback:YES sunroof:YES];
//Add it to the array.
[vehicles addObject:prius];
//Add a motorcycle
Motorcycle *harley = [Motorcycle motorcycleWithBrandName:@"Harley-Davidson" modelName:@"Softail"
modelYear:1979 engineNoise:@"Vrrrrrrrroooooooooom!"];
//Add it to the array.
[vehicles addObject:harley];
//Add another motorcycle
Motorcycle *kawasaki = [Motorcycle motorcycleWithBrandName:@"Kawasaki" modelName:@"Ninja"
modelYear:2005 engineNoise:@"Neeeeeeeeeeeeeeeeow!"];
//Add it to the array
[vehicles addObject:kawasaki];
//Create a truck
Truck *silverado = [Truck truckWithBrandName:@"Chevrolet" modelName:@"Silverado" modelYear:2011
powerSource:@"gas engine" wheels:4 cargoCapacityCubicFeet:53];
[vehicles addObject:silverado];
//Create another truck
Truck *eighteenWheeler = [Truck truckWithBrandName:@"Peterbilt" modelName:@"579" modelYear:2013
powerSource:@"diesel engine" wheels:18 cargoCapacityCubicFeet:408];
[vehicles addObject:eighteenWheeler];
//Sort the array by the model year
NSSortDescriptor *modelYear = [NSSortDescriptor sortDescriptorWithKey:@"modelYear" ascending:YES];
[vehicles sortUsingDescriptors:@[modelYear]];
return vehicles;
}
The above method can be called at any time to either create or reset the initial list of vehicles.
You’ll notice that most of this code has been moved over from VehicleListTableViewController, but now the vehicles are added to the newly created local vehicles
array instead of VehicleListTableViewController‘s self.vehicles
.
Now you can go back to VehicleListTableViewController.m and remove three things that are no longer needed:
- Delete the entire
setupVehiclesArray
method and the call to it inawakeFromNib
. - Delete the
vehicles
instance variable and the call to initialize it inawakeFromNib
. - Delete the
#imports
forCar.h
,Motorcycle.h
, andTruck.h
Your private interface for VehicleListTableViewController and awakeFromNib
implementation should now look like this:
@interface VehicleListTableViewController ()
@end
@implementation VehicleListTableViewController
#pragma mark - View Lifecycle
- (void)awakeFromNib
{
[super awakeFromNib];
//Set the title of the View Controller, which will display in the Navigation bar.
self.title = @"Vehicles";
}
You’ll notice that Xcode shows you have three errors, since there are three places where you used the vehicles property to feed the UITableViewDataSource and segue handling methods. You’ll need to update these to use your new singleton instead.
First, import the VehicleList class at the top of VehicleListTableViewController.m so you can access the singleton:
#import "VehicleList.h"
Then, find the three spots where Xcode indicates an error and update the code to use the VehicleList singleton’s array of vehicles
instead, as shown below:
- (NSInteger)tableView:(UITableView *)tableView numberOfRowsInSection:(NSInteger)section
{
return [[VehicleList sharedInstance] vehicles].count;
}
- (UITableViewCell *)tableView:(UITableView *)tableView cellForRowAtIndexPath:(NSIndexPath *)indexPath
{
UITableViewCell *cell = [tableView dequeueReusableCellWithIdentifier:@"Cell" forIndexPath:indexPath];
Vehicle *vehicle = [[VehicleList sharedInstance] vehicles][indexPath.row];
cell.textLabel.text = [vehicle vehicleTitleString];
return cell;
}
#pragma mark - Segue handling
- (void)prepareForSegue:(UIStoryboardSegue *)segue sender:(id)sender
{
if ([[segue identifier] isEqualToString:@"showDetail"]) {
NSIndexPath *indexPath = [self.tableView indexPathForSelectedRow];
Vehicle *selectedVehicle = [[VehicleList sharedInstance] vehicles][indexPath.row];
[[segue destinationViewController] setDetailVehicle:selectedVehicle];
}
}
Build and run your application; you’ll see the same list as you did before, but you can sleep better knowing that the code behind the app is clean, concise, and easily extensible.
With all the changes above, you’ll be able to easily add new Vehicles to this list in the future. For instance, if you were to add a new UIViewController that allows the user to add their own Vehicle, you’d only need to add it to the singleton’s Vehicles array.
Or, if you wanted to allow the user to edit a Vehicle, you could make sure you sent all the data back without needing to implement a delegate
for the VehicleListViewController.
There’s one tricky thing to watch out for with singletons: they will stay alive for the entire duration of your app’s lifecycle, therefore you don’t want to load them down with too much data. They can be great for lightweight data storage or to make objects accessible throughout your application.
If you’re storing a lot of data in your app, you’ll want to look at something more robust like Core Data to handle the data storage and retrieval of your objects.
Where To Go From Here?
In one single app, you’ve created a clean, object-oriented application using basic objects, inheritance, MVC design, polymorphism, as well as singleton and factory methods. You can review the source code of the finished project here.
For more information on singletons, you can read Mike Ash’s definitive, incredibly detailed post on the Care and Feeding of Singletons.
If you’d like more information about Object-Oriented patterns, Eli Ganem wrote a great tutorial called iOS Design Patterns that reviews a bit of what you’ve learned here, then introduces you to several more advanced design patterns that you can use to construct even more elegant code.
If you’ve got questions, please ask away in the comments below!
Comments