How To Export Blender Models to OpenGL ES: Part 2/3
In this second part of our Blender to OpenGL ES tutorial series, learn how to export and render your model’s materials! By Ricardo Rendon Cepeda.
Enhancing Your Model Viewer iOS App
Open your GLBlender2 project in Xcode and add your enhanced resources to your project: cube.h and cube.c. You may also add cube.obj and cube.mtl, but it’s not necessary.
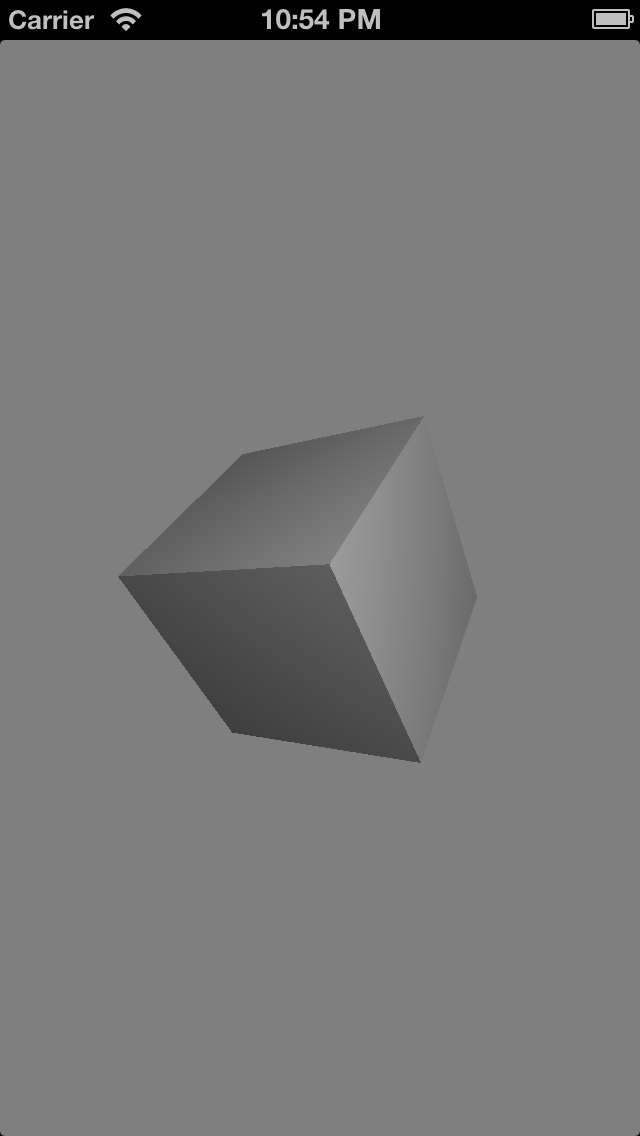
Build and run! You should see your same cube from Part 1, but without a texture. This may not seem exciting, but it’s very important to know that you haven’t compromised your model’s geometry by adding materials.
GLKBaseEffect Materials
Now that you know a lot more about materials and your model is not textured, I’m sure you can appreciate the shading of the cube. The default material properties for GLKBaseEffect, defined by GLKEffectPropertyMaterial, are:
// Properties					// Default Values
GLKVector4		ambientColor;         	// { 0.2, 0.2, 0.2, 1.0}
GLKVector4       	diffuseColor;           // { 0.8, 0.8, 0.8, 1.0}
GLKVector4       	specularColor;          // { 0.0, 0.0, 0.0, 1.0}
GLKVector4       	emissiveColor;          // { 0.0, 0.0, 0.0, 1.0}
GLfloat          	shininess;              // 0.0
That’s exactly what you’re seeing on your cube—a grayish surface. The fourth value is alpha in RGBA mode.
Let’s play around with these parameters, shall we?
Open MainViewController.m and scroll down to the function glkView:drawInRect:. Make sure your call to prepareToDraw happens just before your call to glDrawArrays(). Then, just before those two lines, add the following piece of code:
// Set material
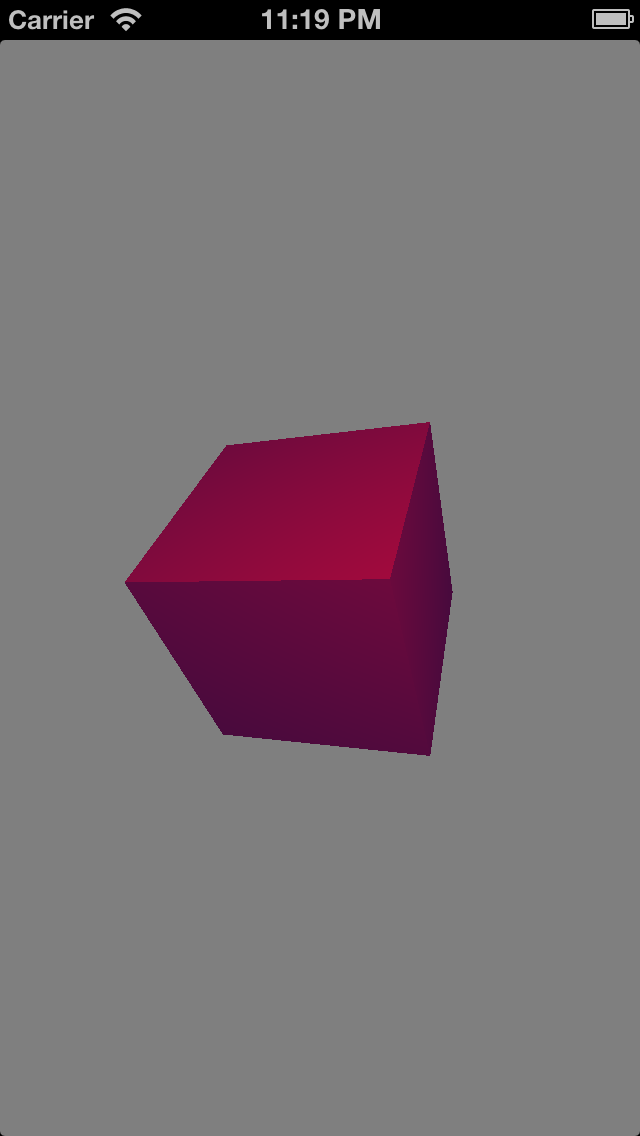
self.effect.material.diffuseColor = GLKVector4Make(0.8f, 0.0f, 0.0f, 1.0f);
self.effect.material.specularColor = GLKVector4Make(0.0f, 0.0f, 0.2f, 1.0f);
In case you’re feeling a bit lost, the complete function should look like this:
- (void)glkView:(GLKView *)view drawInRect:(CGRect)rect
{
    glClear(GL_COLOR_BUFFER_BIT);

    // Set matrices
    [self setMatrices];

    // Positions
    glEnableVertexAttribArray(GLKVertexAttribPosition);
    glVertexAttribPointer(GLKVertexAttribPosition, 3, GL_FLOAT, GL_FALSE, 0, cubePositions);

    // Normals
    glEnableVertexAttribArray(GLKVertexAttribNormal);
    glVertexAttribPointer(GLKVertexAttribNormal, 3, GL_FLOAT, GL_FALSE, 0, cubeNormals);

    // Set material
    self.effect.material.diffuseColor = GLKVector4Make(0.8f, 0.0f, 0.0f, 1.0f);
    self.effect.material.specularColor = GLKVector4Make(0.0f, 0.0f, 0.2f, 1.0f);

    // Prepare effect
    [self.effect prepareToDraw];

    // Draw Model
    glDrawArrays(GL_TRIANGLES, 0, cubeVertices);
}
Build and run! Now you have a bold red cube (diffuse) with a faint blue glow (specular).
Let’s make things more interesting by adding two materials to this cube.
First, draw half of your vertices by changing glDrawArrays() to:
glDrawArrays(GL_TRIANGLES, 0, cubeVertices/2);
Then, add a new material and draw the other half of the cube by adding the following lines to the end of glkView:drawInRect::
// Change material
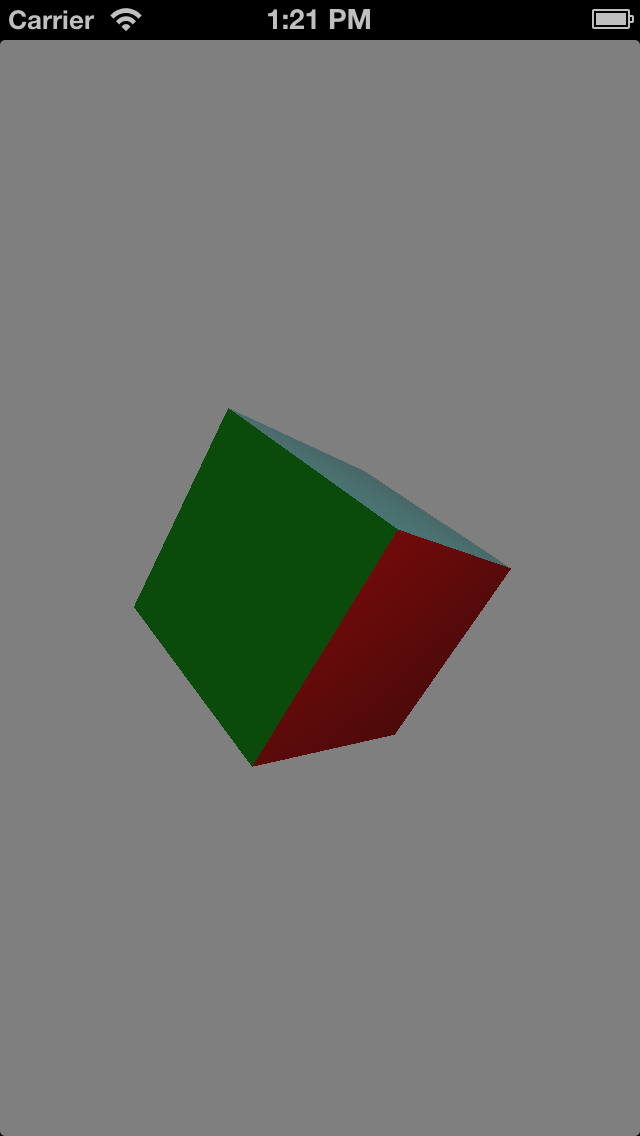
self.effect.material.diffuseColor = GLKVector4Make(0.0f, 0.9f, 0.0f, 1.0f);
self.effect.material.specularColor = GLKVector4Make(0.1f, 0.1f, 0.1f, 1.0f);
// Prepare effect again
[self.effect prepareToDraw];
// Draw 2nd half of model
glDrawArrays(GL_TRIANGLES, cubeVertices/2, cubeVertices/2);
Now you’re rendering half of your cube as an almost-matte green surface. You call prepareToDraw again because you’ve changed the effect, and then glDrawArrays() begins drawing from the previous half of the cube for another half-count of vertices.
Build and run to see the results!

I hope you’re already guessing—and are ready for—what’s about to happen next, but feel free to play around with the material properties. Just don’t stray too far...
Rendering by Parts
Instead of adding a long list of materials and drawing calls in your rendering function, let’s tidy things up with a loop.
First, delete all your calls to self.effect.material, prepareToDraw and glDrawArrays() inside glkView:drawInRect:. Then add the following lines at the bottom of said function:
// Render by parts
for(int i=0; i<cubeMaterials; i++)
{
    // Prepare effect
    [self.effect prepareToDraw];

    // Draw vertices
    glDrawArrays(GL_TRIANGLES, cubeFirsts[i], cubeCounts[i]);
}
Since your faces are grouped by materials, your loop should render all materials according to cubeMaterials. In your command line tool, you also determine the size of cubeFirsts[] and cubeCounts[] by the number of materials, so you won’t encounter any access errors. These two arrays work with each other, so they’re quite organized and know exactly which vertex to start drawing from and how many vertices to draw.
If you were to write out the loop (don’t actually do this), this is what it would look like:
// EXAMPLE ONLY, DO NOT IMPLEMENT
// Render by parts (i<6)
glDrawArrays(GL_TRIANGLES, 0, 6);   // i=0
glDrawArrays(GL_TRIANGLES, 6, 6);   // i=1
glDrawArrays(GL_TRIANGLES, 12, 6);  // i=2
glDrawArrays(GL_TRIANGLES, 18, 6);  // i=3
glDrawArrays(GL_TRIANGLES, 24, 6);  // i=4
glDrawArrays(GL_TRIANGLES, 30, 6);  // i=5
And that’s how your full, 36-vertex cube gets rendered! Build and run to see it with your own eyes. It should look exactly the same as the first gray cube you rendered.
Rendering Your Materials
The last step is to get your materials onto that cube! Add the following lines inside your for loop, before any of your drawing commands:
// Set material
self.effect.material.diffuseColor = GLKVector4Make(cubeDiffuses[i][0], cubeDiffuses[i][1], cubeDiffuses[i][2], 1.0f);
self.effect.material.specularColor = GLKVector4Make(cubeSpeculars[i][0], cubeSpeculars[i][1], cubeSpeculars[i][2], 1.0f);
With these two lines, you set the appropriate material properties to be attached to each face group.
Build and run! You should see a nice colorful cube now...

...but it’s not what you were expecting. The materials are correct, but MaterialPhongC is far too bright and its specular color, white, is completely overpowering its diffuse color, cyan. You can try to fix this by adjusting your scene’s lighting.
In MainViewController.m, add the following lines to createEffect, amongst your light declarations:
self.effect.light0.specularColor = GLKVector4Make(0.25f, 0.25f, 0.25f, 1.0f);
self.effect.light0.diffuseColor = GLKVector4Make(0.75f, 0.75f, 0.75f, 1.0f);
Your scene now has a lighting intensity of 25% white for specular surfaces and 75% white for diffuse surfaces.
Build and run! You’ve got your cyan back, but the scene may be too dark for your liking.
You can play around with your lights and materials, but the truth is that GLKBaseEffect has limited rendering options because it mimics the fixed-function pipeline of OpenGL ES 1.x.
Blender and other high-end graphics software tend to run sophisticated lighting algorithms by implementing shaders. You’ll learn more about these in Part 3, but essentially they are dedicated programs that allow you to develop you own lighting models and other special effects. Since OpenGL ES 2.x, the fixed-function pipeline has become a thing of the past thanks to programmable shaders, which are coded in GLSL and run on the GPU.
OpenGL ES isn’t the only API implementing a programmable, shader-based pipeline. Microsoft (Direct3D with HLSL) and Pixar (Renderman with RSL) also use this type of architecture. That’s all the more reason to learn more about shaders in Part 3. :]