Google Analytics for iOS
Learn how to add usage tracking and other metrics into your iOS app with this Google Analytics Tutorial for iOS! By .
Lap 3: Tracking
As you come around the first bend, you are ahead of all the other runners. Keep up the pace!

GAI (Google Analytics for iOS) is a top-level class that provides facilities to create trackers and set behavioural flags. This class provides access to a shared instance for convenience, in turn this exposes a default tracker instance. The default tracker is initialized to nil and is set by calling trackerWithTrackingId on the shared GAI instance. Should you wish to change this tracker you can override it as required, this is covered later.
The Google Analytics Tracker is used to track screens, events, transitions, timing, and exceptions. The implementation of this interface is thread-safe, and no calls are expected to block or take a long time. All network and disk activity will take place in the background.
So lets see the tracker in action!
Initializing the Tracker
You will need the tracking ID that you obtained in the first part of the tutorial. First you are going to get the Google Analytics for iOS shared instance and setup a number of behavioural flags along with the tracker. The specific behavioural flags you are going to set are:
- trackUncaughtExceptions – Tracking uncaught exceptions will flag up any exceptions that you are not dealing with that have caused your application to crash.
-
logLevel – Google Analytics iOS SDK has 4 logging levels:
kGAILogLevelError,kGAILogLevelWarning,kGAILogLevelInfo, andkGAILogLevelVerbose. Verbose logging enables all of the various types of log output and prints it to the console in Xcode. This is extremely useful when you first start using Google Analytics for iOS as it lets you see what is going on under the hood. - dispatchInterval – By default, this is set to 120, which states that tracking information should be dispatched (uploaded to Google Analytics) automatically every 120 seconds. In this tutorial you will set this to a shorter time period so that you can see the data in your Google Analytics dashboard without having to wait for a prolonged period of time. In a production environment every 120 seconds should be often enough.
To initialize the tracker in your GAI’s sharedInstance, open the app delegate and insert the following into application:didFinishLaunchingWithOptions:, using your own tracking ID in section 4:
// 1
[GAI sharedInstance].trackUncaughtExceptions = YES;

// 2
[[GAI sharedInstance].logger setLogLevel:kGAILogLevelVerbose];

// 3
[GAI sharedInstance].dispatchInterval = 20;

// 4
id<GAITracker> tracker = [[GAI sharedInstance] trackerWithTrackingId:@"UA-XXXXXXX-Y"];
This code will configure and get an instance of your tracker class, so you can start tracking app usage and app events.
Note: Remember to use the tracking ID you obtained when you set up Google Analytics for this app.
Automatic Screen Tracking
Google Analytics was originally built for websites, where it is used to measure pageviews—that is, instances in time where some user views a distinct page on a website. In Google Analytics for mobile, the analog to a webpage is a screen. This will usually represent a single screen of content in your app, but the term can also more generally describe any distinct piece of content your app presents, such as a single component within the screen.
Similarly, the analog to a pageview is a screen view, which represents the act of a user viewing that screen of your app. It’s easy to confuse this sense of “view” with the usual sense of the term in iOS development, where it means a visible UI component within an app rather than the act of a user looking at a part of the app. So stay on your toes when browsing the Google Analytics documentation.
Given all of this, automatic screen tracking means gauging how long users spend looking at the different screens of your app. When users navigate between screens, you will want to record those navigations events, along with the time spent on each screen. In iOS, every screen is managed by a view controller, so you record this information about a screen by updating its view controller.
You can do this automatically by extending GAITrackedViewController. The only manual step required is to set GAITrackedViewController‘s internal property, screenName, which defines the name of the screen for the analytics log.
Let’s use the automatic way to add analytics logging to the screen that displays a clock, which is handled by ClockViewController. First, update ClockViewController.h by importing GAITrackedViewController and extending it as follows:
#import "GAITrackedViewController.h"

@interface ClockViewController : GAITrackedViewController

@end
Second, update ClockViewController.m to set the screenName property. It’s best to do this in viewDidLoad:
- (void)viewDidLoad
{
    [super viewDidLoad];
    self.screenName = @"Clock";
}
That’s it! These two small changes allow a lot of things under the hood to just work. Now that the view controller has a name for the associated screen this name will be used within the parent GAITrackedViewController viewWillAppear: method to register a screen view. Within this method a lot of things are at work the parent viewController will:
- Get the shared instances’
Default Trackersetup with your tracking ID. - Tell the tracker that it’s tracking the “Clock” screen.
- Generate a logging entry containing the time and other information.
- Use the
Default Trackerobject to publish that to the Google Analytics servers for visual exploration. Since we have configured the logging level to output verbose logging you will also see this output to the console.
Not bad for just a couple of lines! Your app is already sending usage data to the Google Analytics servers, but hold your horses just a moment before heading to the GA Dashboard. Let’s add a bit more functionality before checking the results.
Manual Screen Tracking
While automatically recording screen views can be convenient, it is not always possible or desirable to extend the built-in GAITrackedViewController.
In this case, there is a manual approach. You can send information about a screen to Google by explicitly going through the steps that were performed above automatically. You need to get the tracker object, set the field values representing the screen on the tracker object, and then manually build and send the screen view event, or “hit.”
Let’s instrument the StopWatchViewController with this approach. Open StopWatchViewController.m and import GAIDictionaryBuilder at the top of the file:
#import GAIDictionaryBuilder.h
Unlike before, you have to get a handle to the default tracker and give it an identifier for the screen you are currently tracking. You then construct an app view record, that will cause the tracker to record the screen has been viewed and send that to your property on Google Analytics. In the same file, add viewDidAppear as follows:
- (void)viewDidAppear:(BOOL)animated {
    [super viewDidAppear:animated];

    id<GAITracker> tracker = [[GAI sharedInstance] defaultTracker];
    [tracker set:kGAIScreenName value:@"Stopwatch"];
    [tracker send:[[GAIDictionaryBuilder createAppView] build]];
}
Build and run the app! Spend a few moments switching between the two tabs. Every time you switch tabs, you are viewing a new screen. This screen view produces a “hit” event, which the app logs out to the debug console as a timestamp and a dictionary of descriptive fields. You will see below our Stopwatch screen has been recorded with an appview event.

From time to time, the debug console will also show you calls to instances of GAIBatchingDispatcher. This is the Google Analytics library automatically sending the log messages to the Google Analytics web service. After you’ve seen those messages in the console, you should be able to see your activity on the Google Analytics website. If you navigate to the real-time area in your properties reporting dashboard you can see how many users are on each screen at any one time and how that changes in real-time.
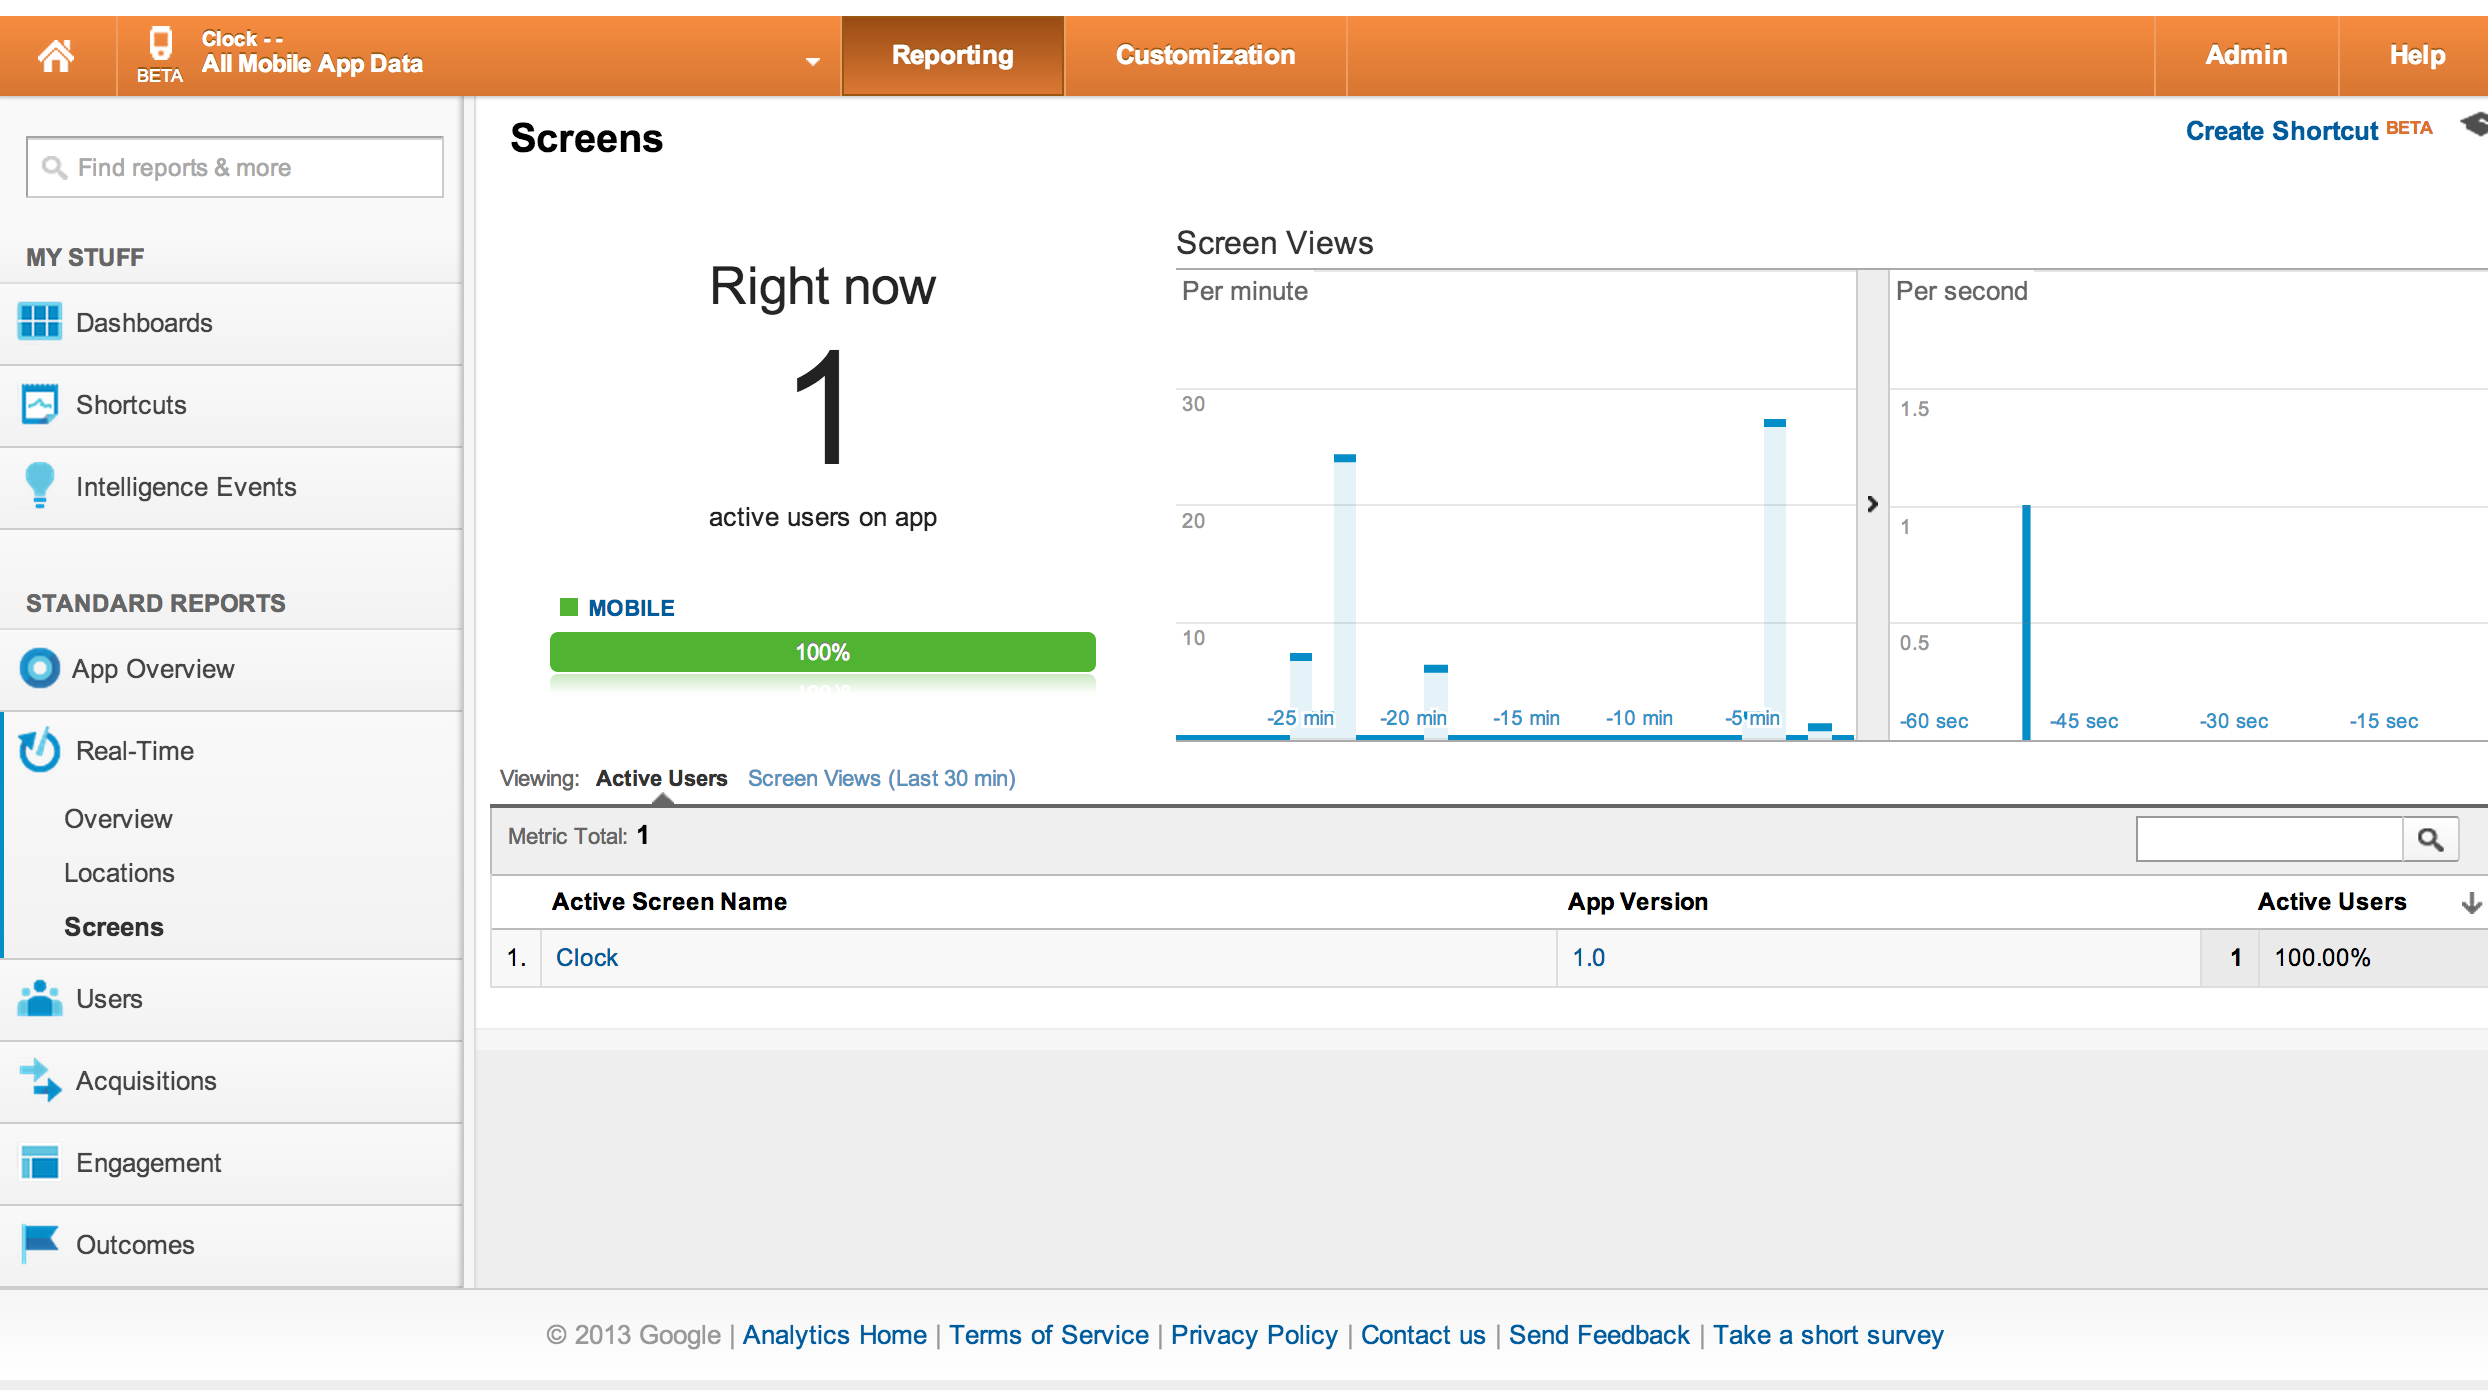
Note: Pay attention to the date range you are previewing in Google Analytics, it does not include today by default and you will not see the hits you produce until you include today’s date in the range.
Google Analytics provides various views into your data. A good one to try is Standard Reports->Real-Time->Screens, which will show you screen transition events over the last few minutes.