ReactiveCocoa Tutorial – The Definitive Introduction: Part 2/2
Get to grips with ReactiveCocoa in this 2-part tutorial series. Put the paradigms to one-side, and understand the practical value with work-through examples By Colin Eberhardt.
Threading
I’m sure you’re itching to wire-up the JSON output of the Twitter search to the UI, but before you do that there is one last thing you need to do. To find out what this is, you need to do a bit of exploration!
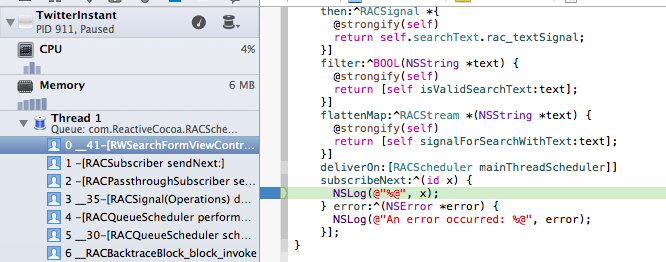
Add a breakpoint to the subscribeNext:error: step at the location indicated below:

Re-run the application, re-enter your Twitter credentials again if needed, and type some text into the search field. When the breakpoint hits you should see something similar to the image below:

Notice the code where the debugger hit a break is not executed on the main thread, which appears as Thread 1 in the above screenshot. Keep in mind that it’s paramount you only update the UI from the main thread; therefore if you want to display the list of tweets in the UI you’re going to have to switch threads.
This illustrates an important point about the ReactiveCocoa framework. The operations shown above execute on the thread where the signal originally emitted its events. Try adding breakpoints at the other pipeline steps, you might be surprised to find they execute on more than one different thread!
So how do you go about updating the UI? The typical approach is to use operation queues (see the tutorial How To Use NSOperations and NSOperationQueues elsewhere on this site for more details), however ReactiveCocoa has a much simpler solution to this problem.
Update your pipeline by adding a deliverOn: operation just after flattenMap: as shown below:
[[[[[[self requestAccessToTwitterSignal]
  then:^RACSignal *{
    @strongify(self)
    return self.searchText.rac_textSignal;
  }]
  filter:^BOOL(NSString *text) {
    @strongify(self)
    return [self isValidSearchText:text];
  }]
  flattenMap:^RACStream *(NSString *text) {
    @strongify(self)
    return [self signalForSearchWithText:text];
  }]
  deliverOn:[RACScheduler mainThreadScheduler]]
  subscribeNext:^(id x) {
    NSLog(@"%@", x);
  } error:^(NSError *error) {
    NSLog(@"An error occurred: %@", error);
  }];
Now re-run the app and type some text so your app hits the breakpoint. You should see the log statement in your subscribeNext:error: block is now executing on the main thread:
What? There’s just one simple operation for marshalling the flow of events onto a different thread? Just how awesome is that!?
You can safely proceed to update your UI!
NOTE: If you take a look at the RACScheduler class you’ll see that there is quite a range of options for delivering on threads with different priorities, or adding delays into pipelines.
It’s time to see those tweets!
Updating the UI
If you open RWSearchResultsViewController.h you’ll see it already has a displayTweets: method, which will cause the right-hand view controller to render the supplied array of tweets. The implementation is very simple, it’s just a standard UITableView datasource. The single argument for the displayTweets: method expects an NSArray containing RWTweet instances. You’ll also find the RWTweet model object was provided as part of the starter project.
The data which arrives at the subscibeNext:error: step is currently an NSDictionary, which was constructed by parsing the JSON response in signalForSearchWithText:. So how do you determine the contents of this dictionary?
If you take a look at the Twitter API documentation you can see a sample response. The NSDictionary mirrors this structure, so you should find that it has a key named statuses that is a NSArray of tweets, which are also NSDictionary instances.
If you look at RWTweet it already has a class method tweetWithStatus: which takes an NSDictionary in the given format and extracts the required data. So all you need to do is write a for loop, and iterate over the array, creating an instance of RWTweet for each tweet.
However, you’re not going to do that! Oh no, there’s much better things in store!
This article is about ReactiveCocoa and Functional Programming. The transformation of data from one format to another is more elegant when you use a functional API. You’re going to perform this task with LinqToObjectiveC.
Close the TwitterInstant workspace, and then open the Podfile that you created in the first tutorial, in TextEdit. Update the file to add the new dependency:
platform :ios, '7.0'

pod 'ReactiveCocoa', '2.1.8'
pod 'LinqToObjectiveC', '2.0.0'
Open up a terminal window in the same folder and issue the following command:
pod update
You should see output similar to the following:
Analyzing dependencies
Downloading dependencies
Installing LinqToObjectiveC (2.0.0)
Using ReactiveCocoa (2.1.8)
Generating Pods project
Integrating client project
Re-open the workspace and verify the new pod is showing as shown in the image below:

Open RWSearchFormViewController.m and add the following imports to the top of the file:
#import "RWTweet.h"
#import "NSArray+LinqExtensions.h"
The NSArray+LinqExtensions.h header is from LinqToObjectiveC, and adds a number of methods to NSArray that allow you to transform, sort, group and filter its data using a fluent API.
Now to put this API to use … update the current pipeline at the end of viewDidLoad as follows:
[[[[[[self requestAccessToTwitterSignal]
  then:^RACSignal *{
    @strongify(self)
    return self.searchText.rac_textSignal;
  }]
  filter:^BOOL(NSString *text) {
    @strongify(self)
    return [self isValidSearchText:text];
  }]
  flattenMap:^RACStream *(NSString *text) {
    @strongify(self)
    return [self signalForSearchWithText:text];
  }]
  deliverOn:[RACScheduler mainThreadScheduler]]
  subscribeNext:^(NSDictionary *jsonSearchResult) {
    NSArray *statuses = jsonSearchResult[@"statuses"];
    NSArray *tweets = [statuses linq_select:^id(id tweet) {
      return [RWTweet tweetWithStatus:tweet];
    }];
    [self.resultsViewController displayTweets:tweets];
  } error:^(NSError *error) {
    NSLog(@"An error occurred: %@", error);
  }];
As you can see above, the subscribeNext: block first obtains the NSArray of tweets. The linq_select method transforms the array of NSDictionary instances by executing the supplied block on each array element, resulting in an array of RWTweet instances.
Once transformed, the tweets get sent to the results view controller.
Build and run to finally see the tweets appearing in the UI:

Note: ReactiveCocoa and LinqToObjectiveC have similar sources of inspiration. Whilst ReactiveCocoa was modelled on Microsoft’s Reactive Extensions library, LinqToObjectiveC was modelled on their Language Integrated Query APIs, or LINQ, specifically Linq to Objects.
Asynchronous Loading of Images
You’ve probably noticed there is a gap to the left of each tweet. That space is there to show the Twitter user’s avatar.
The RWTweet class already has a profileImageUrl property that is populated with a suitable URL for fetching this image. In order for the table view to scroll smoothly, you need to ensure the code that fetches this image from the given URL is not executed on the main thread. This can be achieved using Grand Central Dispatch or NSOperationQueue. But why not use ReactiveCocoa?
Open RWSearchResultsViewController.m and add the following method to the end of the file:
-(RACSignal *)signalForLoadingImage:(NSString *)imageUrl {

  RACScheduler *scheduler = [RACScheduler
                         schedulerWithPriority:RACSchedulerPriorityBackground];

  return [[RACSignal createSignal:^RACDisposable *(id<RACSubscriber> subscriber) {
    NSData *data = [NSData dataWithContentsOfURL:[NSURL URLWithString:imageUrl]];
    UIImage *image = [UIImage imageWithData:data];
    [subscriber sendNext:image];
    [subscriber sendCompleted];
    return nil;
  }] subscribeOn:scheduler];

}
You should be pretty familiar with this pattern by now!
The above method first obtains a background scheduler as you want this signal to execute on a thread other than the main one. Next, it creates a signal that downloads the image data and creates a UIImage when it has a subscriber. The final piece of magic is subscribeOn:, which ensures that the signal executes on the given scheduler.
Magic!
Now, within the same file update the tableView:cellForRowAtIndex: method by adding the following just before the return statement:
cell.twitterAvatarView.image = nil;

[[[self signalForLoadingImage:tweet.profileImageUrl]
  deliverOn:[RACScheduler mainThreadScheduler]]
  subscribeNext:^(UIImage *image) {
   cell.twitterAvatarView.image = image;
  }];
The above first resets the image since these cells are reused and could therefore contain stale data. Then it creates the required signal to fetch the image data. The deliverOn: pipeline step, you encountered previously, marshals the next event onto the main thread so that the subscribeNext: block can be safely executed.
Nice and simple!
Build and run to see that the avatars now display correctly:
![]()