How to Make a Line Drawing Game with Sprite Kit
Learn how to make a line drawing game like Flight Control and Harbor Master in this Sprite Kit tutorial! By Jean-Pierre Distler.
Learn how to make a line drawing game like Flight Control!
In 2009, Firemint introduced the line drawing game to the world when they released the incredibly popular Flight Control.
In a line drawing game, you trace a line with your finger and then sprites follow the line that you drew.
In this tutorial, you’ll learn how to write your own line drawing game with Sprite Kit. Instead of being a mere clone of Flight Control, you will create a game called “Hogville” where your goal is to bring some cute and tired pigs to food and shelter.
This tutorial assumes you have some experience with Sprite Kit. While you don’t have to be an expert, you should know the basics, like how to create sprites and run actions on them. If you’ve got a big question mark in place of that knowledge, take some time to work through Ray’s Sprite Kit Tutorial for Beginners before proceeding.
Getting Started
To get started, download the starter project.
I created this starter project using the Sprite Kit Game template and set it to run in landscape mode. I also added all the artwork you’ll need – and a big thanks to Vicki Wenderlich for providing the art!
Build and run, and you should see a blank screen in landscape as a starting point:

Now you can get right to the business of adding your game elements and developing the line drawing gameplay.
Adding the Background… and a Pig!
After a long day of being a pig, all you want is some food and a bed—a pile of hay will do! It’s hard work rolling in the mud all day. In Hogville, it will be your player’s job to give the pigs what they want by drawing the lines to steer them home.
Before you start drawing lines, though, you need a pig to follow them. Your pig would be a bit unhappy floating in a black void, so you’ll also add a background to give the poor pig some familiar surroundings.
Open MyScene.m and find initWithSize:. Inside the if statement, add the following code:
SKSpriteNode *bg = [SKSpriteNode spriteNodeWithImageNamed:@"bg_2_grassy"];
bg.anchorPoint = CGPointZero;
[self addChild:bg];

SKSpriteNode *pig = [SKSpriteNode spriteNodeWithImageNamed:@"pig_1"];
pig.position = CGPointMake(self.size.width / 2.0f, self.size.height / 2.0f);
[self addChild:pig];
This adds the background image and a pig sprite. You place the lower-left corner of the background image in the lower-left corner of the scene by setting bg‘s anchorPoint to (0, 0) and using its default position.
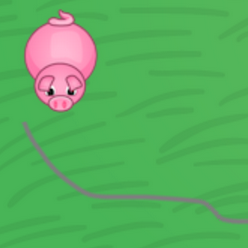
Build and run your game and behold your plump, rosy pig in the middle of a sunny, green field.

Moving the Sprite
Next you need to create a class for the pig sprite. This will contain the path which the pig should follow, along with methods to make the pig follow this path over time.
To create a class for the pig sprite, go to File\New\File…, choose the iOS\Cocoa Touch\Objective-C class template and click Next. Name the class Pig, make it a subclass of SKSpriteNode, click Next and then Create.
Open Pig.h and add the following two method declarations to the interface:
- (void)addPointToMove:(CGPoint)point;
- (void)move:(NSNumber *)dt;
Now open Pig.m and add the following variable before the @implemenation section:
static const int POINTS_PER_SEC = 80;
This constant defines the speed of the pig as 80 points per second.
Next, declare two instance variables by adding the following code immediately after the @implementation line:
{
  NSMutableArray *_wayPoints;
  CGPoint _velocity;
}
_wayPoints will do what its name suggests and store all the points along which the pig should move. _velocity will store the pig’s current speed and direction.
Next, implement initWithImageNamed: and initialize _waypoints inside it:
- (instancetype)initWithImageNamed:(NSString *)name {
  if(self = [super initWithImageNamed:name]) {
    _wayPoints = [NSMutableArray array];
  }

  return self;
}
Now that you’ve initialized _wayPoints, you need a method to add waypoints to it. Implement addPointToMove: by adding the following code to Pig.m:
- (void)addPointToMove:(CGPoint)point {
  [_wayPoints addObject:[NSValue valueWithCGPoint:point]];
}
This method simply adds the given point to the _wayPoints array. In order to store a CGPoint in an NSArray, you use NSValue‘s valueWithCGPoint method to store the CGPoint in an object.
Now begin implementing move: by adding the following code to Pig.m:
- (void)move:(NSNumber *)dt {
  CGPoint currentPosition = self.position;
  CGPoint newPosition;

  //1
  if([_wayPoints count] > 0) {
    CGPoint targetPoint = [[_wayPoints firstObject] CGPointValue];

    //2 TODO: Add movement logic here

    //3
    if(CGRectContainsPoint(self.frame, targetPoint)) {
      [_wayPoints removeObjectAtIndex:0];
    }
  }
}
You will call this method each frame to move the pig a little bit along its path. Here’s how this part of the method works:
- First you check to ensure there are waypoints left in the array. For the moment, the pig stops moving when it reaches the final point of the path. Later, you’ll make the pig a little smarter so it continues walking in its last direction even when no waypoints remain.
- This comment marks where you’ll put the code that updates the pig’s position. You’ll add that code next.
- Finally, you check if the pig has reached the waypoint by seeing if the pig’s
framecontains thetargetPoint. In this case, you remove the point from the array so that your next call tomove:will use the next point. Note that it’s important to check if the frame contains the target point (rather than checking if the position equals the target point), effectively stopping the pig when he’s “close enough”. That makes some of the calculations later a bit easier.
You added that final if statement in the above code because the pig isn’t guaranteed to reach the waypoint in just one call to move:. That makes sense, because the pig needs to move at a constant speed, a little each frame.
Why? Let’s assume you have the first waypoint in the upper-left corner at (0, 50) and the second point at (300, 50). Something like this can happen if the player moves their finger very fast over the screen.
If you took the simple approach of setting the position to the first point in the array and then to the second point in the array, your pig would appear to teleport from one waypoint to the next. Have you ever seen a teleporting pig? I’m sure even Captain Kirk can’t make that claim.

With the logic to process the waypoints in place, it’s time to add the code that calculates and updates the pig’s new position along the path between the waypoints. In move:, replace the //2 TODO: Add movement logic here comment with the following code:
//1
CGPoint offset = CGPointMake(targetPoint.x - currentPosition.x, targetPoint.y - currentPosition.y);
CGFloat length = sqrtf(offset.x * offset.x + offset.y * offset.y);
CGPoint direction = CGPointMake(offset.x / length, offset.y / length);
_velocity = CGPointMake(direction.x * POINTS_PER_SEC, direction.y * POINTS_PER_SEC);

//2
newPosition = CGPointMake(currentPosition.x + _velocity.x * [dt doubleValue],
                          currentPosition.y + _velocity.y * [dt doubleValue]);
self.position = newPosition;
Here’s what you’re doing with the code you just added:
You calculate a vector that points in the direction the pig should travel and has a length representing the distance the pig should move in dt seconds.
To calculate the vector, first you find the difference between the pig’s current location and the next waypoint and store it as offset, a CGPoint representing the differences in both the x and y directions.
As you can see in the following image, the distance between the two points is the length of the hypotenuse of the right triangle formed between the pig’s current position and the waypoint.

You divide offset‘s components by length to create a normalized vector (a vector of length 1) that points in the direction of the waypoint and you store it in direction.
Finally, you multiply direction by POINTS_PER_SEC and store it in _velocity, which now represents a vector pointing in the direction the pig should travel, with a length that is the distance the pig should travel in one second.
- You calculate the pig’s new position by multiplying
_velocitybydtand adding the result to the pig’s current position. Because_velocitystores the distance the pig should travel in one second anddtholds the number of seconds that have passed since the last call tomove:, multiplying the two results in the distance the pig should travel indtseconds.
You’re done here for the moment. It’s time to use your new class and move the pig.