Unity 4.3 2D Tutorial: Physics and Screen Sizes
Learn how to use Unity’s 2D physics engine for collision detection, and deal with different screen sizes and aspect ratios. By Chris LaPollo.
Triggers
Triggers are a special kind of collider. They still test for collisions like regular colliders do, but they don’t actually have any effect on the objects with which they collide. That is, they allow other colliders to pass through them, but Unity notifies the objects involved that a collision occurred, allowing you to “trigger” some game logic.
Because Zombie Conga only requires collision detection and not physics-based reactions, trigger colliders are the perfect solution.
Turn the zombie’s colliders into triggers by selecting zombie in the Hierarchy and checking the box labeled Is Trigger in each of the Polygon Collider 2D components in the Inspector, shown below:

Run the scene and the zombie walks through the enemy once again, but this time, with colliders!
But how is this different from what you had before you added colliders?
When two colliders touch and at least one of them is a trigger, Unity calls various methods on the scripts attached to the GameObject(s) containing the trigger(s). Unity calls OnTriggerEnter2D when a collider enters a trigger, OnTriggerExit2D when a collider exits a trigger, and OnTriggerStay2D every frame during which the collider remains inside a trigger.
However, you should also know that you can attach multiple scripts to a GameObject, and each one can define one or more of these trigger handling methods. During collisions, Unity calls these methods on every script containing them, so you can have multiple scripts react to the collision if necessary. And if two triggers ever collide, Unity calls the appropriate methods on the scripts for both objects.
In Zombie Conga, you’ll only ever need to know when a collider enters a trigger, so you’ll only implement OnTriggerEnter2D.
Switch back to ZombieController.cs in MonoDevelop and add the following method to the class:
void OnTriggerEnter2D( Collider2D other )
{
  Debug.Log ("Hit " + other.gameObject);
}
This just prints out a log to Unity’s console when the zombie collides with any other Collider2D, which you’ll use to test that things are working properly before writing any real logic.
Save the file (File\Save) and go back to Unity.
Play the scene and ram that zombie right into that old lady! Check your Console view (Window\Console) and you’ll see the following message print out many times (or 1 time if you have the Collapse option set in your Console window).
![]()
You see so many log messages because Unity calls the method multiple times. But why?
There are actually many different contact points generated as the zombie walks through the enemy, and Unity sends you a message for every one. In most games you’ll want to make sure you don’t respond to all of these collisions, so you’ll add some code later to solve this problem.
Most games also have different types of objects with which to collide and each one may need to trigger different game logic. Zombie Conga is no exception. But before you can handle different types of collisions differently, you’ll need some different types of collisions, right? It’s time to add a collider to the cat so the zombie can hit that kitty like it’s some old lady on the beach!
Hitting Cats
You’ve been adding polygon colliders to your sprites so far, but the collisions in Zombie Conga really don’t need to be as exact as what you get with these colliders. When writing video games, doing the simplest thing is usually the best for performance reasons, so for the cat, you’ll use a simple circle.
Select cat in the Hierarchy and add a collider by choosing Component\Physics 2D\Circle Collider 2D.
In the Scene view you can see a green circle indicating the bounds of the cat’s collider, like this:
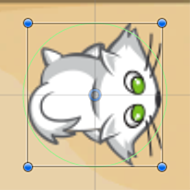
Unity picks a size that tries to fill your sprite’s bounding box, but the cat’s collider doesn’t need to be so big. Inside the Inspector, change the Radius value to 0.3 for the Circle Collider 2D component, as shown below:

The cat’s collider now looks like this:

Play the scene and you’ll see it prints out a bunch of messages like this when the zombie touches the cat:
![]()
Again, you’ll fix the multiple collision issue later. For now, you need to fix something about your colliders that you probably didn’t even know was broken.
Static Colliders, and Why They’re Secretly Bad For You
You’ve added colliders to both the enemy and the cat, but there is something else you did that you may not have realized. You inadvertently told Unity that these colliders are static, meaning they won’t move within the scene and they won’t get added, removed, enabled or disabled at runtime.
Unfortunately, those assumptions are incorrect. The enemies in Zombie Conga will move and you’ll disable a cat’s collider once the zombie touches it. You need to tell Unity that these colliders are not static.
But first, why does it matter?
Unity builds up a physics simulation containing all of the colliders in the scene, and it optimizes this process by handling differently colliders it believes to be static. If a static collider changes at runtime, Unity needs to rebuild the physics simulation, which can be an expensive operation (read: slow) and can also cause the physics to behave oddly. So when you know you’ll be moving GameObjects around, be sure they don’t have static colliders attached.
How do you make a collider dynamic (i.e. not static)? In Unity, if a GameObject has colliders but no rigidbody, then those colliders are considered static. That means you just need to add rigidbodies to the cat and the enemy.
Select cat in the Hierarchy and add a Rigidbody 2D component by choosing Component\Physics 2D\Rigidbody 2d in Unity’s menu.
With cat selected in the Hierarchy, check the box labeled Is Kinematic in the RigidBody 2D component inside the Inspector, shown below:

This indicates that you will be controlling this object’s movement via scripts rather than relying on the physics engine to move it around.
Repeat the previous steps for the enemy to give it a kinematic Rigidbody 2D component as well.
Update: This bug has been fixed in Unity 4.5, so if you are using 4.5 or later, check the box labeled Is Kinematic for zombie, too. Yay, bug fixes!
For the enemy to move, she’ll need a script. With enemy still selected, add a new C# script called EnemyController. You should remember how to add scripts from the earlier tutorials in this series, but if not, the following Spoiler gives a brief explanation.
[spoiler title=”Need help adding a script?”]There are various ways to create scripts and attach them to GameObjects in Unity, so here is just one:
- Open the Scripts folder in the Project browser.
- Choose Assets\Create\C# Script from Unity’s menu.
- Name the new script EnemyController. Do not include the .cs filename extension because Unity adds that for you.
- Drag EnemyController from the Project browser onto enemy in the Hierarchy to attach the script to the enemy.
[/spoiler]
Open EnemyController.cs in MonoDevelop and then add the following instance variable to the script:
public float speed = -1;
Like you’ve done in other parts of this tutorial, you declared speed as public so you can adjust it from within the editor, allowing you to tweak the feel of the game. You used a negative value for speed to move enemies across the screen from the right to the left.
Now add the following line to Start:
rigidbody2D.velocity = new Vector2(speed, 0);
This simply starts the old lady walking along the x-axis. You won’t ever change her velocity, so there is no need to set the velocity anywhere other than inside Start.
If you’d like to be able to adjust the enemy’s speed at runtime, simply add the same line you added to Start to a method called FixedUpdate, which is similar to Update but is called at fixed intervals based on the physics simulation.
Start means it will ignore any adjustments you make to speed at runtime. You can still tweak this value from within Unity’s editor, but you’ll need to restart the scene to try each new value, which makes the process a bit more tedious.
Save the file (File\Save) and go back to Unity.
Play the scene and cheer as Grandma has clearly recovered nicely from her hip surgery.
Enemy walking with a speed of -2
It won’t take you long to realize that the old lady has wandered off and probably isn’t ever coming back. Rather than issuing a Silver Alert, you’ll solve this problem by doing the following two things: you’ll determine when she leaves the screen and then you’ll respawn her on the other side of the screen, just out of sight. That will make it look like another lady walked onto the beach. But to build your Old Lady Army, you’ll need to know the screen’s bounds.