Procedural Level Generation in Games using a Cellular Automaton: Part 2
A tutorial on procedural level generation using a cellular automaton to create cave-like levels in games. By Kim Pedersen.
Treasure
No knight is going to be thrilled about trudging through an unfamiliar cave without potential for some kind of reward. Treasure will help keep him motivated and coming back for more.
Placing treasure can be as easy as randomly selecting a floor cell and placing a gold-filled chest there. But that might make it far too easy for the knight. You'll apply a different approach that will put treasure in less obvious places.
You've already created a method to count how many walls surround a cell. By looping over all the cells in the finished cave system, you can determine how many walls surround each cell. Cells surrounded by several walls are often at the end of a corridor or in an isolated area; the perfect place to hide treasure.
First, you'll add a new cell type to allow you to mark cells that contain treasure easily. Open CaveCell.h and add the following type to the CaveCellType enumeration, just above CaveCellTypeMax:
CaveCellTypeTreasure,
You'll use this new type for any cell that contains treasure.
Add the following method to Cave.m:
- (void)placeTreasure
{
  NSUInteger treasureHiddenLimit = 4;

  for (NSUInteger y = 0; y < self.gridSize.height; y++) {
    for (NSUInteger x = 0; x < self.gridSize.width; x++) {
      CaveCell *cell = (CaveCell *)self.grid[y][x];

      if (cell.type == CaveCellTypeFloor) {
        NSUInteger mooreNeighborWallCount =
          [self countWallMooreNeighborsFromGridCoordinate:CGPointMake(x, y)];

        if (mooreNeighborWallCount > treasureHiddenLimit) {
          // Place treasure here
          cell.type = CaveCellTypeTreasure;
        }
      }
    }
  }
}
This method simply loops over all cells in the cave, and for each floor cell it checks if the number of walls in the Moore neighborhood is greater than treasureHiddenLimit. If so, the cell becomes a treasure cell.
You still need to make the treasure visible, so add the following case to the switch statement in generateTiles in Cave.m:
case CaveCellTypeTreasure:
{
  node = [SKSpriteNode spriteNodeWithTexture:[self.atlas textureNamed:@"tile0_0"]];

  SKSpriteNode *treasure = [SKSpriteNode spriteNodeWithTexture:[self.atlas textureNamed:@"treasure"]];
  treasure.name = @"TREASURE";
  treasure.position = CGPointMake(0.0f, 0.0f);
  [node addChild:treasure];

  break;
}
If the cell type is equal to CaveCellTypeTreasure, then it creates a tile for the floor. Then it adds another SKSpriteNode, and assigns a treasure texture as a child to the floor tile. By adding the chest as a child, you can easily remove it when the knight collects the goods.
Placing the treasure requires a single line of code to be added to generateWithSeed: in Cave.m. Add the following code just after the line that calls placeEntranceAndExit:
[self placeTreasure];
Build and run and send your knight on a treasure hunt.
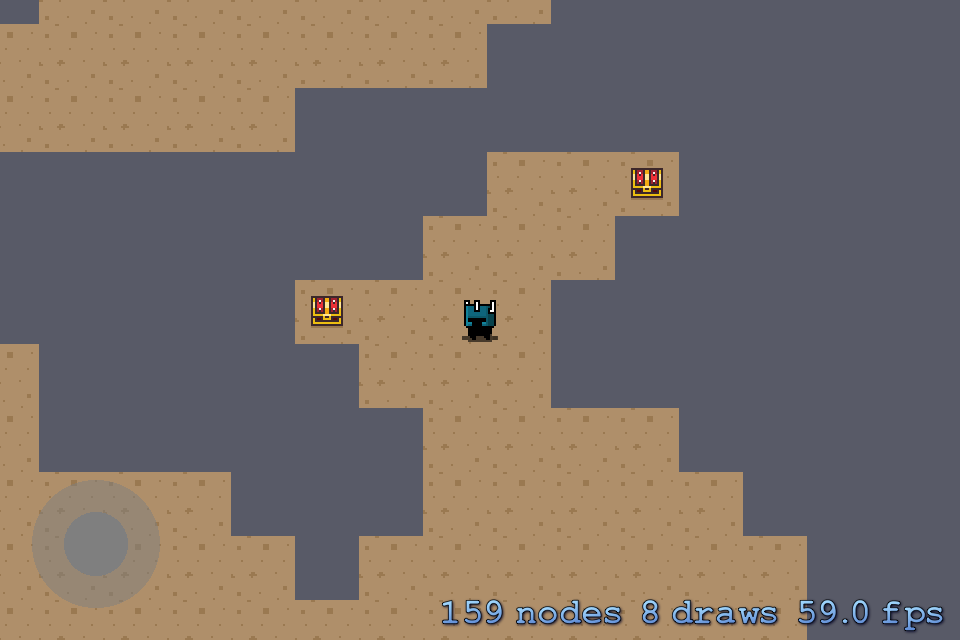
You now have a fully functional cave generator that places entrance, exit and treasure procedurally. What more could you want? Well, maybe you should do something about the knight's superhuman ability to walk through walls.
Collision Detection
In the previous tutorial on procedural level generation, the internal physics engine was used to resolve collisions. In this tutorial, you'll take a different approach and implement your own custom collision detection and handling.
There are many varieties of collision detection, and the math behind the methods can be pretty complicated. Lucky for you, this tutorial uses basic rectangular shapes for the cave and knight, so simple bounding box collision detection will suffice.
In order to detect collisions between the knight and the cave, you need to be able to tell which cell(s) the knight currently occupies. In this case, the knight sprite is a bit smaller than a cell, so you know the knight will only ever occupy one, two or four cells.
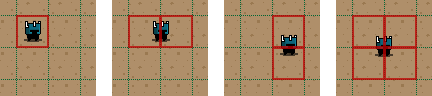
Once you know which cell(s) the knight occupies, you can tell which are wall cells. For each wall cell, you'll resolve the collision based on the intersection between the knight and the wall.
To do this, calculate the intersection between the rectangle for the knight and the rectangle for the cell.
The following illustration shows how to resolve the collisions:
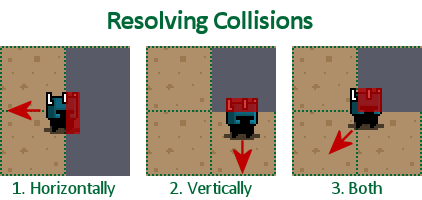
- The intersection between the knight and wall is higher than it is wide. Hence, the collision will resolve horizontally, which allows the knight to slide along the wall vertically.
- The intersection between the knight and the wall is wider than it is tall. The collision will resolve vertically, which allows the knight to slide along the wall horizontally.
- In case the intersection between the knight and wall is as high as it is wide, the collision will be resolved both horizontally and vertically.
Once you've determined how to resolve the collision, you'll use the intersecting rectangle to move the knight out of the collision.
For instance, if you determine you need to resolve horizontally, you move the knight horizontally in the opposite direction he is moving by an amount that corresponds to the width of the intersecting rectangle.
Since you might need to resolve several wall collisions at once, the best practice is not to change the position of the knight directly. That would cause the knight to stutter while resolving the collisions.
Instead, you'll change the desired position of the knight. Luckily, the Player class already includes such a property. :]
Based on the explanation above, you'll need to add a few helper methods:
- A method to get an array of cells in the cave the knight currently occupies.
- Another method to resolve collisions between the knight and any wall cells. This method returns a vector to repel the knight in the correct direction based on the intersecting rectangle.
You'll add the collision-handling code to MyScene. This is the most logical place, as this is where the game logic lives.
Start by adding a forward declaration of CaveCell in Cave.h before @interface:
@class CaveCell;
Next, implement the two helper methods described above. You'll start with the method to return an array of cell(s) the knight is currently occupying.
But before you can do that, you need to add two new methods to Cave:
- One that will return the grid coordinate for a position (in points)
- Another that returns the rectangle for a cell given a grid coordinate in the cave.
Add these methods to Cave.m:
- (CGPoint)gridCoordinateForPosition:(CGPoint)position
{
  return CGPointMake((position.x / self.tileSize.width), (position.y / self.tileSize.height));
}

- (CGRect)caveCellRectFromGridCoordinate:(CGPoint)coordinate
{
  if ([self isValidGridCoordinate:coordinate]) {
    CGPoint cellPosition = [self positionForGridCoordinate:coordinate];

    return CGRectMake(cellPosition.x - (self.tileSize.width / 2),
      cellPosition.y - (self.tileSize.height / 2),
      self.tileSize.width,
      self.tileSize.height);
  }
  return CGRectZero;
}
The first method simply calculates which grid coordinates correspond to the position by dividing the position coordinates with the width and height of a tile.
The other method returns the rectangle for a cell at the coordinate passed as a parameter.
Now you need to create a few public methods in the Cave class. Open Cave.h and add the following method declarations to the interface:
- (CaveCell *)caveCellFromGridCoordinate:(CGPoint)coordinate;
- (CGPoint)gridCoordinateForPosition:(CGPoint)position;
- (CGRect)caveCellRectFromGridCoordinate:(CGPoint)coordinate;
Next, open MyScene.m and add the following #import:
#import "CaveCell.h"
This allows MyScene to access information about a CaveCell object instance.
Still in MyScene.m add the following method:
- (NSArray *)getCaveCellsFromRect:(CGRect)rect
{
  NSMutableArray *array = [NSMutableArray array];

  CaveCell *topLeft = [self.cave caveCellFromGridCoordinate:
    [self.cave gridCoordinateForPosition:rect.origin]];

  CaveCell *topRight = [self.cave caveCellFromGridCoordinate:
    [self.cave gridCoordinateForPosition:CGPointMake(CGRectGetMaxX(rect), CGRectGetMinY(rect))]];

  CaveCell *bottomLeft = [self.cave caveCellFromGridCoordinate:
    [self.cave gridCoordinateForPosition:CGPointMake(CGRectGetMinX(rect), CGRectGetMaxY(rect))]];

  CaveCell *bottomRight = [self.cave caveCellFromGridCoordinate:
    [self.cave gridCoordinateForPosition:CGPointMake(CGRectGetMaxX(rect), CGRectGetMaxY(rect))]];

  if (topLeft && topLeft.type == CaveCellTypeWall) {
    [array addObject:topLeft];
  }
  if (topRight && topRight.type == CaveCellTypeWall && ![array containsObject:topRight]) {
    [array addObject:topRight];
  }
  if (bottomLeft && bottomLeft.type == CaveCellTypeWall && ![array containsObject:bottomLeft]) {
    [array addObject:bottomLeft];
  }
  if (bottomRight && bottomRight.type == CaveCellTypeWall && ![array containsObject:bottomRight]) {
    [array addObject:bottomRight];
  }

  return array;
}
This method accepts a CGRect and finds any cells that intersect it. First it finds the CaveCell at each corner of rect and stores them in topLeft, topRight, bottomLeft, and bottomRight.
For each of these cells, you check if it's a wall and ensure it hasn't already been added to array. That's because the four cells could potentially all be the same cell if the knight fits exactly within the rectangle of a single cell.
Now that you know the unique wall cell(s) the knight currently occupies, add the second method, which will allow you to resolve all the collisions. Add the following to MyScene.m:
- (CGPoint)intersectionRepelDistanceBetweenRect:(CGRect)playerRect andRect:(CGRect)cellRect
{
  if (CGRectIntersectsRect(playerRect, cellRect)) {
    // 1
    NSInteger signX = CGRectGetMaxX(playerRect) > CGRectGetMaxX(cellRect) ? 1 : -1;
    NSInteger signY = CGRectGetMaxY(playerRect) > CGRectGetMaxY(cellRect) ? 1 : -1;

    // 2
    CGRect intersectionRect = CGRectIntersection(playerRect, cellRect);

    // 3
    if (CGRectGetWidth(intersectionRect) < CGRectGetHeight(intersectionRect)) {
      // If the width is less than the height, resolve the collision horizontally
      return CGPointMake(CGRectGetWidth(intersectionRect) * signX, 0.0f);
    } else if (CGRectGetWidth(intersectionRect) > CGRectGetHeight(intersectionRect)) {
      // If the width is greater than the height, resolve the collision vertically
      return CGPointMake(0.0f, CGRectGetHeight(intersectionRect) * signY);
    } else {
      // If the width and height of the intersection are equal, then resolve collision
      // both horizontally and vertically
      return CGPointMake(CGRectGetWidth(intersectionRect) * signX,
                         CGRectGetHeight(intersectionRect) * signY);
    }
  }
  // 4
  return CGPointZero;
}
We'll cover this line-by-line:
- You compare the right and bottom corners of the two rectangles to determine the direction of the intersection. This way you'll know what direction the knight was going when the player collided with the wall cell, so that you can reverse the movement.
- The handy built-in function
CGRectIntersectioncalculates the intersection between the two rectangles. - Based on the intersection rectangle, you return the appropriate direction to resolve the collision. Remember the images describing this earlier?
- If the knight and cell did not intersect, then return
CGPointZero.
You'll now put these two methods to good use. Add the following code to update: in MyScene.m, just after the comment // Insert code to detect collision between player and walls here:
NSArray *cells = [self getCaveCellsFromRect:self.player.boundingRect];

for (CaveCell *cell in cells) {
  CGPoint repel = [self intersectionRepelDistanceBetweenRect:self.player.boundingRect
    andRect:[self.cave caveCellRectFromGridCoordinate:cell.coordinate]];

  self.player.desiredPosition = CGPointMake(self.player.desiredPosition.x + repel.x,
    self.player.desiredPosition.y + repel.y);
}
Build and run. Voila! The knight no longer has free reign of the cave and superhuman abilities...or does he? Seems he's found his way to the hinterlands.
There are still some places he can squeeze through because there isn't yet a border of walls surrounding the cave. This is easy to fix.

Open Cave.m and add the following method:
- (BOOL)isEdgeAtGridCoordinate:(CGPoint)coordinate
{
  return ((NSUInteger)coordinate.x == 0 ||
    (NSUInteger)coordinate.x == (NSUInteger)self.gridSize.width - 1 ||
    (NSUInteger)coordinate.y == 0 ||
    (NSUInteger)coordinate.y == (NSUInteger)self.gridSize.height - 1);
}
This method returns YES if a given grid coordinate is at the edge of the grid and NO if the grid coordinate isn't at the edge of the grid.
Still inside Cave.m, replace the line that sets cell.type in initializeGrid with the following code:
if ([self isEdgeAtGridCoordinate:coordinate]) {
  cell.type = CaveCellTypeWall;
} else {
  cell.type = [self randomNumberBetween0and1] < self.chanceToBecomeWall ? CaveCellTypeWall :
    CaveCellTypeFloor;
}
This will ensure all edge cells become walls, but leave it to chance if all other cells should become walls or floors.
Do another build and run. Haha!! The knight is a captive of your cave, well, except for the exit.
