Database Migrations With Vapor
In this Server-Side Swift tutorial, learn how to perform database migrations with Vapor on your application database – a useful tool for tasks such as creating tables, seeding data, and adding columns.
Version
- Swift 5, macOS 10.14, Xcode 11

All applications are dependent on data. Data is stored in a database with a schema, and you and your customers create and consume it. But when you create a database, you need a way to translate your application models into your database models. In Vapor, this process is called migration. A migration is a set of instructions for how to create or change a model in your database, along with instructions for how to revert those changes. Database migrations with Vapor allow you to add database tables, change columns, and seed data, as well as keep a log of your migrations so you (and your application) know which migrations have or haven’t run.
In this tutorial, you’ll learn how to:
- Create and update a database in Vapor using migrations.
- Create tables, add columns, and more.
- Seed data in your database with a migration.
- Xcode 11 and Swift 5.4 (or newer versions)
- Docker. If you don’t have Docker yet, visit Docker install for Mac.
- A database client that supports PostgreSQL. This tutorial uses Postico. It’s a free PostgreSQL client that you can download here. However, any database client that supports PostgreSQL will do.
You may also want to check out the Server-Side Swift with Vapor course to learn more.
Getting Started
Download the starter project by clicking the Download Materials button at the top or bottom of this tutorial. Then, navigate to the starter folder. Open the Vapor app in Xcode by double-clicking Package.swift.
While you wait for the Swift Package Manager (SwiftPM) to resolve dependencies, check out the existing project in /Sources/App/:
Pay attention to the following:
- Configurations: You’ll see two files, configure.swift and Routes.swift. configure.swift includes where you configure your application, and it’s also where you’ll later register your Migrations.
-
Models: This contains the
Tool
database model.
Finally, remember to set the Working Directory inside your build scheme to the project folder.
Configuring Your Local PostgreSQL Database Using Docker
Next, configure your PostgreSQL container. Open your terminal and paste the following command:
$ docker run --name tool_finder -e POSTGRES_DB=vapor_database \
-e POSTGRES_USER=vapor_username -e POSTGRES_PASSWORD=vapor_password \
-p 5432:5432 -d postgres
This command:
- Runs a new container named tool_finder.
- Pulls down the image if it doesn’t exist on your machine already.
- Specifies the database name, vapor_database, username, vapor_username, and password, vapor_password, through environment variables.
- Instructs the container to listen on port
:5432
and exposes the port to your local machine.
5432
, feel free to change the port before you run the command, e.g. -p 54320:5432
. Just remember to update the database configuration in configure.swift. This also applies to --name
, POSTGRES_DB
, POSTGRES_USER
and Connecting to Your Database
The steps to connect to Postgres through your Vapor application are already implemented in configure.swift. So, build and run.
Next, open Postico and click on the New Favorite button in the bottom left corner. It opens a dialog window that allows you to connect to your database. Input the same values you used when you configured your Postgres Docker container.
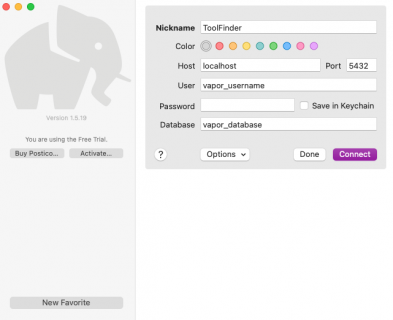
Once you’ve filled in the form, click Connect. It’ll open the connection to your empty database.
You’ll see two folders:
- pg_catalog: This contains metadata information about the database.
- information_schema: This contains views that return information about the database.
You can read more about pg_catalog and information_schema in the official PostgreSQL documentation.
Writing Your First Migration
When you plan your migrations, there are a few good practices to keep in mind:
- Always do a backup of your database before you run a new set of migrations.
- Be cautious not to make irreversible changes to a live project.
- Consider the order in which you make your migrations.
And, now that you’ve connected your application and Postico to the database, you’re ready to write your first migration.
Migrations in Vapor 4
Fluent, which is Vapor’s ORM library, is responsible for migrations in Vapor. You have to write a migration for each table you want to create and for each change you want to make to your existing tables.
The first time Fluent runs, it creates a special table in the database. Fluent uses this table to track all migrations it has run, and it runs migrations in the order you add them. When your application starts, Fluent checks the list of migrations to run. If it has already run a migration, it’ll move on to the next one. If it hasn’t run the migration before, Fluent executes it.
Fluent will never run migrations more than once. Doing so causes conflicts with the existing data in the database. For example, imagine you have a migration that creates a table for your users. The first time Fluent runs the migration, it creates the table. If it tries to run it again, a table with the name already exists and an error is thrown.
Migration Requirements
To write a migration you need to do the following:
- Import
FluentKit at the beginning of your file.
- Create a
struct
to hold your migration, and give it a relevant and descriptive name. - Make your migration conform to the
Migration
protocol. - Add the required
func prepare(on:) -> EventLoopFuture
. This is where you define the changes you want to make to the database with the migration. - Add the required
func revert(on:) -> EventLoopFuture
. This is where you define how to revert the changes you just made to your database. - Register your migration in your app configuration.
For each field you include in your migration, you have to provide a:
- Field key, which is stringly typed.
- Field type, such as
.string
,.int
,.bool
or.datetime
. - List of field constraints, such as whether or not it's required, if it's an identifier and if it's a foreign key.
Next, you'll learn how to create a Tools migration.
Creating a Tools Migration
In Xcode, add a new folder named Migrations inside your App folder.
Next, add a new Swift file named 21-05-31_Tool+Create.swift to hold your migration defining the entity's table.
- Prefix the file name with the date it was created in year/month/day format. This allows you to maintain an overview of the proper order your migrations were created in and the order in which they should be executed.
- Use a descriptive name for the migration explaining what the migration is doing to the model.
For example, you could use 20210123_Tool+AddUpdatedAt if you needed to add an updated_at
field to an existing table for the Tool
model.
Replace the new file's contents with:
// 1
import FluentKit
// 2
extension Tool {
struct Create: Migration {
// 3
func prepare(on database: Database) -> EventLoopFuture<Void> {
return database
.schema("tools") // 4
.id() // 5
.field("name", .string, .required) // 6
.field("created_at", .datetime) // 7
.field("updated_at", .datetime)
.create() // 8
}
// 9
func revert(on database: Database) -> EventLoopFuture<Void> {
return database.schema("tools").delete()
}
}
}
Here you:
- Import
FluentKit
to exposeMigration
. - Extend your
Tool
database model and create astruct
called Create and make it conform to theMigration
protocol. The migration is a nested type to keep migrations organized with their model. - Add the required method
func prepare(on:) -> EventLoopFuture
. - Provide the schema of the database model.
- Create the
id
for the model. - Add a field for the name of the Tool.
- Create the two timestamps for Tool —
createdAt
andupdatedAt
. - Create the table.
- Add the required method,
func revert(on:) -> EventLoopFuture
. Inside, call the.delete()
method on the Tool table.
- The field names are in snake_case, even though the properties in the application are in camelCase. This is a convention from PostgreSQL, since, by default, it's case insensitive in regard to keys.
- The
.id()
builder method is only available if your ID type isUUID
. If you're using anint
, you'll have to define the property yourself using.field("id", .int, .identifier(auto: true))
.
Next, open /Configurations/configure.swift and register your migration with the application by replacing the comment on line 47 with the following:
app.migrations.add(Tool.Create())
Next time you run your application with migrate
enabled, your model will be created in your database.
Running Your Application
Now, open your build scheme and add migrate
under Arguments Passed On Launch.
Then, run your application.
This will prompt a dialog in your output window telling you which migrations will be run and asking you if you're sure you want to go ahead with them.
Type y and press enter.
Wait for the success command to print, along with a message that the command ended. Then, open the build schema and remove the migrate argument.
There are a number of options for you to run your migrations.
You can explicitly run them from your terminal using vapor run migrate
, or from inside Xcode like you just did. In both cases, you'll receive the command prompt, but you can also pass -y
as an argument to skip the prompt.
You can also run the migrations automatically by either adding try app.autoMigrate().wait()
inside your configure.swift, or passing the --auto-migrate
flag when you run your application.
In the next section, you'll view your database.
Viewing Your Database With Postico
Now, access your database with Postico.
You can see that Tool/code> has been added to the database, along with another table named _fluent_migrations.
First, open _fluent_migrations.
Vapor autogenerates this table and holds a registry of all the migrations you've run.
Each migration has a unique identifier, the name you gave it, a batch number and timestamps for creation and update.
Since it was your first migration, the batch number is 1. Each time you run a new migration, the batch number will increase by one.
Next, open the tools table, and in the bottom-left corner, choose to view the Structure.

Structure of the tools table in the database. It has four fields with keys and types matching those you defined in your migration.
Here, you see that the table has four columns that match the ones you defined in your migration:
-
id: Of type
UUID
, and with the primary key constraint enabled. -
name: Of type
TEXT
, and withNOT NULL
enabled. -
created_at: Of type
TIMESTAMPZ
(timestamp with time zone). -
updated_at: Of type
TIMESTAMPZ
.
Moving on, you'll learn about FieldKey
s.
Implementing FieldKeys
As you've seen, the names of fields are defined using strings. This offers a lot of flexibility when changing your tables, but it also introduces a lot of duplicate strings in your app. And, with duplicate strings come a lot of opportunities for you to make avoidable mistakes.
Vapor 4's FieldKey
type can be used to work around this. It allows you to define each key only once and reuse it throughout the project, benefitting from Swift's type safety.
Rewriting Your First Migration Using FieldKeys
First, add a new file, FieldKeys.swift, inside the /Configurations folder.
Now, paste the following:
// 1
import FluentKit
// 2
extension FieldKey {
// 3
static let createdAt: FieldKey = "created_at"
static let name: FieldKey = "name"
static let updatedAt: FieldKey = "updated_at"
}
Here, you:
- Import FluentKit.
- Extend Vapor's
FieldKey
. - Add a new static
FieldKey
per unique key you'll have in your database (across all your tables).
Next, open Tool.swift, scroll to the bottom of the file and paste the following extension:
// 1
extension Tool {
enum Create_20210531 {
// 2
static let schema = "tools"
// 3
static let name: FieldKey = .name
static let createdAt: FieldKey = .createdAt
static let updatedAt: FieldKey = .updatedAt
}
}
Here, you:
- Extend
Tool
with Create_20210531. It holds all the keys you need to create your table. Note the wrapper includes the date of the migration. - Add a static variable for the schema name,
tools
. - Add a
FieldKey
per field, each matching theFieldKey
s you added in FieldKey.swift.
Next, you'll replace your keys.
Replacing Stringly Typed Keys with FieldKeys in Tool and Its Migration
Go through your model and replace all the keys so they refer to the new FieldKeys
constants.
Start by finding the following:
static let schema = "tools"
Replace it with this:
static let schema = Create_20210531.schema
Then, replace the properties and property wrappers for name
, createdAt
and updatedAt
with the following:
@Field(key: Create_20210531.name)
var name: String
@Timestamp(key: Create_20210531.createdAt, on: .create)
var createdAt: Date?
@Timestamp(key: Create_20210531.updatedAt, on: .update)
var updatedAt: Date?
Finally, open 21-05-31_Tool+Create.swift and replace the inside of func prepare(on:) -> EventLoopFuture
with this:
return database
.schema(Tool.schema)
.id()
.field(Tool.Create_20210531.name, .string, .required)
.field(Tool.Create_20210531.createdAt, .datetime)
.field(Tool.Create_20210531.updatedAt, .datetime)
.create()
}
This replaces the strings with the FieldKey
and schemaName
you defined earlier. Now, you have no more duplicate strings in your migration or model, giving you more type safety and making it simpler to change or update fields!
Reverting Your Migration
Next, open then scheme builder in Xcode and add a new argument, migrate --revert
. Make sure that only the checkbox for the new argument is enabled.
Buidl and run. Again, you'll see a dialog in the output window letting you know which migrations will be reverted and then prompting you to say yes, y
, or no, n
.
And, if you open Postico, you'll see that the tools table is gone and _fluent_migrations is empty.
Next, you'll rerun a migration.
Rerunning Your First Migration
Open Xcode again, and in the build scheme, replace the command argument with migrate -y
.
Then, build and run again. Like before, you'll see the dialog in the output window, but this time, the response to the prompt is inferred from the command.
If you open Postico, you'll see that the tools table is back.

View of the database after the first migration. Both the tool table and fluent_migrations table are there.
Moving on, it's time to add a few things.
Adding a Maker to Your Tools
It's quite common for people to own more than one of the same tool, but from different brands. In our database, it'd be useful to keep track of the maker of a given tool, because to some people it matters when they ask to borrow (and rarely return) it.
First, go to FieldKey.swift and paste the new FieldKey
:
static let maker: FieldKey = "maker"
Next, open Tool.swift and paste the following code at the bottom of the file:
extension Tool {
enum AddMaker_20210601 {
static let maker: FieldKey = .maker
}
}
Then, inside your, model add the new field:
@OptionalField(key: AddMaker_20210601.maker)
var maker: String?
Not every tool will have a known maker, so the field is a String?
that requires the OptionalField
Property Wrapper.
Now, replace Tool with:
init(id: UUID? = nil, name: String, maker: String?) {
self.id = id
self.name = name
self.maker = maker
}
Great! You've added a maker.
Adding a New Migration
Next, create a new file for the update migration named 21-06-01_Tool+AddMaker.swift.
Inside the file, paste the following:
import FluentKit
extension Tool {
// 1
struct AddMaker: Migration {
func prepare(on database: Database) -> EventLoopFuture<Void> {
database
.schema(Tool.schema)
// 2
.field(Tool.AddMaker_20210601.maker, .string)
// 3
.update()
}
func revert(on database: Database) -> EventLoopFuture<Void> {
database
.schema(Tool.schema)
// 4
.deleteField(Tool.AddMaker_20210601.maker)
.update()
}
}
}
Here, you:
- Create a new migration to add the maker to the database table
- Add the maker field to the database. This time the
.required
constraint is omitted, since the field can benil
. - Call the
.update()
method. - Delete the maker field on revert.
Finally, register the migration in your configure.swift by pasting the following line directly under the create migration:
app.migrations.add(Tool.AddMaker())
With that added, it's time for the next step.
Running Your Migration
Now, build and run with migrate y
enabled.
Again, the dialog is letting you know which migrations are being run. Notice that the yes / no prompt is answered automatically.
Now, open Postico. The database looks like it did before, with two tables, _fluent_migrations and tools.
This is expected, since you didn't create a new table, but rather updated the existing one.
Now, open _fluent_migrations:
Here, you can see there's a second row along with your second migration. Also note that the batch number is 2.
Adding a Unique Requirement to Your Tool/Maker Combination
As your tool catalog grows, you'll realize the need to prevent duplicate entries in the database.
So, it's time to write another migration to add a unique constraint on the combination of tool and maker. Since you aren't adding any new fields to the table, you don't have to create any new keys.
Create a new Swift file in your migrations folder named 21-06-02_Tool+MakeToolUnique.swift.
Then, paste the following:
// 1
import FluentKit
extension Tool {
struct MakeToolUnique: Migration {
func prepare(on database: Database) -> EventLoopFuture<Void> {
database
.schema(Tool.schema)
// 2
.unique(
on: Tool.Create_20210531.name, Tool.AddMaker_20210601.maker,
name: "unique_tool_maker"
)
.update()
}
func revert(on database: Database) -> EventLoopFuture<Void> {
database
.schema(Tool.schema)
// 3
.deleteUnique(
on: Tool.Create_20210531.name,
Tool.AddMaker_20210601.maker
)
.update()
}
}
}
Here, you:
- Import
FluentKit
to expose the migration APIs - Add a unique constraint on the combination of the two fields
name
andmaker
and call it unique_tool_maker. You can add the unique constraint on any combination of one or many fields and provide a readable name for the constraint if you like. - Delete the unique constraint again when the migration reverts.
Next, register the migration in configure.swift. Paste the following line below the other migrations:
app.migrations.add(Tool.MakeToolUnique())
You're almost done!
Building and Running Your App
Now, confirm you still have the migrate argument enabled in your build scheme.
Build and run. Then, open Postico to view the tools table, selecting the Structure.
Here, you can see that the unique index is added on the combination of name
and maker
with the name you just gave it.
Seeding Data Using Migrations
Migrations are useful for more than just changing the structure of your database.
You can also use them to seed data, such as a list of general categories, or some example data to use in your front end or unit tests.
So, time for you to write your last migration.
Add a new file in the migrations folder named 21-06-03_Tool+Seed.swift and paste the following:
import FluentKit
extension Tool {
struct Seed: Migration {
func prepare(on database: Database) -> EventLoopFuture<Void> {
// 1
let tools: [Tool] = [
.init(name: "Hammer", maker: nil),
.init(name: "Food Processor", maker: "Bosch"),
.init(name: "Zigsaw", maker: "Makita")
]
// 2
return tools.map { tool in
tool.save(on: database)
}
.flatten(on: database.eventLoop)
}
func revert(on database: Database) -> EventLoopFuture<Void> {
// 3
Tool.query(on: database).delete()
}
}
}
Here, you:
- Create a list of three tools, two of which have a maker.
- Map over the three tools and save each one to the database.
- Delete all records in tools on revert.
Next, register the migration in configure.swift below the other migrations:
app.migrations.add(Tool.Seed())
Finally, build and run your migration. Then open the tools table in Postico.
You can see that the table now has three tools in it.
Where to Go From Here?
Download the completed project files by clicking the Download Materials button at the top or bottom of the tutorial.
In this article, you learned the basics of what a migration is and why you should use migrations to configure your database. You also learned most of the common migration options you'll use in your own apps.
If you want to learn more about migrations, check out Server-Side Swift with Vapor or the official Vapor documentation.
If you're looking for a challenge beyond this tutorial, here are a few things you can try:
- Create a REST API to interact with your app.
- Add a type to the
Tool
entity (using an Enum). - Add a quantity property to the
Tool
entity with a default value of 1. - Introduce a new
Loan
entity so you can keep track of which friend borrowed what tool. Remember to set references up correctly in the database!
We hope you enjoyed this tutorial! If you have any questions or comments, please join the forum discussion below!
Comments