Vonage Video API: Real-Time Video in iOS
Get started with the Vonage Video API and add real-time video streaming to your iOS apps.
Version
- Swift 5, iOS 14, Xcode 12

Livestreaming experiences, like those powered by the Vonage Video API, cover everything from classes to concerts to consultations. But what do these things have in common? That’s right — a lack of tea. It’s time someone built an app to host a virtual tea party. In this tutorial, you’ll build a two-way livestreaming app to host a virtual tea party with a friend. How delightful!
Of course, building a livestreaming server and an associated API is no easy feat. Fortunately, there are a few livestreaming platforms that have already done that work for you. One of them is Vonage’s Video API.
While utilizing this API in your app, you’ll learn what WebRTC, HLS and RTMP mean and how to:
- Create and use a Vonage Video API account.
- Create a livestreaming session.
- Publish your camera and microphone to the session.
- Subscribe to and display the video from another user’s camera in the session.
It’s time to jump in.
Getting Started
Use the Download Materials button at the top or bottom of this tutorial to download the starter project.
The Vonage Video API provides an SDK called OpenTok that’s installed via CocoaPods. It creates a separate project for frameworks and groups it with the main project for use in a workspace.
The starter project has OpenTok pre-installed. Open TeaParty.xcworkspace to access the starter project.
The code and the storyboard already provide the interface for the app. Since you’ll be using your camera and microphone, their permission descriptions are predefined in Info.plist.
Build and run. You’ll see a big button in the center of the screen to enter the lounge:
The lounge is where you’ll livestream with your friend. Tap the Enter Lounge button:
Slight problem — it’s completely black and there’s no sign of any video streaming! Your task is to add the livestreaming functionality.
Livestreaming Technologies
The Vonage Video API allows real-time communications between up to 3,000 simultaneous connections. It uses an open-source, multi-platform framework called WebRTC.
For situations where WebRTC isn’t enough, like non-interactive broadcasts or when you require more than 3,000 connections, Vonage offers the following alternative technologies:
- HTTP Live Streaming (HLS): A traditional adaptive bit rate broadcast technology that uses a CDN (content delivery network) to deliver content with a high latency — around 15 to 20 seconds.
- Real-Time Messaging Protocol (RTMP): A broadcast technology with a latency of around five seconds that pushes content to social media platforms like Facebook or YouTube Live.
Since you aren’t planning to host a 3,001 person tea party, you don’t need to worry about these other broadcasting technologies — or buying large quantities of tea!
Creating Your Vonage Video API Account and Project
Open StreamingViewController.swift; you’ll notice three empty properties at the top: apiKey
, sessionId
and token
. You’ll need these credentials to authenticate with the Vonage Video API.
Retrieve these by signing up for a free account on Vonage’s website.
After signing up, logging in and entering an account name, you’ll see the Vonage Video API account portal. This has many uses, including:
- Creating livestreaming projects.
- Registering server callback URLs.
- Configuring cloud storage for videos.
- Providing analytics and debugging tools for livestreaming sessions.
- Setting up billing.
- Providing links to developer documentation.
The Vonage Video API is a paid service, but it provides a free credit to get you started.
Start by selecting Create Project from the left-hand sidebar:
Next, choose Create Custom Project below the Vonage Video API section:
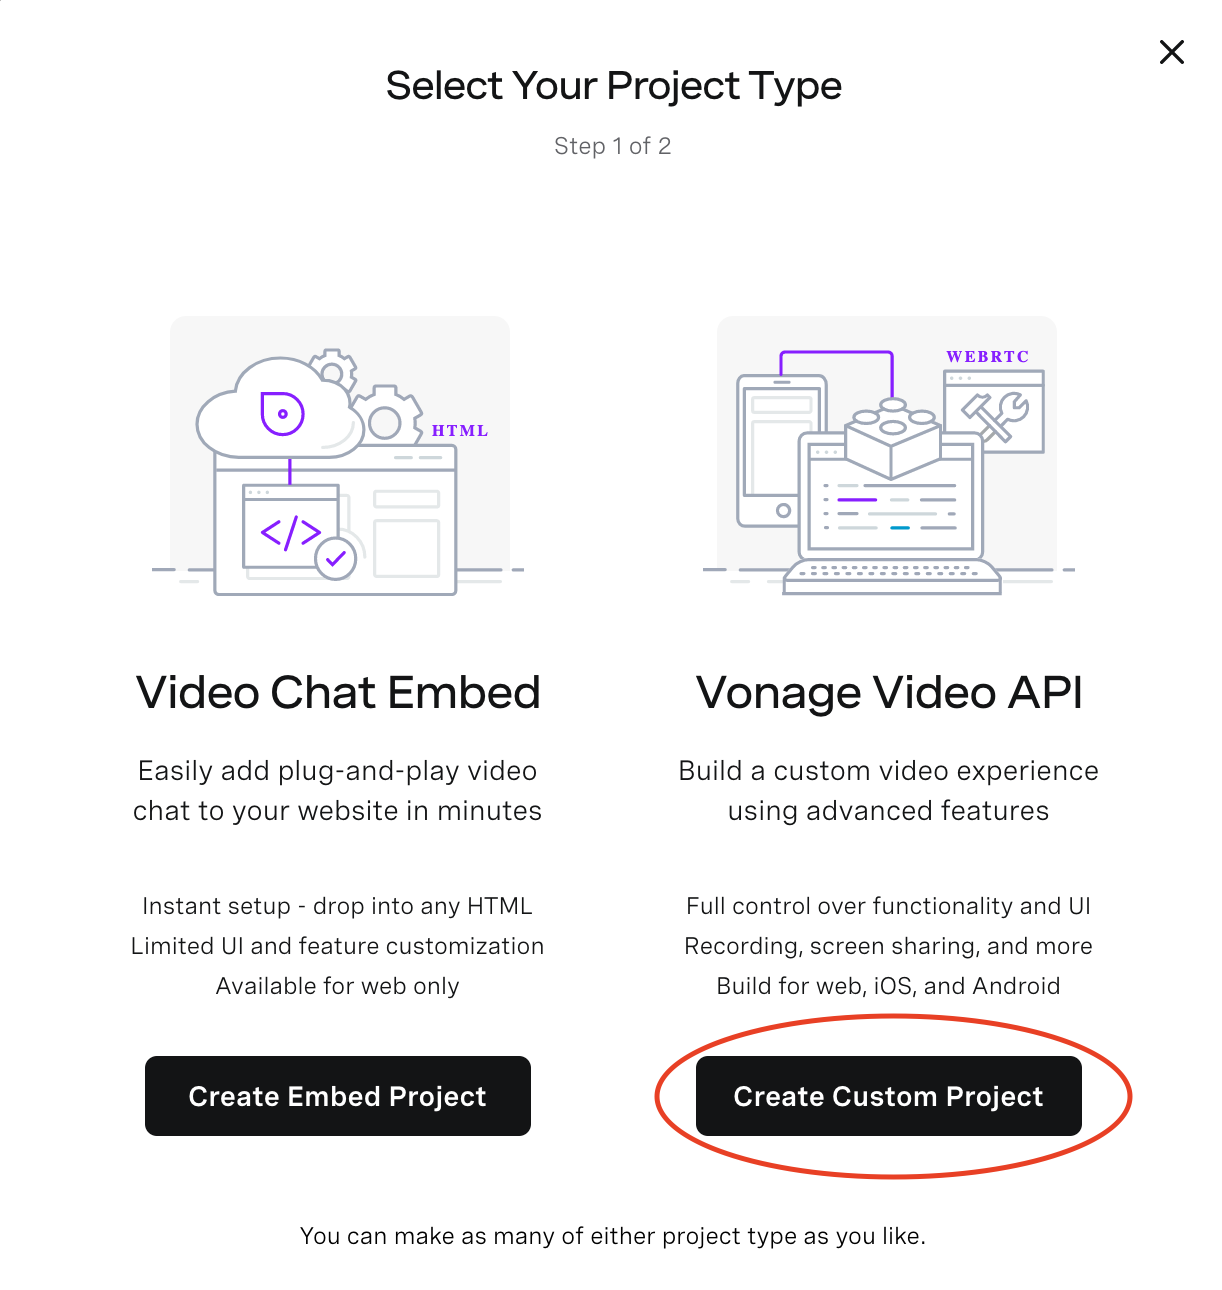
Then, add a project name and select VP8 as the preferred codec:
When streaming video, a codec encodes the camera’s video output to transport it across the network, then decodes the video to display it on a device’s screen. Vonage provides two codecs:
- VP8: This codec runs as software in the memory of a device and works well at lower bit rates. It’s a mature video codec in the context of WebRTC. It’s better for working with large sessions with many connections.
- H.264: This is available as both a software and hardware codec, depending on the device. When running on hardware, it uses less CPU power than VP8. It’s a relatively new codec in the context of WebRTC. This means that each device may have a different implementation, resulting in varying quality. It isn’t as good as VP8 for handling lower bit rates or large sessions.
In this case, you’ll choose VP8 because you’re likely to use it in a production app that hosts a bigger tea party with more connections from different devices (and more cake).
Click Create, then copy the resulting API key:
In your Xcode project, open StreamingViewController.swift and paste your API key into apiKey
:
Creating a Session
Now, back in the Vonage Video API account portal, click View Project and scroll down to the Project Tools section:
This is where you’ll create a session ID and token. As the site explains, a session ID identifies a unique OpenTok session. You can think of the lounge in your Tea Party app as a session.
When creating a session, you use Media Mode to specify how clients in the session will send their video streams. There are two options:
- Relayed: Clients send streams directly between each other — that is, peer-to-peer — rather than using a server. This reduces latency and increases quality due to fewer network hops, but it won’t work if the devices are behind a firewall. A relayed session only supports two clients connected to the session.
- Routed: Clients send streams to each other via the OpenTok Media Router, which is a server that handles distributing the stream to multiple devices. This offers advantages such as the ability to record the stream; audio-fallback when a device has connectivity issues; bandwidth reduction in multi-party sessions and more.
For this app, select Routed as the Media Mode, then click Create Session ID. Copy-paste the given session ID into sessionId
in StreamingViewController.swift, as you did with the API key.
Generating the Token
A token verifies each user’s identity. In a production app, each user would have their own unique token generated by a server. However, for simplicity, you’ll use the same token for each user for this project.
Each token has a role associated with it, which determines the capabilities of the client that connects to the session. There are three possible roles:
- Subscriber: Connects to a session and receives the other client’s streams. The client can’t publish their own camera to the session.
- Publisher: Receives streams and publishes their own camera to a session.
- Moderator: Has the ability to force other clients to disconnect from, and/or stop publishing to, a session.
In the token generation section of the account portal, paste your session ID, then set Role to Publisher, and Expiration Time to 30 days. The Connection Data field should be empty, in this case. In a production app, you’d typically use this to pass in a user ID, name or other data to describe the user.
Next, click Generate token and copy-paste the result into token
in StreamingViewController.swift:
Now, you have the credentials you need to authenticate and start streaming your virtual tea party with the Vonage Video API. It’s time to put the kettle on!
Connecting to the Session
Before you can start livestreaming, you need to connect to the session.
To do this, head to StreamingViewController.swift. Below the token
property, add the following:
private var session: OTSession?
OpenTok uses an OTSession to represent your session. Here, you’re keeping a strong reference to your session object.
Now, to connect to a session add the following code below leave()
:
private func connectToSession() {
// 1
session = OTSession(
apiKey: apiKey,
sessionId: sessionId,
delegate: self
)
// 2
var error: OTError?
session?.connect(withToken: token, error: &error)
// 3
if let error = error {
print("An error occurred connecting to the session", error)
}
}
Here’s what’s happening:
- Initialize
OTSession
with yourapiKey
andsessionId
. Set the delegate toStreamingViewController
. Setting the delegate will cause a compiler error as you have not yet madeStreamingViewController
conform toOTSessionDelegate
. - Connect to the session using your token and pass in a reference to an
OTError
to catch any synchronous errors.OTError
defines errors specific to the OpenTok iOS SDK. - If a synchronous error did occur, print it to the console.
Since you set the delegate of OTSession
to self
, you’ll need to implement the OTSessionDelegate
protocol. Add the following extension at the bottom of StreamingViewController.swift:
// MARK: - OTSessionDelegate
extension StreamingViewController: OTSessionDelegate {
// 1
func sessionDidConnect(_ session: OTSession) {
print("The client connected to the session.")
}
// 2
func sessionDidDisconnect(_ session: OTSession) {
print("The client disconnected from the session.")
}
// 3
func session(_ session: OTSession, didFailWithError error: OTError) {
print("The client failed to connect to the session: \(error).")
}
// 4
func session(_ session: OTSession, streamCreated stream: OTStream) {
print("A stream was created in the session.")
}
// 5
func session(_ session: OTSession, streamDestroyed stream: OTStream) {
print("A stream was destroyed in the session.")
}
}
This code handles events relating to the session. Specifically, when:
- You successfully connect to the session.
- You successfully disconnect from the session.
- An asynchronous error occurs while trying to connect to the session.
- Someone else publishes their video stream to the session. This provides an
OTStream
, which represents their stream. - Someone else stops publishing their video stream to the session.
You’re almost ready to try out your app, but you still need to actually connect to the session.
To do this, add the following at the bottom of viewDidLoad()
:
connectToSession()
Build and run, then enter the lounge. The screen will still be black, but you’ll notice in the console that you’ve successfully connected to the session:
Publishing the Camera
Now that you can connect to the session, it’s time to publish your camera and microphone.
Add the following below connectToSession()
:
private func publishCamera() {
// 1
guard let publisher = OTPublisher(delegate: nil) else {
return
}
// 2
var error: OTError?
session?.publish(publisher, error: &error)
// 3
if let error = error {
print("An error occurred when trying to publish", error)
return
}
// 4
guard let publisherView = publisher.view else {
return
}
// 5
let screenBounds = UIScreen.main.bounds
let viewWidth: CGFloat = 150
let viewHeight: CGFloat = 267
let margin: CGFloat = 20
publisherView.frame = CGRect(
x: screenBounds.width - viewWidth - margin,
y: screenBounds.height - viewHeight - margin,
width: viewWidth,
height: viewHeight
)
view.addSubview(publisherView)
}
Here’s what this code does:
- Initialize an
OTPublisher
object. This object can capture an audio-video stream from the device’s microphone and camera. - Publish an audio-video stream to the session and pass in a reference to
OTError
to catch any synchronous errors. - If a synchronous error did occur, print it to the console.
- Get the view from the publisher, which contains the video captured from the device’s camera. Since the simulator doesn’t have a camera, it substitutes in a default video.
- Add the view as a subview in the corner of
StreamingViewController
.
OTPublisher
‘s delegate to nil
here, but you could implement OTPublisherDelegate
to handle events related to the publisher, such as asynchronous errors. You could also use it to pass settings to OTPublisher
to adjust the camera resolution, audio fallback settings, video scaling behavior and more.
Next, to publish the camera when a connection has been established, inside sessionDidConnect(_:)
, add the following after print
:
publishCamera()
Build and run and you’ll see the simulator’s default video of a spinning teapot in the bottom-right. How apt! You’re now livestreaming in the session. If you were to run this code on a device, you’d see your camera’s video instead. Congratulations, you now have half a tea party! :]
Subscribing to an Incoming Stream
Before you can see a video stream from another client who’s publishing to the session, you need to subscribe to it.
Below the token
property add the following:
private var subscriberView: UIView?
This will keep a strong reference to the view that holds the video stream of the other client.
Now, add the following code below publishCamera()
:
private func subscribe(to stream: OTStream) {
// 1
guard let subscriber = OTSubscriber(stream: stream, delegate: nil) else {
return
}
// 2
var error: OTError?
session?.subscribe(subscriber, error: &error)
// 3
if let error = error {
print("An error occurred when subscribing to the stream", error)
return
}
// 4
guard let subscriberView = subscriber.view else {
return
}
// 5
self.subscriberView = subscriberView
subscriberView.frame = UIScreen.main.bounds
view.insertSubview(subscriberView, at: 0)
}
Here’s what’s going on in this code:
- Create
OTSubscriber
usingOTStream
, which represents the video stream of another device. - Subscribe to this stream and pass in a reference to
OTError
to catch any synchronous errors. - If a synchronous error did occur, print it to the console.
- Get the view from the subscriber. This view contains the stream’s video.
- Keep a reference to the view and insert that view below the subviews of
StreamingViewController
. This view is the same size as the screen’s bounds and will fill the screen.
OTSubscriber
‘s delegate to nil
here. Implementing the OTSubscriberDelegate
protocol enables you to handle events related to the subscriber.
Finally, at the bottom of session(_:streamCreated:)
, add:
subscribe(to: stream)
This makes you subscribe to a stream whenever it’s created.
To have a two-way livestream in your app, you either need a friend with another device or another iOS simulator. In this case, build and run using the iPhone 12 Pro simulator. Then, stop running the app, select the iPhone 12 simulator and build and run again.
Now, on the iPhone 12 Pro simulator, tap the TeaParty app to open it again and you’ll have two simulators running the app at the same time. Enter the lounge on both simulators and you’ll see two spinning teapots on each device:
The two simulators are having a virtual tea party — they’re both publishing their video to the session and subscribing to each other’s video stream!
Disconnecting From the Session
Press the Leave button and you’ll notice the app doesn’t call sessionDidDisconnect()
. That’s because the session is still connected. When leaving a session, it’s important that you make sure to disconnect from it.
In StreamingViewController.swift, replace the body of leave()
with the following:
var error: OTError?
session?.disconnect(&error)
if let error = error {
print("An error occurred disconnecting from the session", error)
} else {
navigationController?.popViewController(animated: true)
}
This disconnects you from the session, which automatically unpublishes your stream when you tap the Leave button. It then pops the current view controller from the navigation stack, if no synchronous error occurred when disconnecting.
Inside session(_:streamDestroyed:)
, add the following code at the bottom:
subscriberView?.removeFromSuperview()
This removes the subscriber’s view from the screen when they stop publishing their stream in the session.
Now, build and run and double-check that leaving and entering the lounge works as you expect.
And, just like that, you now have a fully functioning app ready to install onto real devices so you can have a virtual tea party with your friend! :]
Where to Go From Here?
Download the completed project files by clicking the Download Materials button at the top or bottom of the tutorial.
In this tutorial, you learned a lot about how to create a livestreaming event. You got to know important terms like WebRTC, HLS and RTMP, you set up your Vonage Video API account and you built a two-way live video streaming app using the Vonage Video API.
However, this project just scraped the surface of the Vonage Video API’s capabilities. There’s still plenty to learn, including:
- Archiving: Record, save and retrieve sessions.
- Signaling: Send text and data between clients connected to the session.
- Server integration: Handle interactions between the client and server SDKs to automatically distribute tokens, session IDs and more.
- Broadcasts: Set up HLS, RTMP and WebRTC broadcasts simultaneously.
- SIP Interconnect: Add audio from a VoIP call to a session.
- Voice-only: Set up voice-only sessions.
If you want to learn more about the capabilities of the Vonage Video API, check out their developer guides.
Also make sure you read about iOS video streaming using Apple’s frameworks in our Video Streaming Tutorial for iOS.
I hope you enjoyed this tutorial. If you have any questions or comments, join the discussion below.
Comments