Reactive Programming with RxAndroid in Kotlin: An Introduction
Learn about how Reactive programming is a whole new paradigm using RxJava and RxAndroid in Android with Kotlin. By Kyle Jablonski.
The Map Operator
The map operator applies a function to each item emitted by an observable and returns another observable that emits results of those function calls. You’ll need this to fix the threading issue as well.
If you have an observable called numbers that emits the following:
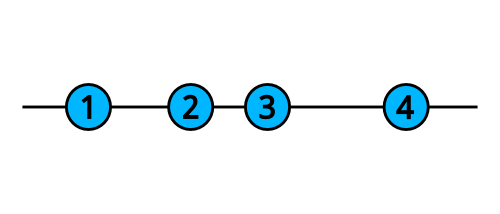
And if you apply map as follows:
numbers.map { number -> number * number }
The result would be the following:
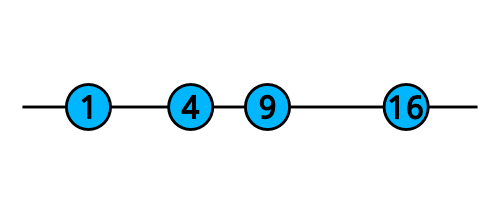
That’s a handy way to iterate over multiple items with little code. Let’s put it to use!
Modify onStart() in CheeseActivity class to look like the following:
override fun onStart() {
  super.onStart()

  val searchTextObservable = createButtonClickObservable()

  searchTextObservable
      // 1
      .subscribeOn(AndroidSchedulers.mainThread())
      // 2
      .observeOn(Schedulers.io())
      // 3
      .map { cheeseSearchEngine.search(it) }
      // 4
      .observeOn(AndroidSchedulers.mainThread())
      .subscribe {
        showResult(it)
      }
}
Going over the code above:
- First, specify that code down the chain should start on the main thread instead of on the I/O thread. In Android, all code that works with
Viewshould execute on the main thread. - Specify that the next operator should be called on the I/O thread.
- For each search query, you return a list of results.
- Finally, make sure that the results are passed to the list on the main thread.
Build and run your project. Now the UI should be responsive even when a search is in progress.
Show Progress Bar with doOnNext
It’s time to display the progress bar!
For that you’ll need a doOnNext operator. doOnNext takes a Consumer and allows you to do something each time an item is emitted by observable.
In the same CheeseActivity class modify onStart() to the following:
override fun onStart() {
  super.onStart()

  val searchTextObservable = createButtonClickObservable()

  searchTextObservable
      // 1
      .observeOn(AndroidSchedulers.mainThread())
      // 2
      .doOnNext { showProgress() }
      .observeOn(Schedulers.io())
      .map { cheeseSearchEngine.search(it) }
      .observeOn(AndroidSchedulers.mainThread())
      .subscribe {
        // 3
        hideProgress()
        showResult(it)
      }
}
Taking each numbered comment in turn:
- Ensure that the next operator in chain will be run on the main thread.
- Add the
doOnNextoperator so thatshowProgress()will be called every time a new item is emitted. - Don’t forget to call
hideProgress()when you are just about to display a result.
Build and run your project. You should see the progress bar appear when you initiate the search:

Observe Text Changes
What if you want to perform search automatically when the user types some text, just like Google?
First, you need to subscribe to TextView text changes. Add the following function to the CheeseActivity class:
// 1
private fun createTextChangeObservable(): Observable<String> {
  // 2
  val textChangeObservable = Observable.create<String> { emitter ->
    // 3
    val textWatcher = object : TextWatcher {

      override fun afterTextChanged(s: Editable?) = Unit

      override fun beforeTextChanged(s: CharSequence?, start: Int, count: Int, after: Int) = Unit

      // 4
      override fun onTextChanged(s: CharSequence?, start: Int, count: Int, after: Int) {
        s?.toString()?.let { emitter.onNext(it) }
      }
    }

    // 5
    queryEditText.addTextChangedListener(textWatcher)

    // 6
    emitter.setCancellable {
      queryEditText.removeTextChangedListener(textWatcher)
    }
  }

  // 7
  return textChangeObservable
}
Here’s the play-by-play of each step above:
- Declare a function that will return an observable for text changes.
- Create
textChangeObservablewithcreate(), which takes anObservableOnSubscribe. - When an observer makes a subscription, the first thing to do is to create a
TextWatcher. - You aren’t interested in
beforeTextChanged()andafterTextChanged(). When the user types andonTextChanged()triggers, you pass the new text value to an observer. - Add the watcher to your
TextViewby callingaddTextChangedListener(). - Don’t forget to remove your watcher. To do this, call
emitter.setCancellable()and overwritecancel()to callremoveTextChangedListener() - Finally, return the created observable.
To see this observable in action, replace the declaration of searchTextObservable in onStart() of CheeseActivity as follows:
val searchTextObservable = createTextChangeObservable()
Build and run your app. You should see the search kick off when you start typing text in the TextView:

Filter Queries by Length
It doesn’t make sense to search for queries as short as a single letter. To fix this, let’s introduce the powerful filter operator.
filter passes only those items which satisfy a particular condition. filter takes in a Predicate, which is an interface that defines the test that input of a given type needs to pass, with a boolean result. In this case, the Predicate takes a String and returns true if the string’s length is two or more characters.
Replace return textChangeObservable in createTextChangeObservable() with the following code:
return textChangeObservable.filter { it.length >= 2 }
Everything will work exactly the same, except that text queries with length less than 2 won’t get sent down the chain.
Run the app; you should see the search kick off only when you type the second character:


Debounce Operator
You don’t want to send a new request to the server every time the query is changed by one symbol.
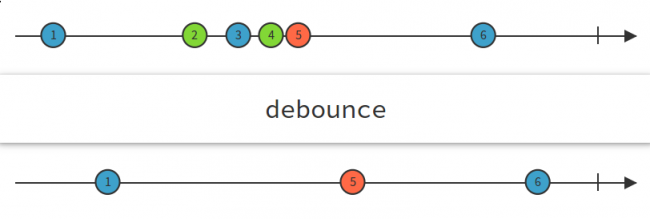
debounce is one of those operators that shows the real power of reactive paradigm. Much like the filter operator, debounce, filters items emitted by the observable. But the decision on whether the item should be filtered out is made not based on what the item is, but based on when the item was emitted.
debounce waits for a specified amount of time after each item emission for another item. If no item happens to be emitted during this wait, the last item is finally emitted:
In createTextChangeObservable(), add the debounce operator just below the filter so that the return statement will look like the following code:
return textChangeObservable
      .filter { it.length >= 2 }
      .debounce(1000, TimeUnit.MILLISECONDS) // add this line
Run the app. You’ll notice that the search begins only when you stop making quick changes:

debounce waits for 1000 milliseconds before emitting the latest query text.
Merge Operator
You started by creating an observable that reacted to button clicks and then implemented an observable that reacts to text field changes. But how do you react to both?
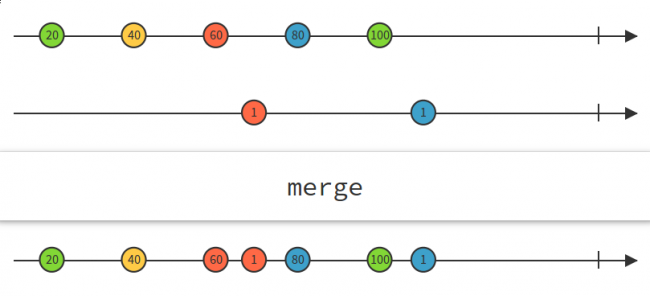
There are a lot of operators to combine observables. The most simple and useful one is merge.
merge takes items from two or more observables and puts them into a single observable:
Change the beginning of onStart() to the following:
val buttonClickStream = createButtonClickObservable()
val textChangeStream = createTextChangeObservable()

val searchTextObservable = Observable.merge<String>(buttonClickStream, textChangeStream)
Run your app. Play with the text field and the search button; the search will kick off either when you finish typing two or more symbols or when you simply press the Search button.