User Authentication on iOS with Ruby on Rails and Swift
Learn how to secure your iOS app by adding user accounts using Swift and a custom Ruby on Rails backend. By Subhransu Behera.
Update 05/13/2015 Updated for Xcode 6.3 / Swift 1.2.
Authentication is often the foundation in most iOS applications. Whether you’re next app is the next Instagram or Facebook, the user needs to be able to open the door to the wonderful universe you create with Sign up and Sign In functions.
In a mobile environment, you’d typically implement this essential function by exposing your user services’ APIs to the app and allowing it to make changes on your server. While this sounds relatively straight forward, there is an elephant in the room — you need to do all you can to protect your user’s security and privacy.
In this tutorial you’ll:
- Learn how to deploy your own Ruby on Rails application server on Heroku
- Build a Swift application that interacts with the backend server to authenticate your user
- Learn the concepts of secure API design and storage
- Capture the moment with a selfie
What’s all this about a selfie? Well, you’ll need something practical to work with, and all the cool kids take selfies, so you’ll build an app that lets the user sign-in to your service and upload their selfie. From ducklips to crazy eyes, the user will be able to safely and securely upload and manage a gallery of selfies, all without concern over whether their image will get out to the masses and become the next meme victim on Social.
Here’s a video demoing the app that you’ll build:
Getting Started
First order of business is to set up your Heroku account and deploy the Rails backend for the app to use.
Setting Up Your Rails Application
Start by cloning the railsauth git repository. This is a simple Ruby on Rails app that already includes all the functionality your app needs. You’ll deploy this directly on Heroku, so there’s no need for you to install Ruby on Rails locally.
Open the terminal, which you can find in Applications\Utilities\Terminal, and type:
git clone https://github.com/subhransu/railsauth
If you don’t already have git installed on your Mac then you can follow this guide.
Heroku Account Creation
Next, create a Heroku account so you can deploy Rails.
If you have an existing Heroku account and have already installed the Heroku Toolbelt for Mac then you can skip directly to the next section.
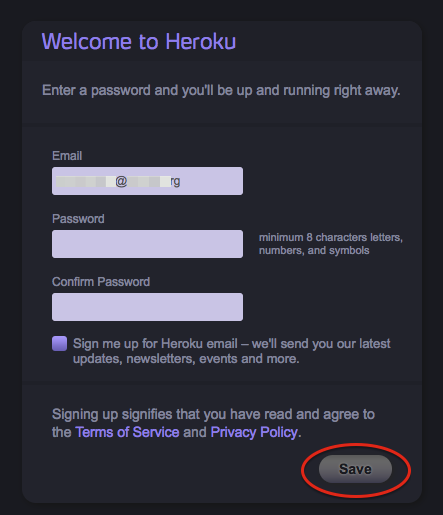
Go to heroku.com and click Sign up for free

Enter your email address and click Sign Up

Check your inbox for an email from Heroku and click on the verification link in-order to verify your email.

Enter a password of your choice and click Save to complete the registration process.
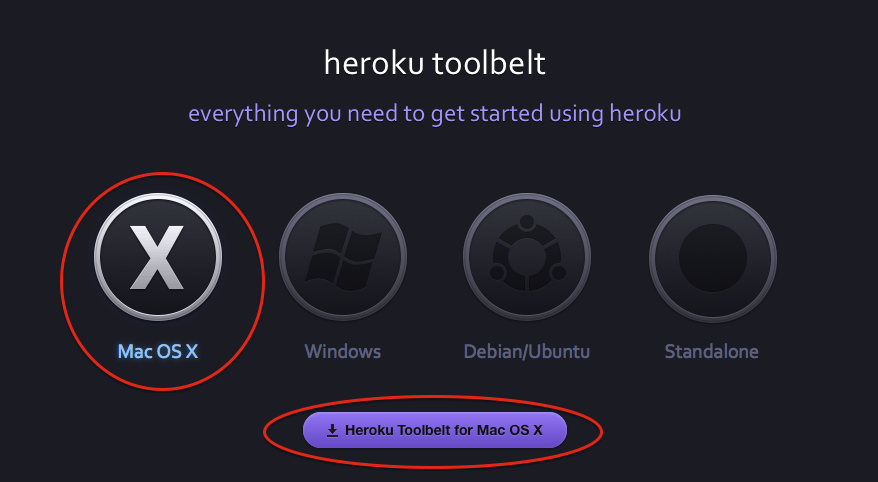
Next, download the Heroku Toolbelt for Mac OS X
Locate the heroku-toolbelt.pkg file you just downloaded and double-click it to launch the installer.

When installation has finished you can quit the installer.
Deploying Rails Application on Heroku
Open the Terminal and type:
heroku login
Enter your Heroku email and password and press Enter. If you’re prompted to create an SSH key, then type Y and press Enter
Your Heroku account does not have a public ssh key uploaded.
Could not find an existing public key at ~/.ssh/id_rsa.pub
Would you like to generate one? [Yn] Y
You’ll see an “Authentication Successful” message on the Terminal. That’s your cue that the basic setup is done and you’re ready to create your first Heroku application.
Type the following into the Terminal:
heroku create
Take a note of both your Heroku application and git repository urls, which will look like this:
Creating XXXXX-XXX-1234... done, stack is cedar
http://XXXXX-XXX-1234.herokuapp.com/ | git@heroku.com:XXXXX-XXX-1234.git
Now it’s back to the Rails application you cloned earlier — you’ve not forgotten about it have you? :]
In the Terminal, change the directory to the railsauth application directory:
cd ~/location/where/you/cloned/railsauth/directory
Next, add your Heroku repository as a remote branch by using the git repo url you noted when you created the application. Enter the following, but replace the placeholder text with your url:
git remote add heroku git@heroku.com:XXXXX-XXX-1234.git
To deploy the railsauth application on Heroku, type:
git push heroku master
If it prompts you to approve the connection to Heroku, simply type yes.
The authenticity of host 'heroku.com (50.19.85.132)' can't be established.
RSA key fingerprint is 8b:48:5e:67:0e:c9:16:47:32:f2:87:0c:1f:c8:60:ad.
Are you sure you want to continue connecting (yes/no)? yes
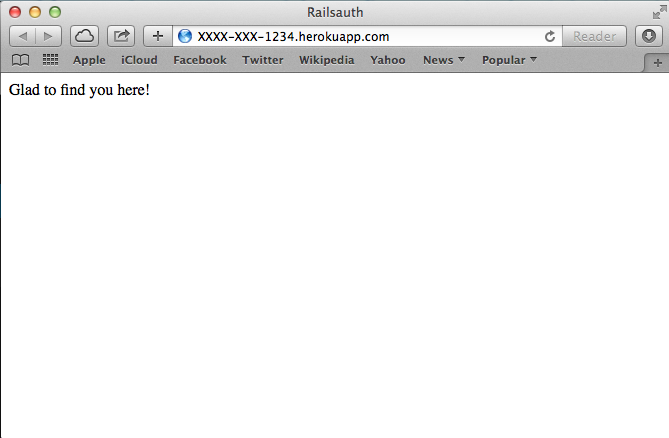
Congratulations! You’ve successfully deployed your Rails app on Heroku. You can verify this by typing:
heroku open
This will open the application in your browser and you’ll see the friendly message, “Glad to find you here!”
Now enter the following into the Terminal:
heroku run rake db:migrate
This runs a Rails migration which creates the necessary database tables on Heroku.

There are two more steps you need to complete before you can start working on the Swift application.
Configuring Amazon S3 (Simple Storage Service)
You’ll store selfies on Amazon S3 (Simple Storage Service). This is a popular service for developers who need to cheaply store and retrieve files. Web developers often use S3 to store their media assets.
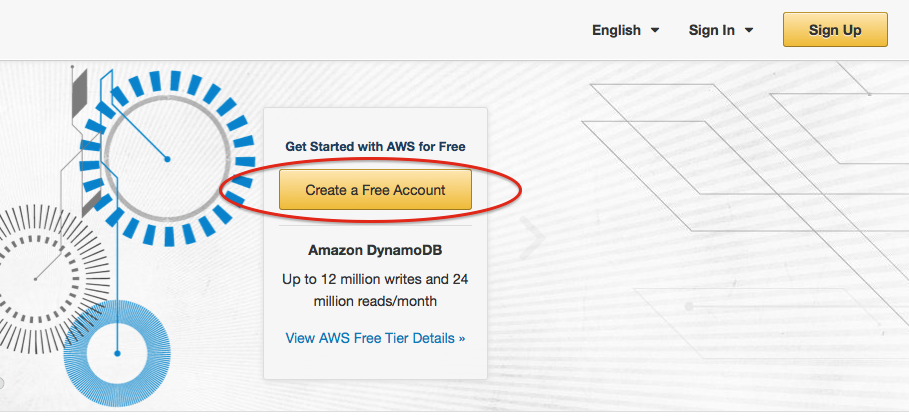
Go to the Amazon Web Service (AWS) Portal and click Create a Free Account
Follow the on-screen instructions to create a free account, and select I am a new user.
Note: You may need to provide your credit card details. Amazon won’t charge you for 12 months, so long as you don’t exceed their Free Tier usage.
The Free Tier is more than sufficient for this tutorial and other basic projects. You can cancel the subscription at any time if you no longer wish to use S3 or any of the other services provided by Amazon.
Next, go to Amazon Web Service (AWS) Portal and click on Sign In.
Click S3 to go to S3 management console:

Click on Create Bucket to create an S3 bucket.

S3 buckets are collections of objects, and you can store any number of objects in your bucket, kind of like a digital bag of holding. It acts much like a folder on your Mac, but it’s more fun to think of it with a mystical twist.
Enter the name of the bucket as yourname-railsauth-assets and choose your region from the drop down. Make sure you take a note of this name. Next, click Create to make an S3 bucket.
Note: Prefix the bucket with your name or username. Buckets on S3 have to be unique across all of S3. You can read more about bucket naming here.

You’ll need to use your AWS security credentials in the Rails application to store selfies on S3.
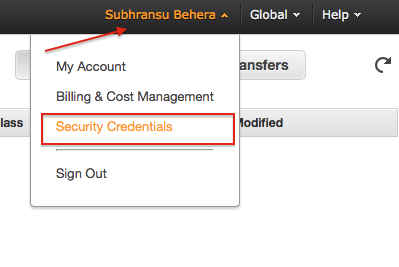
In the Amazon Web Services Portal click on your name in the top-right corner and choose Security Credentials from the drop down menu.
Expand the Access Keys (Access Key ID and Secret Access Key) section by clicking the +.

Click Create New Access Key.

Click Show Access Key to obtain your Access Key ID and your Secret Key.
Note: Download the key file so you have a backup of the keys. You won’t be able to re-obtain your secret key if you lose it. Hence the need to download and stash it away somewhere safe.