LiquidFun Tutorial with Metal and Swift – Part 1
In this LiquidFun tutorial, you’ll learn how to simulate water on iOS using LiquidFun, and render it on screen with Metal and Swift. By Allen Tan.
Update 5/12/2015: Updated for Xcode 6.3 / Swift 1.2.
Fluid dynamics and liquid simulation in games can be extremely difficult topics to digest. Without a good handle on physics and math concepts, it could take the average programmer months to accomplish what games like Where’s My Water and Sprinkle have done.
Thankfully, a group of talented engineers at Google have decided to lend us all a hand by giving us LiquidFun, an open-source multi-platform 2D physics engine. LiquidFun is built on top of Box2D, so while Box2D excels at 2D rigid body simulation, LiquidFun adds both particle-based fluid simulation and soft body simulation to the mix.
In this LiquidFun tutorial series, you’re going to learn the basics of making procedurally animated 2D water. You’ll use LiquidFun to simulate the motion of water particles, and Apple’s new GPU-accelerated 3D graphics API, called Metal, to render the water particles onscreen.
If you’re new to:
- Swift: Check out our quick-start Swift tutorial.
- Metal: Check out our Metal tutorial for beginners.
- Objective-C: Check out our Objective-C crash course.
- C++: Check out our introduction to C++ tutorial.
Getting Started
The first step is to create a Swift project. Launch Xcode (6 or higher), go to File\New\Project…, choose the iOS\Application\Single View Application template and click Next.
Fill out the options as follows:
- Product Name: LiquidMetal
- Language: Swift
- Devices: Universal
Click Next, choose a folder for your project and click Create.
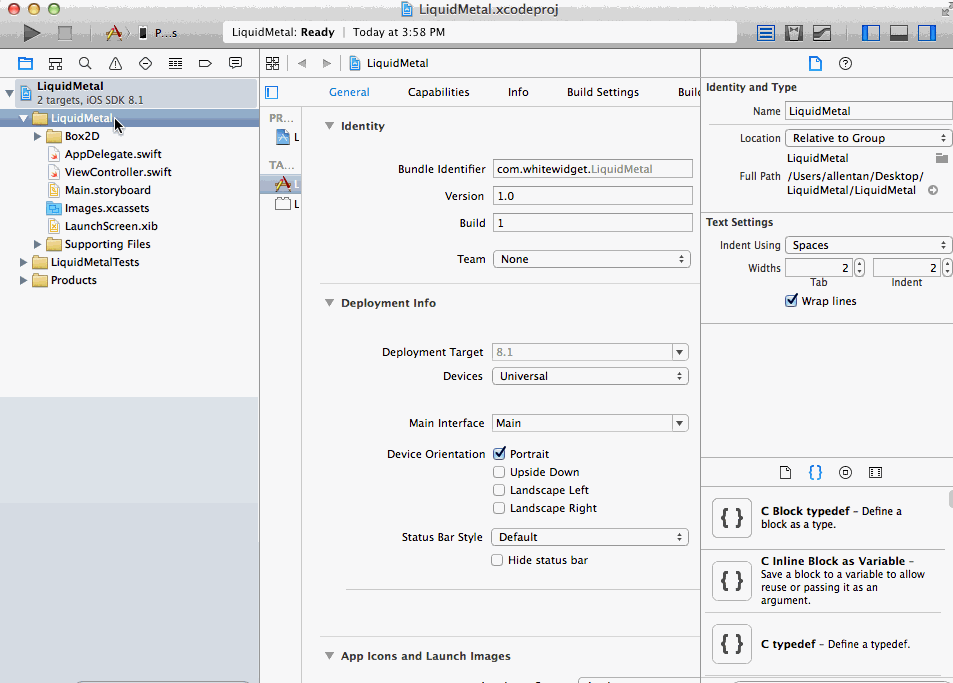
This is a portrait-only application, so open the Target Settings screen and in the General tab, make sure only Portrait is checked in the Device Orientation section:

To add LiquidFun to your project, download the latest stable version of LiquidFun (version 1.1.0 or later) and unarchive the package to a directory of your choice. For this example, I chose my Downloads directory.
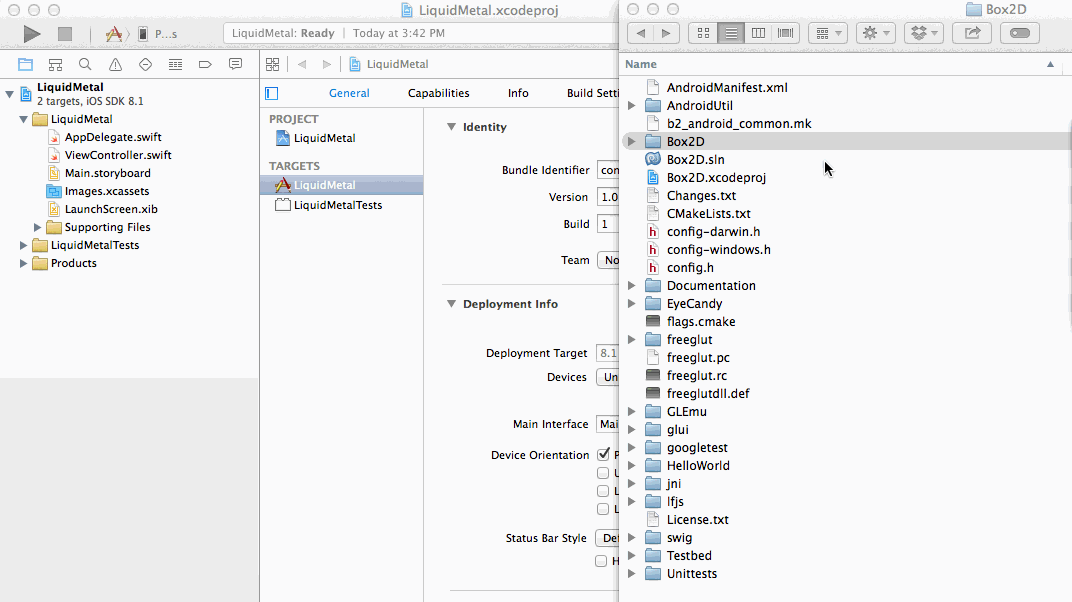
Drag the liquidfun-1.1.0/liquidfun/Box2D/Box2D folder into your Xcode project. Make sure that Destination: Copy items if needed is checked, Added folders: Create groups is selected and Add to targets: LiquidMetal is checked, as shown below:
Because LiquidFun supports multiple platforms, it includes a lot of files that you won’t need for this tutorial. You need to remove the non-Xcode supported files so your project can build properly.
In your Xcode project directory, command-click the following unneeded files:
- Box2D/Box2D.vxcproj
- Box2D/Box2D.vcxproj.filters
- Box2D/Box2DConfig.cmake.in
- Box2D/CMakeLists.txt
- Box2D/UseBox2D.cmake
- Box2D/Documentation
- Box2D/Particle/b2ParticleAssembly.h
- Box2D/Particle/b2ParticleAssembly.neon.s
- Box2D/Particle/b2ParticleAssembly.cpp
Once you’ve selected them all, right-click on the group and choose Delete. Choose Remove References when prompted. Xcode will keep the files in your project directory but exclude them from your project. The GIF below demonstrates this process:
Build and run. You’ll encounter multiple “file not found” issues like the ones shown in the following image:

You’re getting these errors because of how LiquidFun refers to its files internally. To fix them, you need to tell the compiler to look for header files inside the LiquidMetal folder you added to your project. Open the Target Settings screen, and in the Build Settings tab, add the following line to the Header Search Paths field:
$(SRCROOT)/LiquidMetal
This simply includes your project’s root directory to the header search paths – this way when you include a file with a path like Box2D/Particle/b2Particle.h it will resolve correctly.
Your target’s Header Search Paths should look like the following:

That’s it! You’ve added LiquidFun to your Swift project. Build and run on any supported device or the iOS Simulator, and you should see the default splash screen transitioning to an empty view.

Creating a LiquidFun Wrapper
As a C++ library, LiquidFun can’t be used directly with Swift. This is because you can’t invoke C++ code from a Swift source file, nor, for that matter, can you invoke Swift code from a C++ source file. However, there’s a common link between the two languages: Objective-C.
Apple designed Swift to be interoperable with Objective-C; you can use Objective-C APIs in Swift and vice versa. Objective-C is also interoperable with C++, and you can use both languages in Objective-C++ source files.
To use LiquidFun in Swift, you have to create a wrapper class. This wrapper class will have a public interface written in Objective-C and an underlying implementation using Objective-C++.
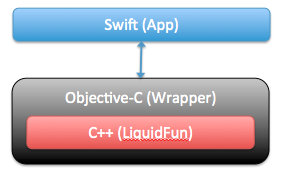
The Objective-C layer is like a black box: Swift will only interact with Objective-C methods, without caring about how Objective-C does its business.
Let’s get started. Right-click the LiquidMetal group in the Project Navigator and select New File…, then select the iOS\Source\Cocoa Touch Class template and click Next. Call the class LiquidFun, enter NSObject into the Subclass of field and select Objective-C for the Language field. Click Next and then Create.
Select LiquidFun.m in your Project Navigator and left-click on it once more to rename the file. Change its name to LiquidFun.mm.
Changing the file’s extension to mm instructs Xcode to treat that file’s contents as Objective-C++ instead of Objective-C. If you hadn’t done that, you’d get errors later when you tried to compile this class.
With the LiquidFun class, you now have a place to mix Objective-C and C++ code together. The next step is to import this file into your Swift code. To do this, you need to create an Objective-C bridging header.
Right-click the LiquidMetal group in the Project Navigator and select New File…, then select the iOS\Source\Header File template and click Next. Name the file Bridging-Header and click Create.
Open Bridging-Header.h and add this line right below #define LiquidMetal_Bridging_Header_h:
#import "LiquidFun.h"
You can use all Objective-C headers exposed in this bridging header directly in any Swift source file in your project. In addition, you can interact with your Objective-C code using Swift syntax. Neat!
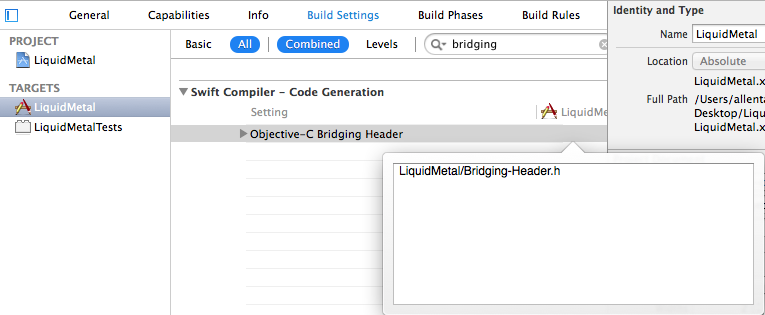
You have to tell the compiler about your Objective-C bridging header. Open the Target Settings screen, and in the Build Settings tab, add the following line to the Objective-C Bridging Header field:
LiquidMetal/Bridging-Header.h
The line you’ve added, shown in the following image, specifies the header file complete with its path from the root of the project.
You can now work seamlessly between C++, Objective-C and Swift. Build and run to confirm that your project is still working as expected.

LiquidFun wrapper class.