Creating Snow Trails in Unreal Engine 4
In this Unreal Engine 4 tutorial, you will learn how to create deformable snow trails using a scene capture and render targets By Tommy Tran.
If you’ve been playing recent AAA games, you may have noticed a trend in snow covered landscapes. A few examples are Horizon Zero Dawn, Rise of the Tomb Raider and God of War. In all of these games, one thing stands out about the snow: you can create snow trails!
Allowing the player to interact with the environment like this is a great way to increase immersion. It makes the environment feel more realistic and let’s face it — it’s just really fun. Why spend hours designing fun mechanics when you can just plop on the ground and make snow angels?
In this tutorial, you will learn how to:
- Create trails by using a scene capture to mask out objects close to the ground
- Use the mask in the landscape material to create deformable snow
- Only show trails around the player for optimization
- Part 1: Painting With Render Targets
- Part 2: Deformable Snow (you are here!)
- Part 3: Interactive Grass
Getting Started
Start by downloading the materials for this tutorial (you can find a link at the top or bottom of this tutorial). Unzip it and navigate to SnowDeformationStarter and open SnowDeformation.uproject. For this tutorial, you will create trails using a character and a few boxes.

Before we start, you should know that the method in this tutorial will only store trails in a defined area rather than the entire world. This is because performance depends on the render target’s resolution.
For example, if you want to store trails for a large area, you would need to increase the resolution. But this also increases the scene capture’s performance impact and render target’s memory size. To optimize this, you need to limit the effective area and resolution.
Now that we have that out of the way, let’s look at what you need to create snow trails.
Snow Trails Implementation
The first thing you need to create trails is a render target. The render target will be a grayscale mask where white indicates a trail and black is no trail. You can then project the render target onto the ground and use it to blend textures and displace vertices.

The second thing you need is a way to mask out only the snow-affecting objects. You can do this by first rendering the objects to Custom Depth. Then, you can use a scene capture with a post process material to mask out any objects rendered to Custom Depth. You can then output the mask to a render target.
The important part of the scene capture is where you place it. Below is an example of the render target captured from a top-down view. Here, the third person character and boxes have been masked out.

At first glance, a top-down capture looks like the way to go. The shapes seem to be accurate to the meshes so there should be no problem, right?
Not exactly. The issue with a top-down capture is that it does not capture anything underneath the widest point. Here’s an example:

Imagine the yellow arrows extending all the way to the ground. For the cube and cone, the arrowhead will always stay inside the object. However, for the sphere, the arrowhead will leave the sphere as it approaches the ground. But as far as the camera can tell, the arrowhead is always inside the sphere. This is what the sphere would look like to the camera:

This will cause the sphere’s mask to be larger than it should be, even though the area of contact with the ground is small.
An extension to this problem is that it is difficult to determine if an object is touching the ground.

A way to fix both of these issues is to capture from the bottom instead.
Capturing From the Bottom
Capturing from the bottom looks like this:

As you can see, the camera now captures the bottom side which is the side that touches the ground. This solves the "widest area" issue from the top-down capture.
To determine if the object is touching the ground, you can use a post process material to perform a depth check. This would check if the object’s depth is higher than the ground depth and lower than a specified offset. If both conditions are true, you can mask out that pixel.

Below is an in-engine example with a capture zone 20 units above the ground. Notice how the mask only appears when the object passes a certain point. Also notice that the mask becomes whiter the closer the object is to the ground.

First, let’s create a post process material to perform the depth check.
Creating the Depth Check Material
To do a depth check, you need to use two depth buffers. One for the ground and another for snow-affecting objects. Since the scene capture will only see the ground, Scene Depth will output the depth for the ground. To get the depth for objects, you just render them to Custom Depth.
First, you need to calculate each pixel’s distance to the ground. Open Materials\PP_DepthCheck and then create the following:

Next, you need to create the capture zone. To do this, add the highlighted nodes:
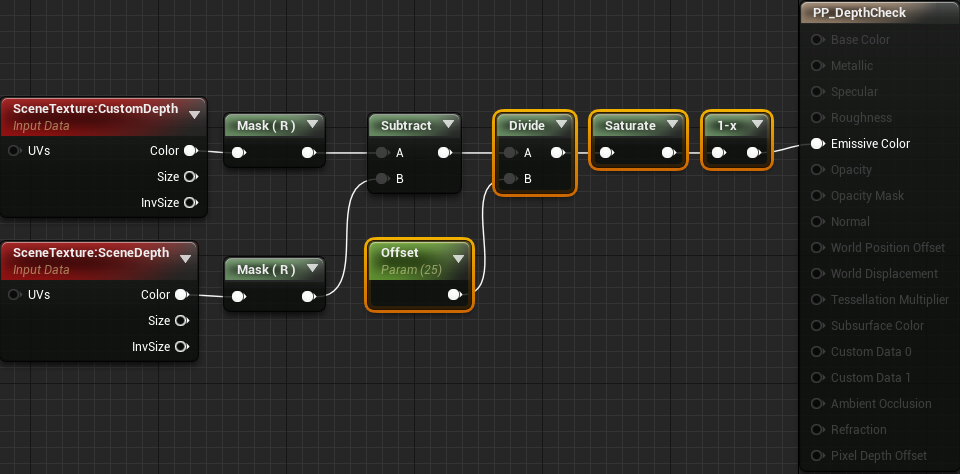
Now, if the pixel is within 25 units of the ground, it will show up in the mask. The masking intensity depends on how close the pixel is to the ground. Click Apply and then go back to the main editor.
Next, you need to create the scene capture.