Android Unit Testing with Mockito
In this Unit Testing with Mockito tutorial for Android, you will learn how to refactor an app in a way that makes it easy to write unit tests in Kotlin using Mockito. By Fernando Sproviero.
The need for writing tests in software development is often underestimated and relegated to later stages of a project. Sometimes not writing any tests is considered right for mobile apps.
You may have heard several excuses, a few of which are:
- “Mobile apps are frontend apps, the real logic is in the backend, so backend apps should be tested instead.”
- “Mobile apps are difficult to unit test, because most of the logic is done in the UI. At most, you should only care about UI tests.”
- “Mobile apps are “simple” or “tiny” compared to backend apps. Thus, effort should be put in the features instead of wasting time making tests.”
Mobile apps are actually becoming larger and more complex. Hence, teams are also growing in size.
Some companies even have separate teams that focus on specific features. And often, there’s another team that has to:
- Merge all the features.
- Upload the final build to Playstore/AppStore.
This increase in code complexity and team collaboration may jeopardize the proper functioning of your application.
Writing good tests can cover this!
In this tutorial, you’ll be refactoring a starter project to use the Model-View-Presenter presentation architecture pattern and write unit tests using Mockito.
But first of all, let’s take a look at the testing pyramid.
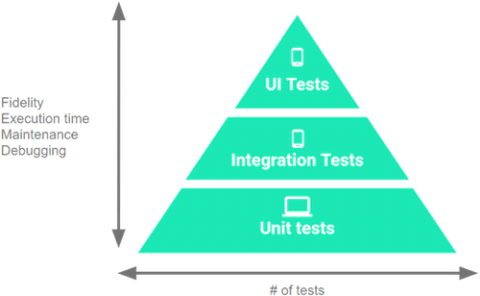
Testing pyramid
Tests are typically broken into three different kinds:
The Testing Pyramid, showing the three categories of tests that you should include in your app’s test suite
-
UI Tests:
These tests interact with the UI of your app, they emulate the user behavior and assert UI results. These are the slowest and most expensive tests you can write because they require a device/emulator to run. On Android, the most commonly used tools for UI testing are Espresso and UI Automator. -
Integration Tests:
When you need to check how your code interacts with other parts of the Android framework but without the complexity of the UI. These tests don’t require a device/emulator to run. On Android, the most common tool for integration testing is Roboelectric. -
Unit Tests:
The system under test (SUT) is one class and you focus only on it. All dependencies are considered to be working correctly (and ideally have their own unit tests :]), so they are mocked or stubbed.
These tests are the fastest and least expensive tests you can write because they don’t require a device/emulator to run. On Android, the most commonly used tools for unit testing are JUnit and Mockito.
A typical rule of thumb is to have the following split among the categories:
- UI Tests: 10%
- Integration Tests: 20%
- Unit Tests: 70%
Because unit tests are so important in the testing pyramid and also easy to write, this tutorial will focus on them.
Note: This tutorial assumes you have previous experience with developing for Android in Kotlin. If you are unfamiliar with the language have a look at this tutorial. If you’re beginning with Android, check out some of our Getting Started and other Android tutorials.
Getting started
Download the starter project. Extract the zip file but don’t open the project in Android Studio yet.
You’ll be working with this simple app named “IngrediSearch” that allows users to search for recipes and favorite them.

- Get your Food2Fork API key
- Create a keystore.properties file with the following content (including the quotes):
FOOD2FORK_API_KEY="YOUR API KEY" - Place this file in the root project.
With the keystore.properties file added, open the project in Android Studio 3.0.1 or greater.
Build and run the project to become familiar with the application features.
The project contains the following main files:
- MainActivity.kt: Contains the main screen.
- SearchActivity.kt: Allows the user to input ingredients.
- SearchResultsActivity.kt: Searches for recipes using the API and shows the results. It also provides the ability to add or remove favorites.
- RecipeActivity.kt: Shows the recipe detail.
- FavoritesActivity.kt: Shows the list of favorites.
- RecipeRepository.kt: Interacts with the API to search for recipes. It also stores the favorites in SharedPreferences.
- RecipeAdapter.kt: Adapter used to show the list in SearchResultsActivity and FavoritesActivity.
Before you start unit testing, it’s best to ask one very important question…
Is this unit testable?
By checking the source code you will find:
Logic in the Activities
class SearchActivity : ChildActivity() {

  override fun onCreate(savedInstanceState: Bundle?) {
    ...
    searchButton.setOnClickListener {
      // 1
      val query = ingredients.text.toString().trim()
      // 2
      if (query.isBlank()) {
        // 3
        Snackbar.make(searchButton, getString(R.string.search_query_required), Snackbar
            .LENGTH_LONG).show()
      } else {
        // 4
        startActivity(searchResultsIntent(query))
      }
    }
  }
}
When the user clicks the search button:
- Trim the ingredients text string entered by the user.
- Check if it’s blank.
- When it’s blank, then show an error message.
- If it’s not blank, then proceed to the next screen.
Activity doing everything
class SearchResultsActivity : ChildActivity() {

  private fun search(query: String) {
    // 1
    showLoadingView()
    // 2
    repository.getRecipes(query, object : RecipeRepository.RepositoryCallback<List<Recipe>> {
      override fun onSuccess(recipes: List<Recipe>?) {
        if (recipes != null && recipes.isNotEmpty()) {
          // 3
          showRecipes(recipes)
        } else {
          // 4
          showEmptyRecipes()
        }
      }

      override fun onError() {
        // 5
        showErrorView()
      }
    })
  }
To perform a search:
- Because the operation is asynchronous, the activity must show a loading view.
- Call the repository of recipes.
- If there are recipes, show them!
- When no recipes are found, a “No recipes were found” message is shown.
- Show an error view if there was an error fetching the recipes.
Adapter doing too much logic
Inside this same activity, you’ll find:
    list.adapter = RecipeAdapter(recipes, object : RecipeAdapter.Listener {
      override fun onAddFavorite(item: Recipe) {
        // 1
        item.isFavorited = true
        // 2
        repository.addFavorite(item)
        // 3
        list.adapter.notifyItemChanged(recipes.indexOf(item))
      }
      ...
    })
- Altering the model (favorited status).
- Calling the repository.
- Updating the view to show the altered model.
Conclusion
Because these are so embedded into the Android activities/adapter, they are not efficiently unit testable. A refactor must be done!
Model-View-Presenter
You’ll refactor the project to the Model-View-Presenter structure. This will ease the creation of unit tests.
Also called just MVP

-
Model:
All your data classes, API connectors, databases. -
View:
Activities, Fragments and any Android Views. It’s responsible for showing the data and propagating the user’s UI actions to the corresponding presenter methods. -
Presenter:
Knows about the model and the view. Publishes methods that will be called by the view. These methods usually involve fetching data, manipulating it, and deciding what to show in the view.