Cocos2d-x Tutorial for Beginners
In this Cocos2d-x tutorial, learn how to create a basic cross-platform game for iOS, Android, and more using C++! By Guanghui Qu.
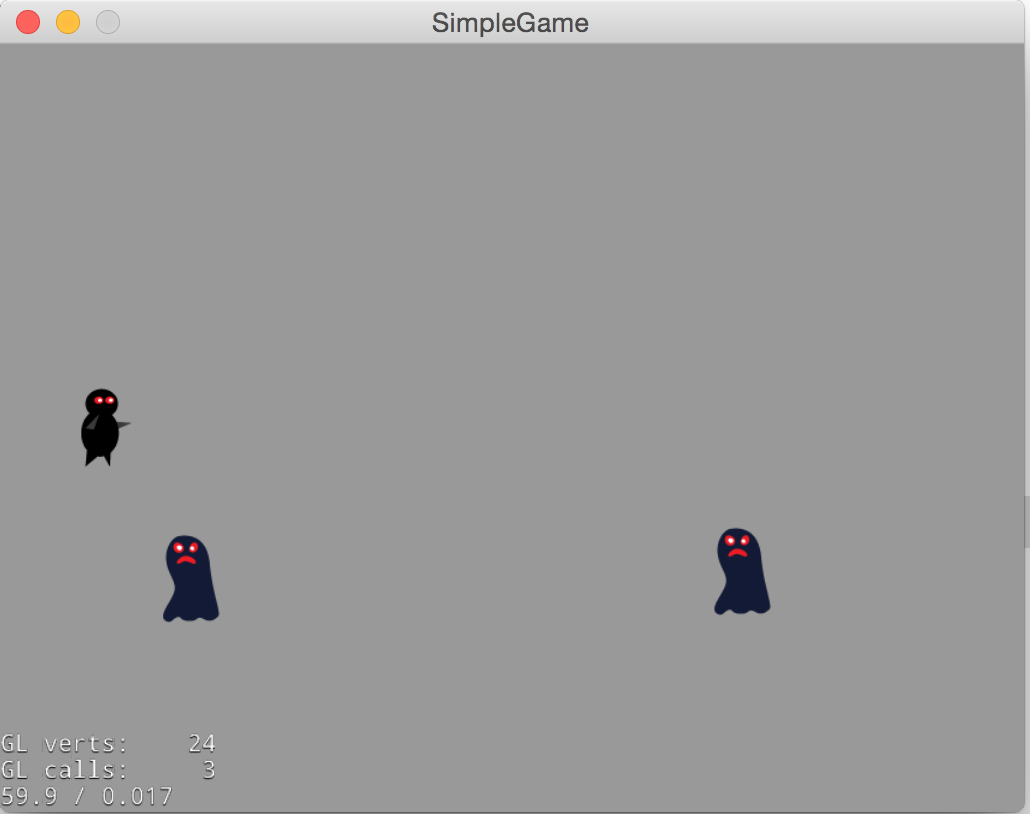
Moving Monsters
Your ninja needs a purpose in life, so you’ll add some monsters to your scene for your ninja to fight. To make things more interesting, you want the monsters to move around – otherwise, it wouldn’t prove to be much of a challenge! You’ll create the monsters slightly off-screen to the right, and set up an action for them telling them to move to the left.
First, open HelloWorldScene.h and add the following method declaration:
void addMonster(float dt);
Then add the following method implementation inside HelloWorldScene.cpp:
void HelloWorld::addMonster(float dt) {
  auto monster = Sprite::create("monster.png");

  // 1
  auto monsterContentSize = monster->getContentSize();
  auto selfContentSize = this->getContentSize();
  int minY = monsterContentSize.height/2;
  int maxY = selfContentSize.height - monsterContentSize.height/2;
  int rangeY = maxY - minY;
  int randomY = (rand() % rangeY) + minY;

  monster->setPosition(Vec2(selfContentSize.width + monsterContentSize.width/2, randomY));
  this->addChild(monster);

  // 2
  int minDuration = 2.0;
  int maxDuration = 4.0;
  int rangeDuration = maxDuration - minDuration;
  int randomDuration = (rand() % rangeDuration) + minDuration;

  // 3
  auto actionMove = MoveTo::create(randomDuration, Vec2(-monsterContentSize.width/2, randomY));
  auto actionRemove = RemoveSelf::create();
  monster->runAction(Sequence::create(actionMove,actionRemove, nullptr));
}
It’s relatively straightforward, but here’s what the above code does:
- The first part of this method is similar to what you did earlier with the player: it creates a monster sprite and places it just offscreen to the right. It sets its y-position to a random value to keep things interesting.
- Next, the method calculates a random duration between two and four seconds for the action it’s about to add to the monster. Each monster will move the same distance across the screen, so varying the duration results in monsters with random speeds.
- Finally, the method creates an action that moves the monster across the screen from right to left and instructs the monster to run it. This is explained in more detail below.
Cocos2d-x provides lots of extremely handy built-in actions that help you easily change the state of sprites over time, including move actions, rotate actions, fade actions, animation actions, and more. Here you use three actions on the monster:
-
MoveTo: Moves an object from one point to another over a specific amount of time. -
RemoveSelf: Removes a node from its parent, effectively “deleting it” from the scene. In this case, you use this action to remove the monster from the scene when it is no longer visible. This is important because otherwise you’d have an endless supply of monsters and would eventually consume all your device’s resources. -
Sequence: Lets you perform a series of other actions in order, one at a time. This means you can have the monster move across the scene and remove itself from the screen when it reaches its destination.
There’s one last thing to do before you let you ninja go to town — you need to actually call the method to create monsters! Just to make things fun, you’ll create monsters that spawn continuously.
Simply add the following code to the end of HelloWorld::init, just before the return statement:
srand((unsigned int)time(nullptr));
this->schedule(schedule_selector(HelloWorld::addMonster), 1.5);
srand((unsigned int)time(nullptr)); seeds the random number generator. If you didn’t do this, your random numbers would be the same every time you ran the app. That wouldn’t feel very random, would it? :]
You then pass HelloWorld::addMonster into the schedule method, which will call addMonster() every 1.5 seconds.
Here Cocos2d-x takes advantage of C++’s pointers to member functions. If you don’t understand how this works, please refer to ioscpp for more information.
That’s it! Build and run your project; you should now see monsters happily (or angrily, as the case may be!) moving across the screen:
Shooting Projectiles
Your brave little ninja needs a way to protect himself. There are many ways to implement firepower in a game, but in this project you’ll have the user click or tap the screen to fire a projectile in the direction of the click or tap. Pew-pew! :]
To keep things simple, you’ll implement this with a MoveTo action — but this means you’ll need to do a little math.
The MoveTo action requires a destination for the projectile, but you can’t use the input location directly because that point only represents the direction to shoot relative to the player. You want to keep the bullet moving through that point until the bullet arrives at the final destination off-screen.
Here’s a picture that illustrates the matter:

The x and y offsets from the origin point to the touched location create a small triangle; you just need to make a big triangle with the same ratio – and you know you want one of the endpoints to be off-screen.
Performing these calculations is a snap with Cocos2d-x’s included vector math routines. But before you can calculate where to move, you need to enable input event handling to figure out where the user touched!
Add the following code to the end of HelloWorld::init, just above the return statement:
auto eventListener = EventListenerTouchOneByOne::create();
eventListener->onTouchBegan = CC_CALLBACK_2(HelloWorld::onTouchBegan, this);
this->getEventDispatcher()->addEventListenerWithSceneGraphPriority(eventListener, _player);
Cocos2d-x versions 3 and up use EventDispatcher to dispatch various events, such as touch, accelerometer and keyboard events.
Note: Throughout this discussion, the term “touch” refers to taps on a touch device as well as clicks on a desktop. Cocos2d-x uses the same methods for handling both types of events.
In order to receive events from the EventDispatcher, you need to register an EventListener. There are two types of touch event listeners:
-
EventListenerTouchOneByOne: This type calls your callback method once for each touch event. -
EventListenerTouchAllAtOnce: This type calls your callback method once with all of the touch events.
Touch event listeners support four callbacks, but you only need to bind methods for the events you care about.
-
onTouchBegan: Called when your finger first touches the screen. If you are usingEventListenerTouchOneByOne, you must returntruein order to receive any of the other three touch events. -
onTouchMoved: Called when your finger, already touching the screen, moves without lifting off the screen. -
onTouchEnded: Called when your finger lifts off the screen. -
onTouchCancelled: Called in certain circumstances that stop event handling, like when you are touching the screen and then something like a phone call interrupts the app.
In this game, you really only care about when touches occur. Declare your callback to receive touch notifications in HelloWorldScene.h like so:
bool onTouchBegan(Touch *touch, Event *unused_event);
Then implement your callback in HelloWorldScene.cpp:
bool HelloWorld::onTouchBegan(Touch *touch, Event *unused_event) {
  // 1  - Just an example for how to get the  _player object
  //auto node = unused_event->getCurrentTarget();

  // 2
  Vec2 touchLocation = touch->getLocation();
  Vec2 offset = touchLocation - _player->getPosition();

  // 3
  if (offset.x < 0) {
    return true;
  }

  // 4
  auto projectile = Sprite::create("projectile.png");
  projectile->setPosition(_player->getPosition());
  this->addChild(projectile);

  // 5
  offset.normalize();
  auto shootAmount = offset * 1000;

  // 6
  auto realDest = shootAmount + projectile->getPosition();

  // 7
  auto actionMove = MoveTo::create(2.0f, realDest);
  auto actionRemove = RemoveSelf::create();
  projectile->runAction(Sequence::create(actionMove,actionRemove, nullptr));

  return true;
}
There’s a lot going on in the method above, so take a moment to review it step by step.
- The first line is commented out, but it’s there to show you how you can access the
_playerobject that you passed as the second parameter toaddEventListenerWithSceneGraphPriority(eventListener, _player). - Here you get the coordinate of the touch within the scene’s coordinate system and then calculate the offset of this point from the player’s current position. This is one example of vector math in Cocos2d-x.
- If
offset‘sxvalue is negative, it means the player is trying to shoot backwards. This is is not allowed in this game (real ninjas never look back!), so simply return without firing a projectile. - Create a projectile at the player’s position and add it to the scene.
- You then call
normalize()to convert the offset into a unit vector, which is a vector of length 1. Multiplying that by 1000 gives you a vector of length 1000 that points in the direction of the user’s tap. Why 1000? That length should be enough to extend past the edge of your screen at this resolution :] - Adding the vector to the projectile’s position gives you the target position.
- Finally, you create an action to move the projectile to the target position over two seconds and then remove itself from the scene.
Build and run your app; touch the screen to make your ninja fire away at the oncoming hordes!
