Swift Algorithm Club: Swift Dijkstra’s Algorithm
Learn how to implement a Swift Dijkstra’s Algorithm in this step-by-step tutorial by the Swift Algorithm Club team. By Ross O'Brien.
4 (1) · 1 Review
The Swift Algorithm Club is an open source project to implement popular algorithms and data structures in Swift.
Every month, the SAC team will feature a cool data structure or algorithm from the club in a tutorial on this site. If your want to learn more about algorithms and data structures, follow along with us!
In this tutorial, you’ll learn how to implement a Swift Dijkstra’s Algorithm: an algorithm for finding the shortest path between nodes in a graph.
This Swift implementation was first created by Taras Nikulin, and is now refactored for a tutorial format.
This tutorial assumes you have read these three tutorials first (or have equivalent knowledge):
Getting Started
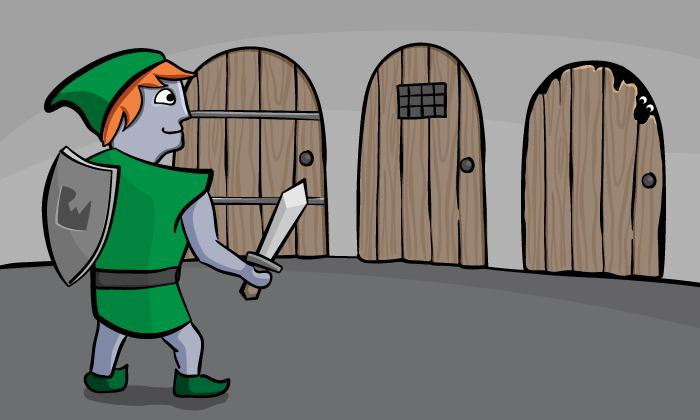
Edsger W. Dijkstra developed an algorithm for finding the shortest path through a graph in 1956, and demonstrated its use by navigating a simplified map of the Netherlands. This became known as Dijkstra’s Algorithm, and you’ll learn how to implement it in Swift in this tutorial.
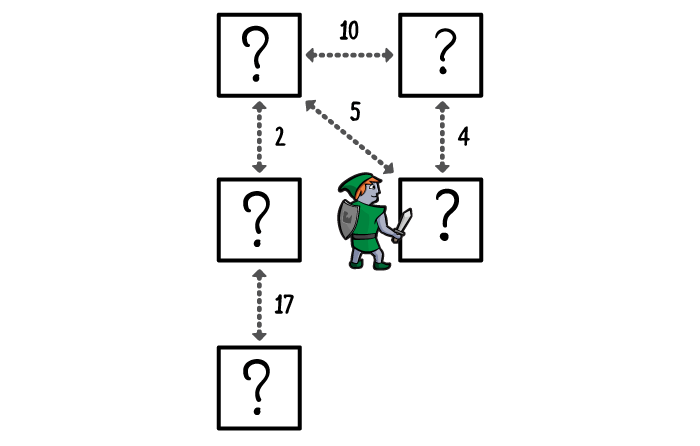
In our previous tutorial on breadth-first search path-finding, our hero Wenderlink was exploring a maze of monsters and wonders, and needed to find a route from room to room from the entrance to a great treasure.
In the tutorial, you implemented a Swift algorithm which found him a path. Better than that, because your search always explored the nearest rooms first, you knew that any route you found would also be the shortest possible route.
However, you only knew this because the distance between any two rooms was always the same. If you only want to measure distance in rooms, then your algorithm finds the route which travels through the fewest number of rooms.
In this tutorial, the devious dungeon creator has extended the corridors between rooms. Some corridors are short, and others are long.
Now, if there are two routes to the treasure, it’s possible that the route through the fewest rooms is actually not the shortest.
But really, that doesn’t change your approach very much. In the breadth-first search, you always explored the nearest rooms first. In Dijsktra’s Algorithm, you do the same, but you prioritise your search differently.
Note: In this tutorial you are using distance to describe the quality you want to minimise, but if you want to use this algorithm in other contexts then other qualities work just as well.
For example, in the context of dungeon exploration a ‘high distance’ could mean a task that takes a long time, or a corridor that contains many obstacles or enemies to defeat. What’s important is this quality is non-negative and that lower is better.
How Dijkstra’s Algorithm Works
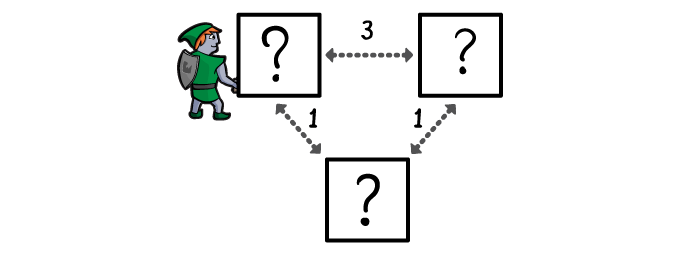
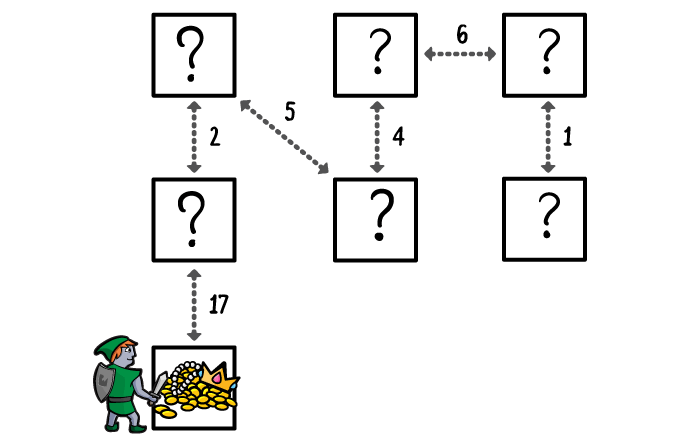
Let’s walk through how Dijkstra’s Algorithm’s works by looking at this example.
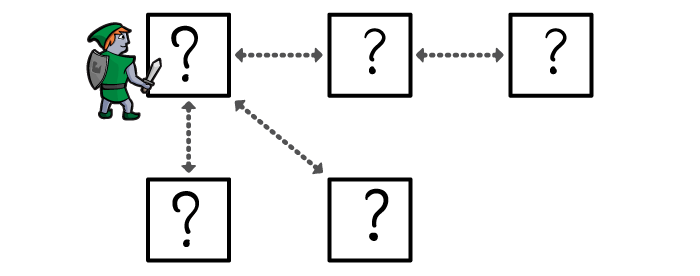
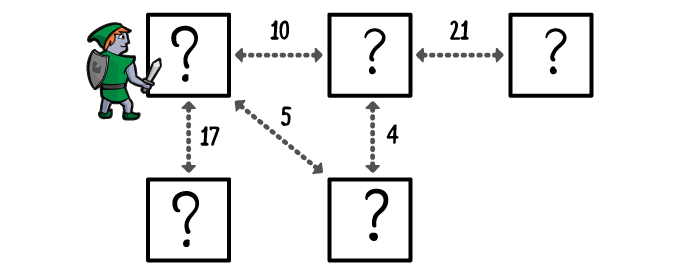
First your hero explores the entrance room, in case that’s where the treasure is.

If it’s not there, he determines all the rooms which are connected to the entrance room, and prioritises them by distance, shortest first.
He then explores the nearest room to the entrance for the treasure.
If it’s not there, he determines all the rooms connected to that room, prioritises them by their distance from the entrance room, and adds them to the priority queue.
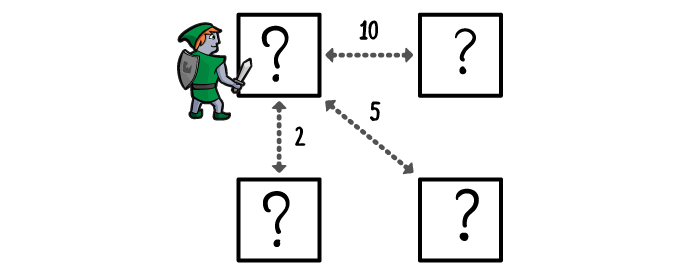
The next nearest room to the entrance room gets explored in turn, with a few differences from other algorithms:
- Unlike breadth-first search, it doesn’t have to be an unexplored room connected to the entrance.
- Unlike depth-first search, it doesn’t have to be an unexplored room connected to the current location.
- It’s simply the highest priority room in the search, as measured by its distance from the entrance room.
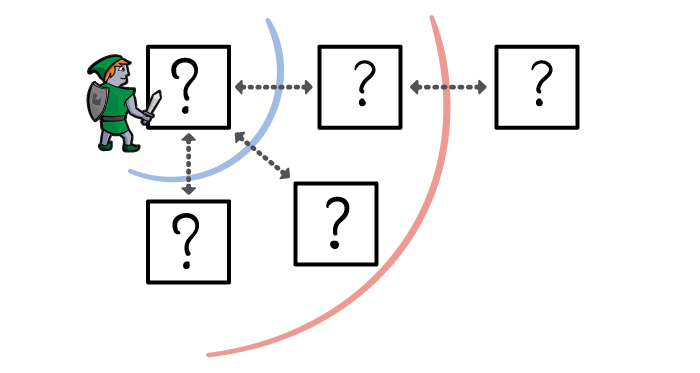
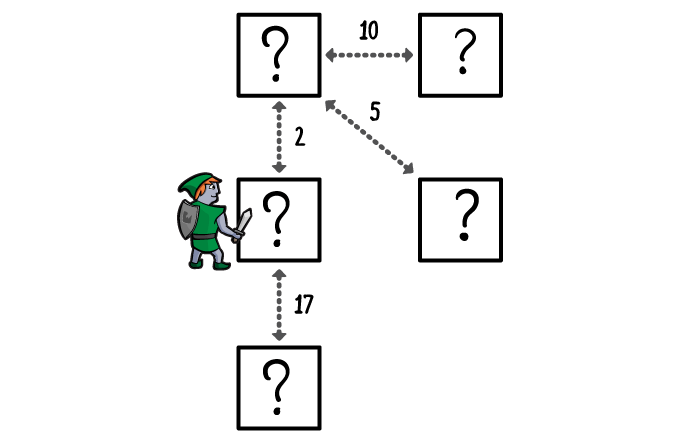
The next nearest room gets explored. This time he finds an alternative corridor to a room already on his priority list. The alternative route is shorter than the route already prioritised, so you update the priority – meaning you’ll explore that room much sooner. If the alternative route was longer, though, you keep the original priority.
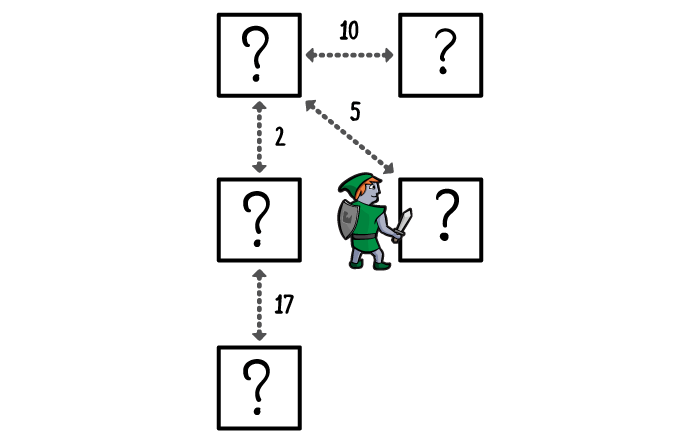
You keep exploring until the treasure room becomes the highest priority room – via the shortest possible route from the entrance – or until you run out of rooms, determining that there is no treasure to be found.
Swift Dijkstra’s Algorithm
Start by downloading the starter playground here. The project contains a Swift 4 playground, including data structures from previous tutorials (updated for Swift 4).
We’re going to extend the Graphable protocol from the Adjacency-List Graphs tutorial, so in your Playground file, type this:
extension Graphable {
  // you'll write some code here soon!
}
Our strategy is actually going to be very similar to how you handled the Breadth-First Search, so let’s revise how you did that.
A graph is a network of vertices and edges, but when we’re calculating the shortest path from one vertex to any other, not all of the edges will be part of that shortest path. So we’re going to create a tree, whose root vertex is where you start the path.
Every vertex in the tree is a vertex which is reachable from the root vertex in the graph. Every edge in the tree is the last edge in the shortest path from the root vertex to the edge’s destination vertex. The edge’s source vertex will also have an entry in the tree, so to get the shortest path to any vertex, you just follow the edges back to the root. There’s always exactly one path, and it’s always the shortest path.
For this you created an enum type Visit, to represent the direction back to the root vertex. (This already exists in the playground, so you don’t need to create it.)
public enum Visit<Element: Hashable> {
  case source
  case edge(Edge<Element>)
}
There are two states for a Visit; either this vertex has an edge back to another vertex, and you keep going back, or it is the root vertex, and you stop.
Our tree is going to take the form of a dictionary of type [Vertex. Every Vertex in the tree has a Visit state to tell us where to go.
Note: This is quite a fragile data structure, in this form! We’re making the enormous assumption that the tree is correctly structured. If there’s a Vertex in this tree, and the tree has an Edge for that Vertex, then we’re assuming that the edge’s destination is that Vertex, and the edge’s source is also in the tree. If we’re mistaken about this then the whole algorithm falls apart. So, we’re going to construct the tree very carefully.
If you wanted to, of course, you could build a much more robust version of this data structure, perhaps with throws and try statements and so on to keep everything safe, but right now that would make this tutorial too long so we’re going to keep things simple. :]
You’re going to need to ask your tree for information, so you’re going to write a function which takes a tree and a given destination vertex, and returns the path from the tree’s root to the destination.
In the playground file, inside the protocol extension, type this:
public func route(to destination: Vertex<Element>, in tree: [Vertex<Element> : Visit<Element>]) -> [Edge<Element>] { // 1

  var vertex = destination // 2
  var path : [Edge<Element>] = [] // 3

  while let visit = tree[vertex],
    case .edge(let edge) = visit { // 4

    path = [edge] + path
    vertex = edge.source // 5
  }
  return path // 6
}
Let’s review what you’ve just done.
- You wrote the function signature. As intended, this function takes a
Vertexand[Vertex: Visit]dictionary tree and returns an array ofEdges. - You created a variable to represent the ‘current’
Vertexin the tree. Initially this is the destination vertex, but this will change. - You created a variable to store the path of edges from the tree’s root to the destination. Initially this is an empty array.
- You created a while-loop to gather up the edges. The loop tests that there is a
Visitentry in the tree for the ‘current’Vertex, and that this entry takes the form of an edge. When this test fails, the loop ends. - You added the edge to the beginning of the path, and set
vertexto the edge’s sourceVertex, moving one step closer to the root - With the loop ended, you returned the array of edges from the function.
So far, so good. Now, when you implemented Breadth-First Search, you could also use the count property of the edge array to tell us how long the path was, in terms of the number of rooms passed through. In Dijkstra’s algorithm you need to measure the distance differently.
For this we’re going to use the weight quality of the edges. In the Adjacency List tutorial the weight is represented by a Double?, because some edges might be weight and some might not. you’ll be assuming that all edges which make up part of a route will be weighted.
Under the route function you’ve written, type this:
public func distance(to destination: Vertex<Element>, in tree: [Vertex<Element> : Visit<Element>]) -> Double { // 1
  let path = route(to: destination, in: tree) // 2
  let distances = path.flatMap{ $0.weight } // 3
  return distances.reduce(0.0, { $0 + $1 }) // 4
}
Let’s review what you’ve just done.
- As before, you’ve written the function signature. This function takes a
Vertexand[Vertex: Visit]dictionary tree and returns the distance traversed on the path from tree source to destination as aDouble. - You call the route function you wrote earlier to get the list of edges in the path.
- You
flatMapeach edge into itsweight. If an edge’s weight should somehow benil, that edge is quietly ignored here. - You reduced the array of distances to their total (assuming a path with no edges has 0.0 distance, and then adding the weight of each edge in the path in turn).
So, if you can just generate a tree from the graph, you can generate the shortest path and determine its overall length. Let’s do that now!