Geofences on Android with GoogleApiClient
In this tutorial you’ll learn how to leverage GoogleApiClient to add geofences to an Android app, as well as post notifications when a geofence is crossed. By Joe Howard.
Displaying a Notification
There’s nothing yet to inform a user when they’ve reached one of their geofences. Time to fix that!
Open up AreWeThereIntentService.java; you’ll see the starter project includes an empty onHandleIntent() implementation. The pending intent you associated with the geofence triggers AreWeThereIntentService and fires the onHandleIntent() callback.
Add the following implementation to onHandleIntent(), importing the missing headers as you go:
prefs = getApplicationContext().getSharedPreferences(
    Constants.SharedPrefs.Geofences, Context.MODE_PRIVATE);
gson = new Gson();

// 1. Get the event
GeofencingEvent event = GeofencingEvent.fromIntent(intent);
if (event != null) {
  if (event.hasError()) {
    onError(event.getErrorCode());
  } else {

    // 2. Get the transition type
    int transition = event.getGeofenceTransition();
    if (transition == Geofence.GEOFENCE_TRANSITION_ENTER ||
      transition == Geofence.GEOFENCE_TRANSITION_DWELL ||
        transition == Geofence.GEOFENCE_TRANSITION_EXIT) {
      List<String> geofenceIds = new ArrayList<>();

      // 3. Accumulate a list of event geofences
      for (Geofence geofence : event.getTriggeringGeofences()) {
        geofenceIds.add(geofence.getRequestId());
      }
      if (transition == Geofence.GEOFENCE_TRANSITION_ENTER ||
        transition == Geofence.GEOFENCE_TRANSITION_DWELL) {
        // 4. Pass the geofence list to the notification method
        onEnteredGeofences(geofenceIds);
      }
    }
  }

}
Once you set the values of the prefs and gson properties of the service, you do the following:
- Create a
GeofencingEventobject from the service intent. - Create an integer that stores the type of geofence transition.
- Build up a list of ids that triggered the service.
- Pass that list on to the notification method.
Add the following code to the beginning of onEnteredGeofences(), importing any missing headers:
// 1. Outer loop over all geofenceIds
for (String geofenceId : geofenceIds) {
  String geofenceName = "";

  // 2, Loop over all geofence keys in prefs and retrieve NamedGeofence from SharedPreferences
  Map<String, ?> keys = prefs.getAll();
  for (Map.Entry<String, ?> entry : keys.entrySet()) {
    String jsonString = prefs.getString(entry.getKey(), null);
    NamedGeofence namedGeofence = gson.fromJson(jsonString, NamedGeofence.class);
    if (namedGeofence.id.equals(geofenceId)) {
      geofenceName = namedGeofence.name;
      break;
    }
  }

  // 3. Set the notification text and send the notification
  String contextText =
          String.format(this.getResources().getString(R.string.Notification_Text), geofenceName);
}
Here’s what happens when the device enters a geofence:
- Loop over all the geofence ids.
- Then loop again to pull out the geofence name from
SharedPreferences. - Finally, you create a string to display to the user.
Now add the following to the end of the outer for loop, just below the creation of contextText:
// 1. Create a NotificationManager
NotificationManager notificationManager =
    (NotificationManager) this.getSystemService(Context.NOTIFICATION_SERVICE);

// 2. Create a PendingIntent for AllGeofencesActivity
Intent intent = new Intent(this, AllGeofencesActivity.class);
intent.addFlags(Intent.FLAG_ACTIVITY_SINGLE_TOP | Intent.FLAG_ACTIVITY_CLEAR_TOP);
PendingIntent pendingNotificationIntent = PendingIntent.getActivity(this, 0, intent, PendingIntent.FLAG_UPDATE_CURRENT);

// 3. Create and send a notification
Notification notification = new NotificationCompat.Builder(this)
  .setSmallIcon(R.mipmap.ic_launcher)
  .setContentTitle(this.getResources().getString(R.string.Notification_Title))
  .setContentText(contextText)
  .setContentIntent(pendingNotificationIntent)
  .setStyle(new NotificationCompat.BigTextStyle().bigText(contextText))
  .setPriority(NotificationCompat.PRIORITY_HIGH)
  .setAutoCancel(true)
  .build();
notificationManager.notify(0, notification);
It looks dense, but it’s fairly straightforward code:
- You create a notification manager using
getSystemService(). - Next, you create an intent to start up
AllGeofencesActivity. - The builder pattern creates the notification with the intent using the app icon, a string constant title, and the context string.
Build and run. Nothing has changed visually, but all the plumbing is in place to show a notification to the user when they enter a geofence.
Time to take your app on a virtual road trip to test this all out! :]
Testing with Mock Locations
Ideally, you’d test this on a device and physically move into the geofences you created.
If you’re working with the emulator, or you don’t quite have the resources to fly to Bora Bora right now, there’s a way to mock your location and trigger your geofences in a virtual fashion. This tutorial focuses on mocking through the emulator, but you can also mock locations on a device using third-party apps such a Fake GPS and My Fake Location.

On the emulator, go to Settings\Developer options. Make sure Allow mock locations is already on:

Build and run the app in the emulator, and add some geofences.
In order to mock your location, you can use the Android Debug Bridge or telnet from the command line, but in this case you’ll use the Android DDMS which is bundled with Android Studio.
From the menu, choose Tools\Android\Android Device Monitor to open the DDMS window.
Choose the Emulator Control tab and locate (sorry!) Location Controls near the bottom:

Enter the longitude and latitude of one of your geofences for your mock location; note that the fields are reversed from your app’s interface. Click Send to mock the emulator location. You will likely need to open the Google Maps app on the emulator to trigger a location lookup.
If you don’t see anything pop up, click and drag the emulator screen down from where the battery is shown to display the notification center. At that point, you should see the geofence notification in the emulator:
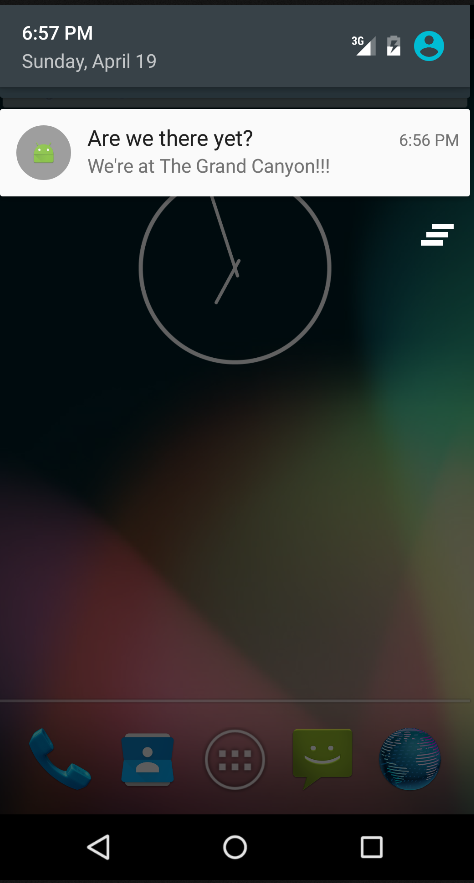
Now you can say, with all certainty, “YES, we’re here!” :]
Where To Go From Here?
You can download the final project for this tutorial here.
You’ve come a long way in this tutorial: you’ve learned how to add and remove geofences, and trigger notifications for your user.
Geofences can be finicky on device reboot, as well as when Location services turn on and off. As a nice challenge for yourself, create a broadcast receiver that listens for BOOT_COMPLETED and reregisters your app’s stored geofences on reboot.
Also be sure to check out the Google Play Services overview on developer.android.com to find out what else you can do with Google Play Services and GoogleApiClient.
If you have any questions or comments on this tutorial, feel free to join the forum discussion below!