ReSwift Tutorial: Memory Game App
In this ReSwift tutorial, you’ll learn to create a Redux-like app architecture in Swift that leverages unidirectional data flow. By Michael Ciurus.
Note: This tutorial uses Xcode 8 and Swift 3.
As the size of iOS apps continues to grow, MVC is slowly losing its stronghold as the “go-to” architectural pattern of choice.
There are more scalable architectural patterns available to iOS developers, such as MVVM, VIPER and Riblets. They all look quite different, but they have a common goal: to divide the code into blocks with single responsibility with multidirectional data flow. In a multidirectional flow, the data moves in many directions between the various modules.
Sometimes, you don’t want (or need) multidirectional data flow — instead, you want the data to flow in one direction: that’s unidirectional data flow. In this ReSwift tutorial, you’ll veer off the beaten path and learn how to use the ReSwift framework to implement unidirectional data flow in a state-heavy Memory Game app named MemoryTunes.
But first – what is ReSwift?
Introducing ReSwift
ReSwift is a small framework that helps you to create Redux-like architectures in Swift.
ReSwift has four major components:
- Views: React to Store changes and display them on screen. Views send Actions.
- Actions: Initiate a state change in the app. An Action is handled by a Reducer.
- Reducers: Directly change the application state, which is stored in the Store.
- Store: Stores the current value of the application state. Other modules like Views can subscribe and react to its changes.
ReSwift presents many interesting advantages:
- Very strong constraints: It’s so tempting to place little bits of code in a convenient location where they don’t really belong. ReSwift prevents that by setting very strong constraints on what happens and where that happens.
- Unidirectional data flow: Apps that implement multidirectional data flow can be very hard to read and debug. One change can lead to a cascade of events that send data around the program. Unidirectional flow is more predictable and greatly reduces the cognitive load needed to read the code.
- Easy to test: Most of the logic is contained in the Reducers, which are pure functions.
- Platform independent: All elements of ReSwift — Stores, Reducers, and Actions — are platform independent. You can easily reuse them on iOS, macOS or tvOS.
Multidirectional vs. Unidirectional Flow
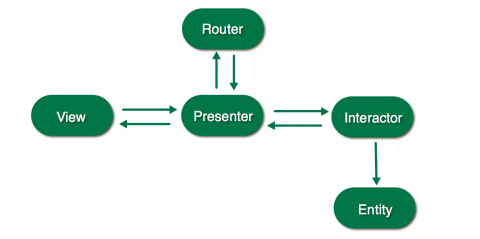
To show what I mean about data flow, take the following example. An app architechted with VIPER supports multidirectional data flow between its components:
VIPER – Multidirectional data flow
Compare that with the unidirectional data flow in an app built on ReSwift:
ReSwift – Unidirectional data flow
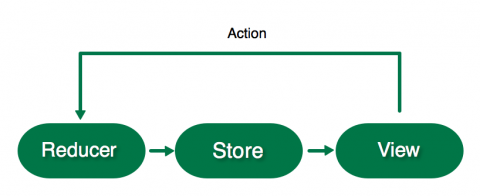
Since data can only flow in one direction, it’s much easier to visually follow along with the code and track down any issues in your app.
Getting Started
Start by downloading the starter project here which currently contains some skeleton code and frameworks, including ReSwift, that you’ll learn more about as you go.
First, you’ll need to set up the wiring of ReSwift. You’ll begin by setting up the core of the application: its state.
Open AppState.swift and create an AppState structure that conforms to StateType.:
import ReSwift

struct AppState: StateType {

}
This structure will define the entire state of the app.
Before you can create a Store that will contain the AppState value you have to create the main Reducer.

Reducers are the only blocks that can directly change the current value of the AppState held by the Store. Only Actions can initiate a Reducer to start changing the current application state. The Reducer changes the current value of AppState depending on the type of Action it receives.
Create the main app reducer function in AppReducer.swift:
import ReSwift

func appReducer(action: Action, state: AppState?) -> AppState {
  return AppState()
}
appReducer is a function that takes an Action and returns the changed AppState. state is the current state of the app; this function should change it accordingly depending on the type of action received. Right now it simply creates a new AppState value — you’ll return to this once you have a Store configured.
It’s time to create the Store so the reducer has a state, something to act upon.

The Store contains the current state of your whole app: this is the value of your AppState structure. Open AppDelegate.swift and replace import UIKit with the following:
import ReSwift

var store = Store<AppState>(reducer: appReducer, state: nil)
This creates a store global variable initialized by the appReducer. appReducer is the Store’s main Reducer, which contains instructions on how the store should change when it receives an Action. Because this is the initial creation, rather than an iterative change, you pass a nil state.
Build and run the app to ensure it compiles:
It’s not very exciting… But at least it works :]

App Routing
It’s time to create the first actual state in your app. You’ll start with interface navigation, or routing.
App routing is a challenge in every architecture, not just ReSwift. You’re going to use a very simple approach in MemoryTunes, where you’ll define all the destinations in an enum, and your AppState will hold the current destination value. AppRouter will react to changes in that value and show the current destination on screen.
Open AppRouter.swift and replace import UIKit with the following:
import ReSwift

enum RoutingDestination: String {
  case menu = "MenuTableViewController"
  case categories = "CategoriesTableViewController"
  case game = "GameViewController"
}
This enum represents all of the view controllers in your app.
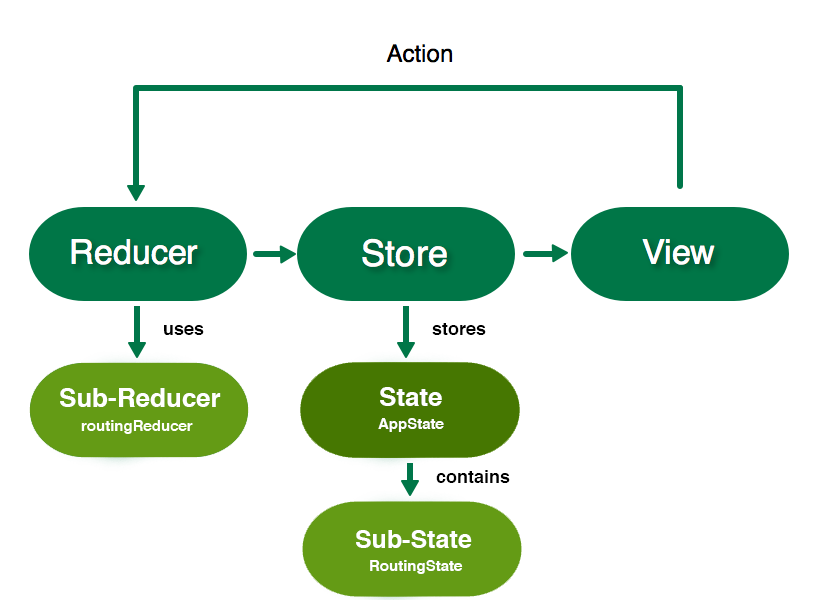
Finally! You have something to store in the app’s State. There’s only one main state structure (AppState in this case), but you can divide the state of the app into sub-states referenced in the main state.
Because it’s good practice, you’ll group state variables into sub-state structures. Open RoutingState.swift and add the following sub-state structure for routing:
import ReSwift

struct RoutingState: StateType {
  var navigationState: RoutingDestination

  init(navigationState: RoutingDestination = .menu) {
    self.navigationState = navigationState
  }
}
RoutingState contains navigationState, which represents the current destination on screen.
menu is the default value of navigationState. It implicitly makes it the default value of the application state at start if you don’t indicate otherwise while initializing RoutingState.
In AppState.swift, add the following inside the struct:
let routingState: RoutingState
AppState now contains the RoutingState sub-state.
Build and run, and you’ll notice a problem:
Oops…

appReducer no longer compiles! This is because you added routingState to AppState, but didn’t pass it anything in the default initializer call. To create the routingState, you need a reducer.
There’s only one main Reducer function, but just as with state, reducers should be divided between sub-reducers.
Sub-State and Sub-Reducers
Add the following Reducer for routing in RoutingReducer.swift:
import ReSwift

func routingReducer(action: Action, state: RoutingState?) -> RoutingState {
  let state = state ?? RoutingState()
  return state
}
Similar to the main Reducer, routingReducer changes the state depending on the action it receives, then returns it. You don’t have any actions yet, so this creates a new RoutingState if state is nil and returns it.
Sub-reducers are responsible for initializing the start values of their corresponding sub-states.
Go back to AppReducer.swift to fix the compiler warning. Modify the contents of appReducer to match the following:
return AppState(routingState: routingReducer(action: action, state: state?.routingState))
This adds the routingState argument to the AppState initializer. action and state from the main reducer are passed to routingReducer to determine the new state. Get used to this routine, because you’ll have to repeat it for each sub-state and sub-reducer you create.