Android ListView Tutorial with Kotlin
In this tutorial, you’ll learn how to use Android’s ListView to easily create scrollable lists, by creating a simple recipe list app using Kotlin. By Joe Howard.
Defining the Layout of the ListView’s Rows
You probably noticed that the starter project comes with the file res/layout/list_item_recipe.xml that describes how each row in the ListView should look and be laid out.
Below is an image that shows the layout of the row view and its elements:

Your task is to populate each element of the row view with the relevant recipe data, hence, you’ll define what text goes in the “title” element, the “subtitle” element and so on.
In the getView() method, add the following code snippet just before the return statement:
// Get title element
val titleTextView = rowView.findViewById(R.id.recipe_list_title) as TextView

// Get subtitle element
val subtitleTextView = rowView.findViewById(R.id.recipe_list_subtitle) as TextView

// Get detail element
val detailTextView = rowView.findViewById(R.id.recipe_list_detail) as TextView

// Get thumbnail element
val thumbnailImageView = rowView.findViewById(R.id.recipe_list_thumbnail) as ImageView
This obtains references to each of the elements (or subviews) of the row view, specifically the title, subtitle, detail and thumbnail.
Now that you’ve got the references sorted out, you need to populate each element with relevant data. To do this, add the following code snippet under the previous one but before the return statement:
// 1
val recipe = getItem(position) as Recipe

// 2
titleTextView.text = recipe.title
subtitleTextView.text = recipe.description
detailTextView.text = recipe.label

// 3
Picasso.with(context).load(recipe.imageUrl).placeholder(R.mipmap.ic_launcher).into(thumbnailImageView)
Here’s what you’re doing in the above snippet:
- Getting the corresponding recipe for the current row.
- Updating the row view’s text views so they are displaying the recipe.
- Making use of the open-source Picasso library for asynchronous image loading — it helps you download the thumbnail images on a separate thread instead of the main thread. You’re also assigning a temporary placeholder for the
ImageViewto handle slow loading of images.
Now open up MainActivity so that you can get rid of the old adapter. In onCreate, replace everything below (but not including) this line:
val recipeList = Recipe.getRecipesFromFile("recipes.json", this)
With:
val adapter = RecipeAdapter(this, recipeList)
listView.adapter = adapter
You just replaced the rather simple ArrayAdapter with your own RecipeAdapter to make the list more informative.
Build and run and you should see something like this:

Now you’re cooking for real! Look at those recipes — thumbnails and descriptions sure make a big difference.
Styling
Now that you’ve got the functionality under wraps, it’s time to turn your attention to the finer things in life. In this case, your finer things are elements that make your app more snazzy, such as compelling colors and fancy fonts.
Start with the fonts. Look for some custom fonts under res/font. You’ll find three font files: josefinsans_bold.ttf, josefinsans_semibolditalic.ttf and quicksand_bold.otf.
Open RecipeAdapter.java and go to the getView() method. Just before the return statement, add the following:
val titleTypeFace = ResourcesCompat.getFont(context, R.font.josefinsans_bold)
titleTextView.typeface = titleTypeFace

val subtitleTypeFace = ResourcesCompat.getFont(context, R.font.josefinsans_semibolditalic)
subtitleTextView.typeface = subtitleTypeFace

val detailTypeFace = ResourcesCompat.getFont(context, R.font.quicksand_bold)
detailTextView.typeface = detailTypeFace
In here, you’re assigning a custom font to each of the text views in your rows’ layout. You access the font by creating a Typeface, which specifies the intrinsic style and typeface of the font, by using ResourcesCompat.getFont(). Next you set the typeface for the corresponding TextView to set the custom font.
Now build and run. Your result should look like this:

On to sprucing up the colors, which are defined in res/values/colors.xml. Open up RecipeAdapter and add the following below the inflater declaration:
companion object {
  private val LABEL_COLORS = hashMapOf(
      "Low-Carb" to R.color.colorLowCarb,
      "Low-Fat" to R.color.colorLowFat,
      "Low-Sodium" to R.color.colorLowSodium,
      "Medium-Carb" to R.color.colorMediumCarb,
      "Vegetarian" to R.color.colorVegetarian,
      "Balanced" to R.color.colorBalanced
  )
}
You’ve created a hash map that pairs a recipe detail label with the resource id of a color defined in colors.xml.
Now go to the getView() method, and add this line just above the return statement:
detailTextView.setTextColor(
    ContextCompat.getColor(context, LABEL_COLORS[recipe.label] ?: R.color.colorPrimary))
Working from the inside out:
- Here you get the resource id for the color that corresponds to the
recipe.labelfrom theLABEL_COLORShash map. -
getColor()is used inside ofContextCompatto retrieve the hex color associated with that resource id. - Then you set the color property of the
detailTextViewto the hex color.
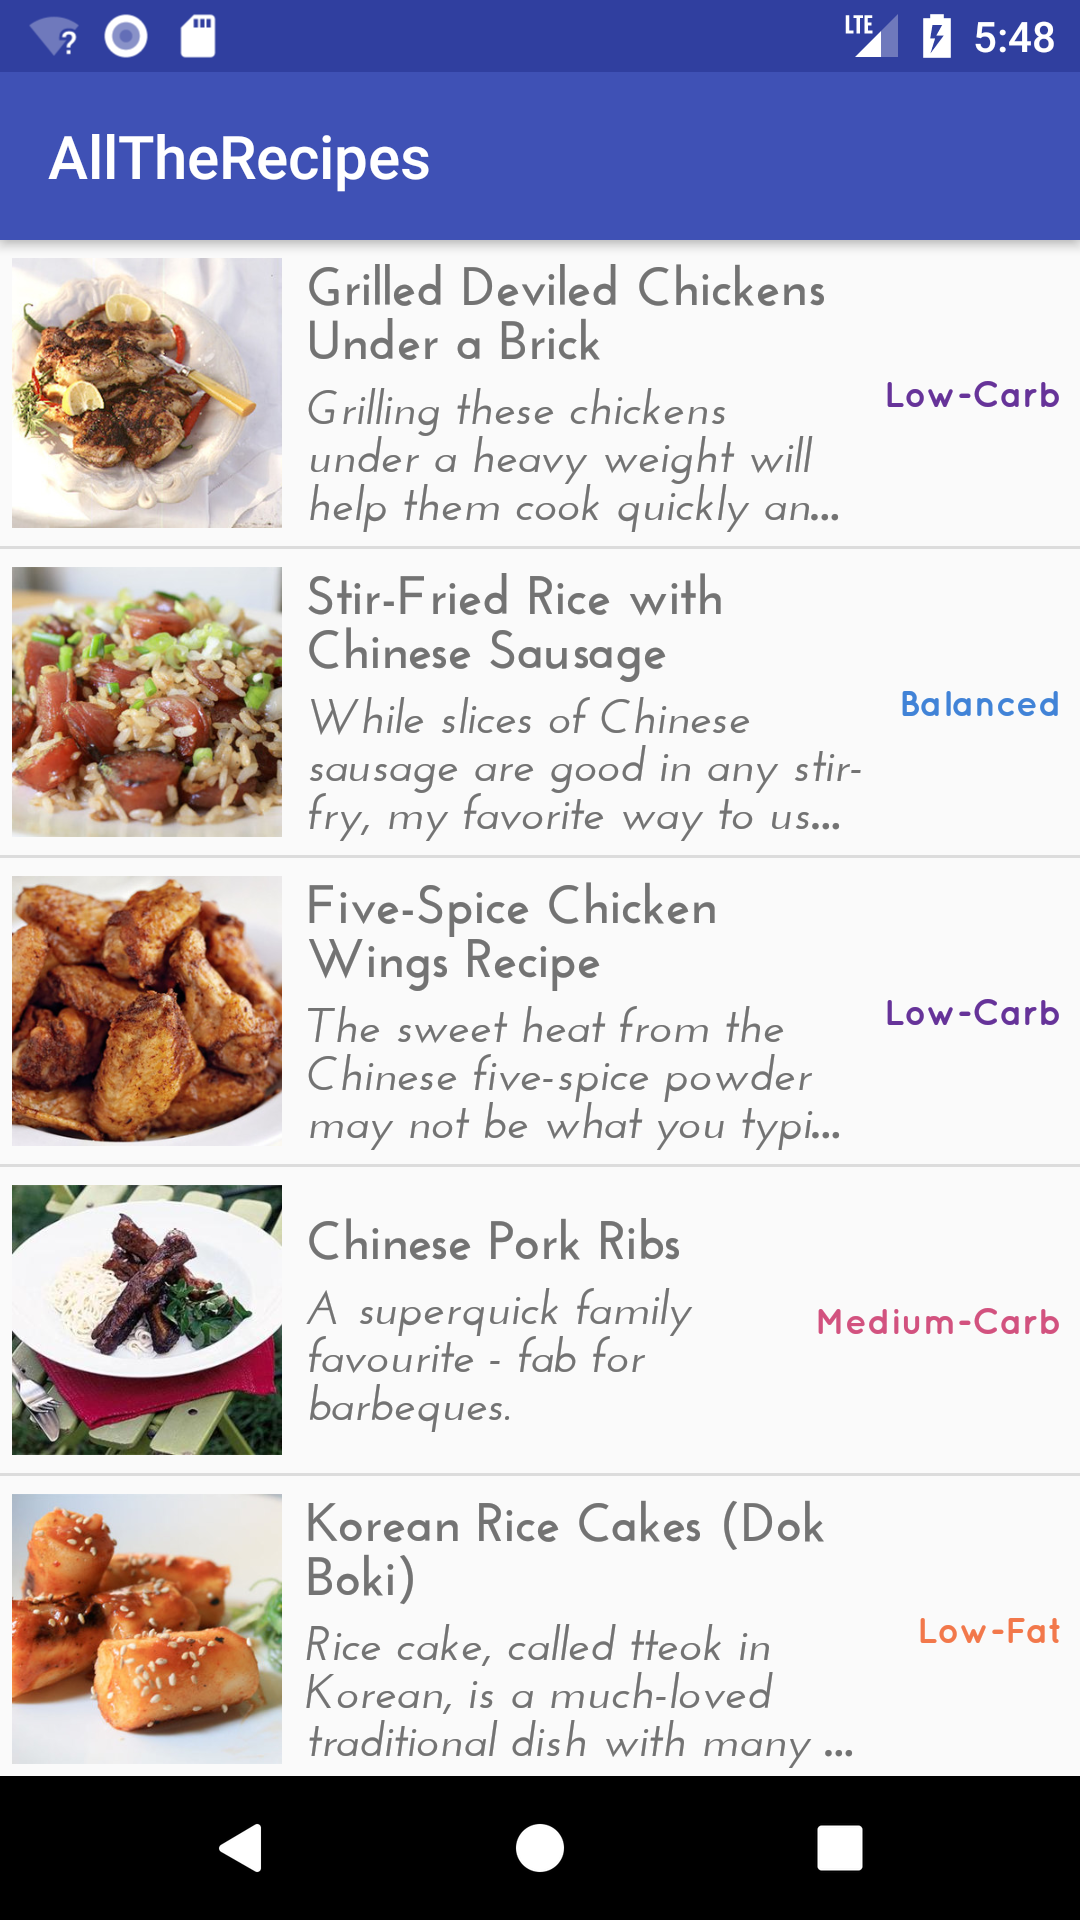
Build and run. Your app should look like this:
User Interaction
Now your list has function and style. What’s it missing now? Try tapping or long pressing it. There’s not much to thrill and delight the user.
What could you add here to make the user experience that much more satisfying? Well, when a user taps on a row, don’t you think it’d be nice to show the full recipe, complete with instructions?
You’ll make use of AdapterView.onItemClickListener and a brand spanking new activity to do this with elegance.
Make a New Activity
This activity will display when the user selects an item in the list.
Right-click on com.raywenderlich.alltherecipes then select New > Activity > EmptyActivity to bring up a dialog. Fill in the Activity Name with RecipeDetailActivity. Leave the automatically populated fields as-is. Check that your settings match these:
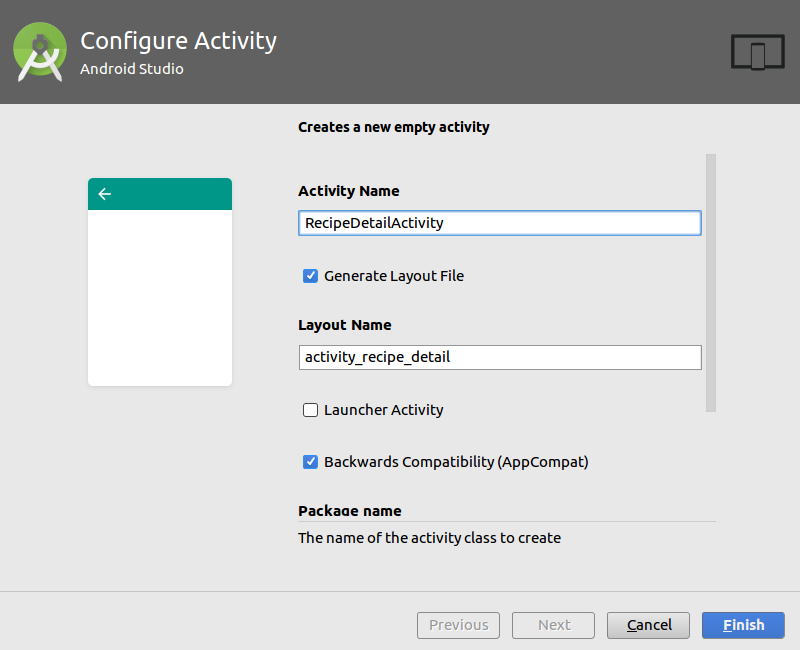
Click Finish.
Open res/layout/activity_recipe_detail.xml and add a WebView by inserting the following snippet inside the ConstraintLayout tag:
<WebView
  android:id="@+id/detail_web_view"
  android:layout_width="0dp"
  android:layout_height="0dp"
  app:layout_constraintBottom_toBottomOf="parent"
  app:layout_constraintEnd_toEndOf="parent"
  app:layout_constraintStart_toStartOf="parent"
  app:layout_constraintTop_toTopOf="parent" />
WebView will be used to load and display a webpage containing the selected recipe’s instructions.
Open up RecipeDetailActivity, and add a WebView reference as a property by adding the following line within the class definition:
private lateinit var webView: WebView
Add the following below the webView property declaration:
companion object {
  const val EXTRA_TITLE = "title"
  const val EXTRA_URL = "url"

  fun newIntent(context: Context, recipe: Recipe): Intent {
    val detailIntent = Intent(context, RecipeDetailActivity::class.java)

    detailIntent.putExtra(EXTRA_TITLE, recipe.title)
    detailIntent.putExtra(EXTRA_URL, recipe.instructionUrl)

    return detailIntent
  }
}
This adds a companion object method to return an Intent for starting the detail activity, and sets up title and url extras in the Intent.
Head back to MainActivity and add the following to the bottom of the onCreate method:
val context = this
listView.setOnItemClickListener { _, _, position, _ ->
  // 1
  val selectedRecipe = recipeList[position]

  // 2
  val detailIntent = RecipeDetailActivity.newIntent(context, selectedRecipe)

  // 3
  startActivity(detailIntent)
}
Note: Before you dive into the explanation, make sure you understand the four arguments that are provided by onItemClick; they work as follows:
- parent: The view where the selection happens — in your case, it’s the ListView
- view: The selected view (row) within the ListView
- position: The position of the row in the adapter
- id: The row id of the selected item
You’re setting the OnItemClickListener object for the ListView, and inside doing the following:
- Get the recipe object for the row that was clicked
- Create an intent to navigate to your
RecipeDetailActivityto display more information - Launch the
RecipeDetailActivityby passing the intent object you just created to thestartActivity()method.
Once again, open RecipeDetailActivity and add the following snippet at the bottom of the onCreate method:
// 1
val title = intent.extras.getString(EXTRA_TITLE)
val url = intent.extras.getString(EXTRA_URL)

// 2
setTitle(title)

// 3
webView = findViewById(R.id.detail_web_view)

// 4
webView.loadUrl(url)
You can see a few things happening here:
- You retrieve the recipe data from the
Intentpassed fromMainActivityby using theextrasproperty. - You set the title on the action bar of this activity to the recipe title.
- You initialize
webViewto the web view defined in the XML layout. - You load the recipe web page by calling
loadUrl()with the corresponding recipe’s URL on the web view object.
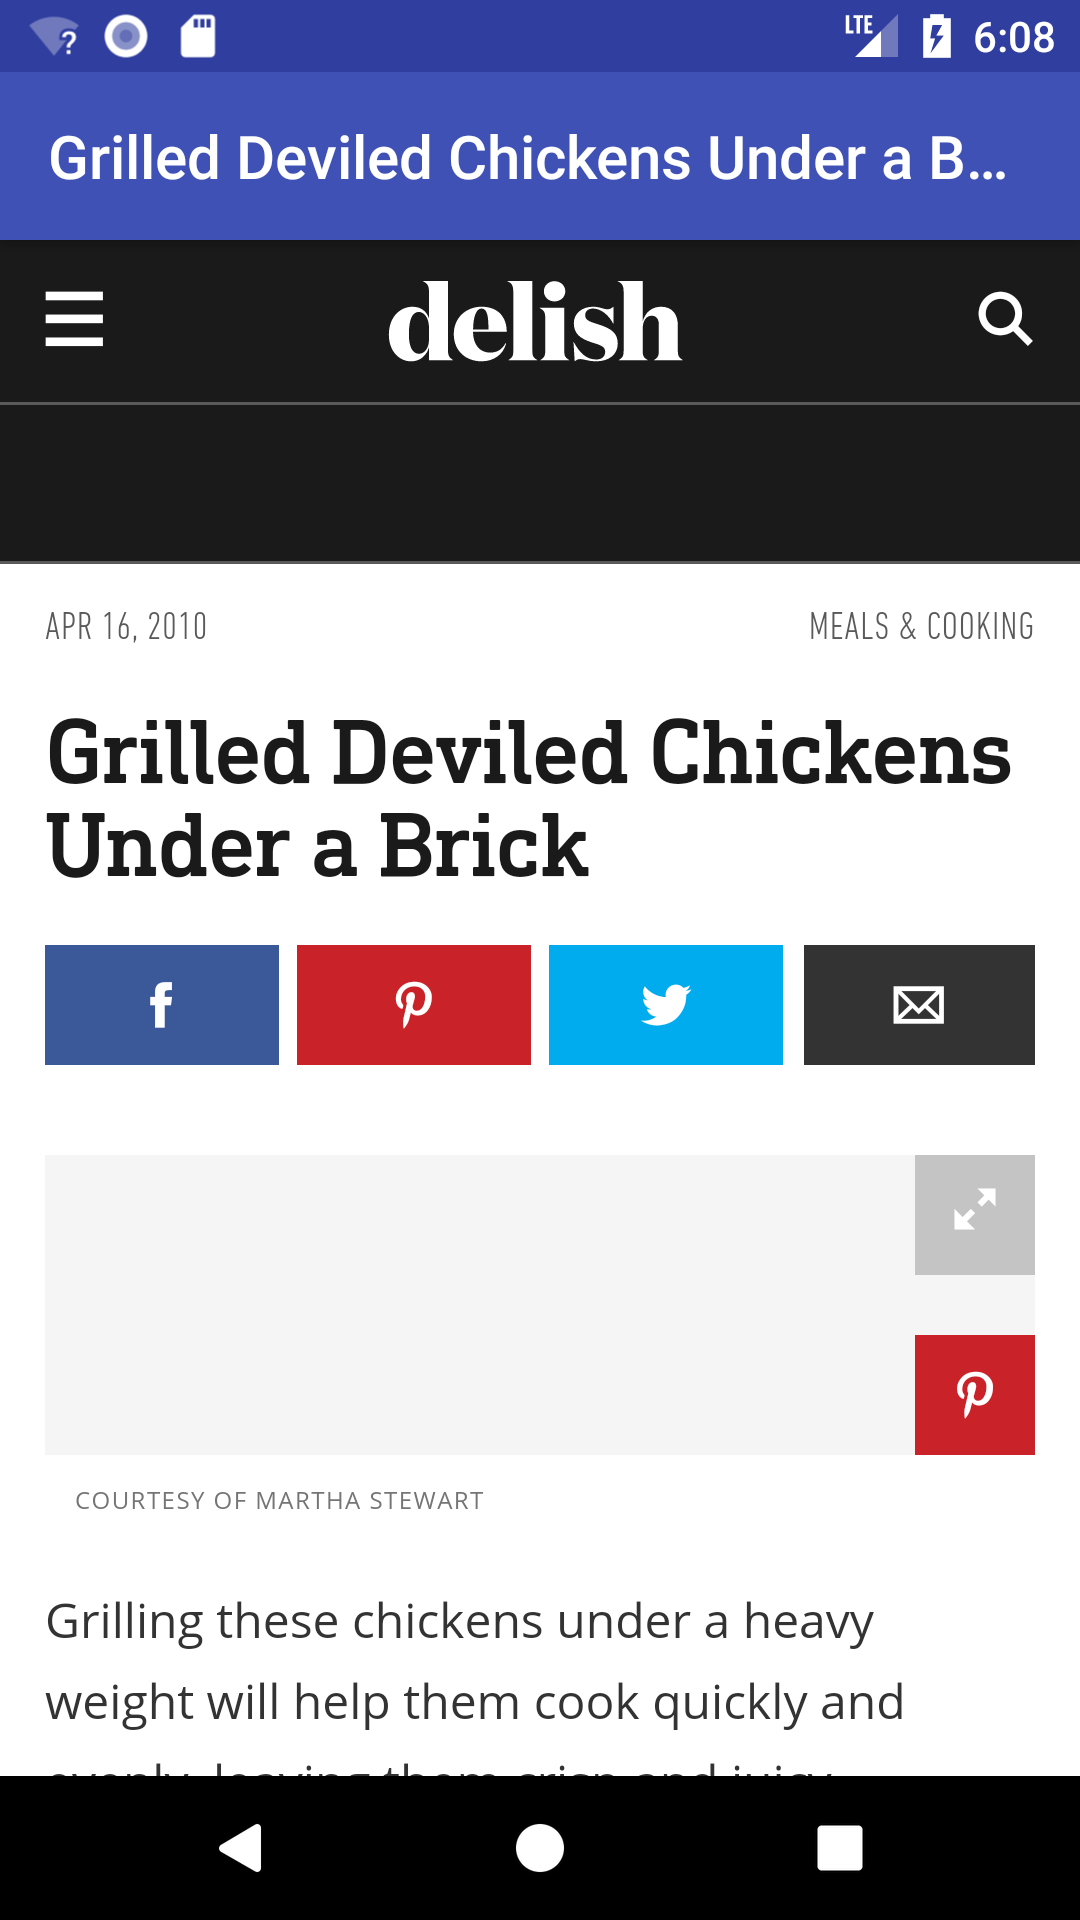
Build and run. When you click on the first item in the list, you should see something like this: