OS X Stack Views with NSStackView
In this tutorial you will learn how to use stack views to design your OS X app’s layout by leveraging the power of NSStackView. By Marin Todorov.
Stack View Animations
In this last section you’re going to learn the basics of working with arranged subviews.
First of all, in order to access your stack view from code, you need to create an outlet for it. Open ViewController.swift and add a new outlet variable to the class:
@IBOutlet weak var topStack: NSStackView!
Now switch back to Main.storyboard and drag from your ViewController to the top stack view in the document outline while pressing Command on your keyboard:
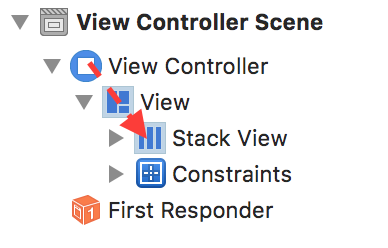
From the popup menu, select topStack, and voila! Your stack outlet is connected.
Note: Now that you have a live outlet to the stack view you can work with it from code in the same manner you do for labels, button, and other Cocoa controls. For example you can dynamically add arranged view by calling the addArrangedSubview(_:) method on your stack view or remove and arranged view by making use of removeArrangedSubview(_:).
Run the app and check the button in the top-right corner of the window:

The menu button is selected by default, but if you click it repeatedly you’ll see it toggles between selected and deselected states. The button is already connected to the method in ViewController called actionToggleListView(_:), so you can just add your code at the bottom of the method body.
First, add an empty animation at the bottom of the method:
NSAnimationContext.runAnimationGroup({context in
  //configure the animation context
  context.duration = 0.25
  context.allowsImplicitAnimation = true

  //perform the animation

}, completionHandler: nil)
runAnimationGroup() allows you create UI animations by simply listing the desired changes in the argument closure. The animations closure gets one parameter, which is the animation context – you can adjust various aspects of the animation by changing the properties on the context. So far you set the animations duration and you enable implicit animations.
Note: Unlike on iOS, in OSX there are different (but similar in effect) APIs to create animations. I personally like using NSAnimationContext.runAnimationGroup(_) because it’s the closest to what I’m using on iOS and can write my code easier and faster by just using the same approach on both platforms.
Next you can just toggle the visibility of the first arranged view of the top stack — more specifically, the table view that shows the list of books. To make all changes in the window layout animate nicely, also add a call to layoutSubtreeIfNeeded().
Just below the comment //perform the animation (but still inside the closure) insert this:
self.topStack.arrangedSubviews.first!.hidden = button.tag==0 ? true : false
self.view.layoutSubtreeIfNeeded()
This will hide or show the book list each time you click the button. Since you made your changes from within an animation block, the layout flows nicely to accommodate your changes.
Note: Just like with any other animation under Auto Layout you need to force a layout pass from inside the animations block to animate the changes you do to your views. In fact changing the hidden property on your first arranged view will be automatically animated, the rest of the arranged views however will have to change position and you’d like to animated those changes. That’s why at the end of the block you make a call to layoutSubtreeIfNeeded().
And there you have the completed raywenderlich.com book store project!

For kicks, choose your favorite book from the list and click on the purchase button. This will open your default web browser and take you directly to the book store page:

Where to Go From Here
To see the completed project, download BookShop-completed.zip.
This tutorial covered quite a bit! You know how to:
- Align views in your UI by bundling them in stacks
- Design complex layouts with nested stack views
- Use constraints to customize stack layouts
- And finally, how to interact with the arranged subviews
If you’d like to learn more about stack views and how to use them for fun and profit, consider the following resources:
- Apple’s NSStackView docs: Here you’ll discover more about this class’s properties and methods.
- Mysteries of Auto Layout, part 1: In this WWDC ’15 talk you’ll learn about the motivation behind stack views and see some live demos.
- Finally, watch the UIStackView video series right here because most of the concepts on iOS and OS X are the same.
- if you’d like to learn more about how the book list was coded in the starter project check out this great tutorial about Cocoa table views
If you have any questions or comments on this tutorial, feel free to join the discussion below in the forums! Thanks for joining me again!