Cocoa Bindings on macOS
Cocoa bindings make glue code a thing of the past. Discover how you can simplify your controller code in this Cocoa Bindings on macOS Tutorial! By Andy Pereira.
Update note: This Cocoa Bindings on macOS tutorial has been updated to Xcode 8 and Swift 3 by Andy Pereira. The original tutorial was written by Jake Gundersen.
Cocoa bindings, or simply bindings, free you up from having to spend hours writing glue code; that is, creating links between the model and the view in the controller when using the Model-View-Controller (MVC) pattern.
Cocoa bindings have a simple goal: write less code. You’ll discover as you work through this that they do indeed live up to this objective.
In this Cocoa Bindings on macOS tutorial, you’ll create an app that displays search results from the App Store via the iTunes API as you learn how to use Cocoa bindings to do the following:
- Set the relationship within Interface Builder between a data model property and a UI element, such as a label or a button
- Set up default values
- Apply formatting, such as a currency or date format
- Change the data structure, e.g. when converting a value into a representing color

Getting Started
Although you won’t have to spend the next several of your hours coding, there’s still a fair amount of work ahead in Interface Builder using Auto Layout, so familiarity with both of these tools is a prerequisite.
Download the starter project here.
Build and run the project, and you’ll see it has a nice interface — but no data.

You’ll also see there are a couple of files to help you along. iTunesRequestManager.swift contains a struct with two static methods. The first sends a query to the iTunes API and downloads a JSON payload that contains iOS apps results for a provided search string, while the second is a helper method to download an image asynchronously.
The second file, iTunesResults.swift, defines a data model class that matches the data downloaded by the iTunes search method.
Note: All variables in the Result class are defined as dynamic. This is because bindings rely on key-value coding, and therefore require the Objective-C runtime. Adding the dynamic keyword guarantees that access to that property is always dynamically dispatched using the Objective-C runtime.
The class inherits from NSObject; this is also a requirement for bindings. You’ll discover why a little later, when you add a variable to your view controller class.
Searching via iTunes
First, you’re going to retrieve search results via the iTunes API and add them to an NSArrayController.
Open Main.storyboard and look at the objects in the View Controller Scene. Note that objects on which you’ll set bindings all have the labels ‘(Bind)’.
Setting Up an NSArrayController
The NSArrayController object manages the content of a NSTableView. This content often takes the form of an array of model objects.
Note: NSArrayController offers much more than a simple array, including managing object selection, sorting and filtering. Cocoa Bindings make heavy use of this functionality.
Open Main.storyboard. Find an NSArrayController object in the Object Library, and drag it into the list of objects under the View Controller Scene grouping in the document outline:

Next, open the assistant editor and make sure ViewController.swift is the file you’re working on. Control-drag from the Array Controller object in the Storyboard to the ViewController.swift source to add an outlet to it, and name it searchResultsController:

Adding the Search Box and Button
Now you’re ready to use the search box and button to get a list of search results and add them to the searchResultsController object.
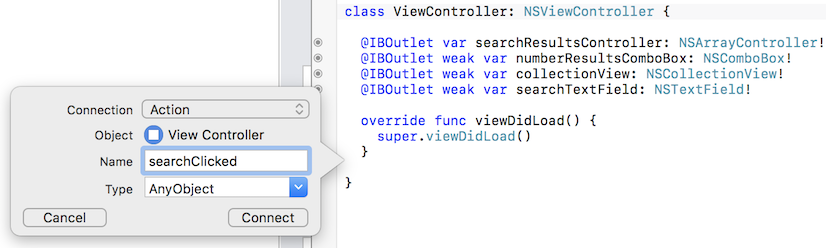
Control-drag from the search button in the storyboard to the ViewController.swift source to create an action method. Select to create an Action connection and name it searchClicked.
Now add the following code inside searchClicked(:_) :
//1
if (searchTextField.stringValue == "") {
  return
}
//2
guard let resultsNumber = Int(numberResultsComboBox.stringValue) else { return }
//3
iTunesRequestManager.getSearchResults(searchTextField.stringValue,
  results: resultsNumber,
  langString: "en_us") { results, error in
    //4
    let itunesResults = results.map { return Result(dictionary: $0) }

    //Deal with rank here later

    //5
    DispatchQueue.main.async {
      //6
      self.searchResultsController.content = itunesResults
      print(self.searchResultsController.content)
  }
}
Taking each line in turn:
- Check the text field; if it’s blank, don’t send that query to iTunes search API.
- Get the value in the dropdown. This number is passed to the API and controls how many search results to return. There’s a number of preconfigured options in the dropdown, but you can also type in other numbers — 200 is the maximum.
- Make a call to
getSearchResults(_:results:langString:completionHandler:). This passes in the number of results from the combo box and the query string you typed into the text field. It returns, via a completion handler, either an array ofDictionaryresult objects or anNSErrorobject if there’s a problem completing the query. Note that the method already handles the JSON parsing. - Here you use some Swift-style array mapping to pass the dictionary into an initialization method that creates a
Resultobject. When done, theitunesResultsvariable contains an array ofResultobjects. - Before you can set this new data on the
searchResultsController, you need to make sure you’re on the main thread. Therefore you useDispatchQueue.main.asyncto get to the main queue. You haven’t set up any bindings, but once you have, altering the content property on thesearchResultsControllerwill update theNSTableView(and potentially other UI elements) on the current thread. Updating UI on a background thread is always a no-no. - Finally you set the content property of the
NSArrayController. The array controller has a number of different methods to add or remove objects it manages. Each time you search, you want to clear out the previous results and work with the results of the latest query. For now, print the content ofsearchResultsControllerto the console to verify that everything works as planned.
Now, add the following ViewController extension:
extension ViewController: NSTextFieldDelegate {
  func control(_ control: NSControl, textView: NSTextView, doCommandBy commandSelector: Selector) -> Bool {
    if commandSelector == #selector(insertNewline(_:)) {
      searchClicked(searchTextField)
    }
    return false
  }
}
This invokes searchClicked(_:) when the user presses Enter in the text field, just as if you’d clicked the search button. This simply makes it easier to run a quick search using the keyboard.
Build and run, type flappy into the search bar and press Enter or click the Search button. You should see something like the following show up in the console:
