Introduction to Multiplayer Games With Unity and Photon
Learn how to make your own multiplayer game with Unity and the Photon Unity Networking (PUN) library. By Gur Raunaq Singh.
If you’ve been making games with Unity for some time, you know there’s a lot of hard work that goes into creating a game. Things such as level design, game mechanics, and progression take a lot of trial and error and careful design to get right. Even then, only a limited number of people are able to complete a full game.
Compared to that, multiplayer games such as Fortnite and PUBG have taken the world by storm. These games, which are easy to learn but hard to master, keep getting more and more popular with a record-breaking number of people. Some people even make a career out of these games as Twitch streamers, something that is very difficult to do with single player games.
In this tutorial, you’ll learn how to make your own multiplayer game with Unity and the Photon Unity Networking library (PUN for short).
Specifically, you’ll learn:
- The key differences between Unity Networking and PUN.
- How to create a Lobby scene where players can join.
- How to load the game scene and synchronize the Transform values of players.
Let’s get started.
Photon vs Unity — Which is better?
Before getting on to the tutorial, let’s take a look at the key differences between Unity Networking and Photon Unity Networking.
Exploring the Architecture
Both Unity and PUN have similar low-level APIs. But the architecture required for these libraries to use these APIs is the key differentiating factor between them.
Source: https://www.youtube.com/watch?v=xLECRl1eyGk
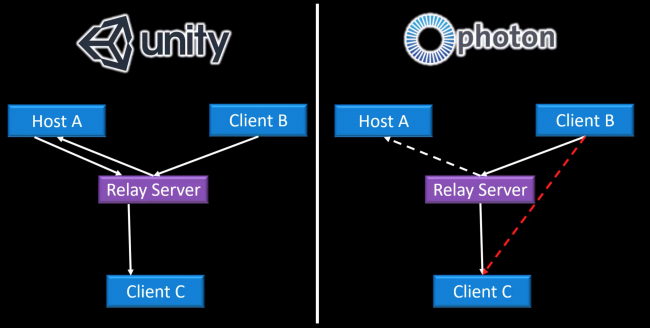
The above diagram depicts how messages are transferred between nodes in a network in Unity and in PUN.
Unity Networking supports a server/client architecture. All messages have to go through the Host client and can’t be sent directly between nodes. For example, based on the diagram above, messages transmit from client B to client C using the following path: Client B ▸ Relay Server ▸ Host A ▸ Relay Server ▸ Client C.
As you can see, the message takes a total 4 hops from source to destination. In addition to this, if the Host gets disconnected from the network, the game stops.
PUN has a similar server/client architecture, but also supports peer-to-peer sending of messages. For example, based on the diagram above, messages transmit from Client B to Client C using the following path: Client B ▸ Relay Server ▸ Client C.
That’s a total of 2 hops compared to the 4 in Unity for the same message transfer between two nodes. In addition to this, PUN could potentially bypass the Relay Server entirely and Client B can communicate directly with Client C, thus reducing the hops to 1.
Because of this, PUN is faster than Unity.
Pricing
Another key difference between Unity and PUN is the Pricing model.
Unity offers a free number of Concurrent Users (CCU) for each license.
- Personal: 20 Concurrent Users
- Plus: 50 Concurrent Users
- Professional: 200 Concurrent Users
If you need to increase the number of CCUs that your game supports, you’ll have to pay for the extra bandwidth that you use. You’ll be charged $0.49/GB of traffic that travels through the Unity infrastructure (Matchmaker and Relay Server).
Source – https://support.unity3d.com/hc/en-us/articles/209604483-How-much-does-Unity-Multiplayer-cost-
PUN also provides up to 20 CCU, 8000 Monthly Actives and 500 Messages per room for Free. In addition to the free plan, it offers a very nice $95 one-time payment option for 60 Months, which includes 100 CCUs, 40k monthly actives, and 500 messages per room. This option is great for small indie developers who are on a budget.
The combination of comparably faster performance, well written tutorials and documentation, and a healthy choice of pricing plans make PUN a very good option for developers to build multiplayer games.
Pricing – https://www.photonengine.com/en-US/PUN/pricing
Getting Started
You’ll need Unity version 2018.3 or newer to load the starter project successfully. In case you don’t have it installed on your system, you can download it from unity3d.com.
Once you have everything set up, download the starter project using the Download Materials link at the top or bottom or this tutorial, and open Photon Starter with Unity.
Project Overview
Take a look at the folder structure in the Project window:

Here’s what each folder contains:
- LogViewer: Files required for the LogViewer asset.
- Materials: Materials required for this tutorial.
- Models: Models required for this tutorial.
- Photon: Files required for the Photon Library.
- PhysicsMaterial: Physics Materials used in the project.
- Prefabs: Prefabs for the tutorial.
- Resources: Prefabs that have to be synced by Photon.
- Scenes: The game’s Main Menu and Arena scenes.
- Scripts: The scripts required for the project.
Open the Launcher scene from Assets / RW / Scenes.
If you’ve played multiplayer games before, you’ll know that before you and your friends start playing the game together, you first need to create or join a Lobby (or a Game Room) where you all connect and then the lobby leader initiates the game.
In this scene you’ll make a Lobby using Photon Unity Networking. You’ll create a Room with a specific name, and then your friend can join your lobby by entering the same room “name” in their instance of the game.
Once you and your friend have joined the same room, the lobby leader can load the MainArena scene, where you both can play the game together.
Creating a Photon Account
Before you get started with building the Lobby, you’ll need to create an account at the official site of Photon Engine by going to https://dashboard.photonengine.com/en-us/account/SignUp.


- Once you’ve successfully signed up, you’ll be redirected to your account Dashboard.
- On the same page, click on the Create a new app button. Enter a name for your app, “SampleApp” for example, and click on the Create button at the bottom of the form.
- Finally, on the Dashboard page, you’ll see a box with the details of your “SampleApp”. Copy the AppId and store it somewhere, as you’ll use this later on in the tutorial for testing.
Back in the Unity Editor, open the PUN Wizard by selecting Window ▸ Photon Unity Networking ▸ PUN Wizard.

In the PUN Wizard window, click Setup Project and enter the AppId that you saved while setting up a photon engine account in the previous section. Click the Setup Project button.
Now that you have Photon set up, let’s get started with building the Lobby.