Kotlin Multiplatform Project for Android and iOS: Getting Started
In this tutorial, you’ll learn how to use Kotlin Multiplatform and build an app for Android and iOS with the same business logic code. By JB Lorenzo.
Hallo! Gluten Tag. :]
Are you a bit tired of writing two versions of similar code for Android and iOS?
While these two platforms are different, the business logic behind your app is probably similar: download files, read from and write to a database, send messages to a remote host, and retrieve and display fancy kitten pictures.
These similarities are why Kotlin Multiplatform Mobile (KMM) exists. Historically, it’s known as Kotlin Multiplatform Project, or MPP. Thanks to Kotlin/JVM, Kotlin/JS and Kotlin/Native, you can compile/transpile a single project for many platforms.
In this tutorial, you’ll learn how to build and update an app for Android and iOS while only having to write the business logic once in Kotlin. More specifically, you’ll learn how to:
- Integrate KMM into an existing project.
- Set up the common module.
- Fetch data from a network.
- Save data.
Ready to get started? Keep reading!
Getting Started
Download the starter project by clicking the Download Materials button at the top or bottom of the tutorial.
Open the starter project in Android Studio 4.1 or later.
Use a recent version of Kotlin — 1.4.20 or above. For iOS, you need Xcode 11.3 or later.
Looking at the code, you’ll find the starter project provides the interface and some logic for the MultiGrain app: A simple app that navigates a list of grains and their descriptions, it saves your favorite grains and has platform specific code in the UI.
Build and run the starter code on Android Studio and you’ll see the screen below.

Once you click the Grains button, you’ll see the screen below. It has a hardcoded list of grains.

Of course, you’ll want to update the list from time to time, and it’s better if it can be done remotely. It’s also great if you can save the users’ favorite grains locally. Since you have both Android and iOS apps, you can save some headache by sharing some code for fetching the data and saving your preferences.
But before you get into the implementation, you’ll learn some theory first.
Multiplatform
Kotlin Multiplatform supports more than just Android and iOS. It also supports JavaScript, Windows and other native targets. You’ll focus on the mobile aspect, or Kotlin Multiplatform Mobile (KMM).
Common Code
KMM allows shared code in Android and iOS. On Android, it does this by using a shared module with Gradle. On iOS, you can import the shared module as a framework that you can access from Swift code.

If you think it’s easy to understand how Android uses common code, you’re right. It’s a simple include in settings.gradle. However, as mentioned earlier, for iOS it’s different, as the code is compiled to native code. You’ll go through the steps of creating this framework later.
Not all code can be common; for example, calling native libraries for key-value storage requires writing different code for iOS and Android. To do this, there can be a common interface acting as common code. Then the platform specifies the interface that will be used in each platform separately.
Platform-Specific Code
Sometimes you need to call methods that are specific to a platform. It isn’t possible to use platform-specific code inside the common module, but Kotlin has a mechanism it uses to achieve this result: expect/actual.
First, declare a class, method or function in the common module using the expect keyword, and leave the body empty, as you often do when creating interfaces or abstract classes. Then, write the platform-specific implementations for the class, method or function in all the other modules using the actual keyword in the signature.

Each platform can share a common interface while also possessing its own implementation.
Now that you’ve covered the theory, what now? Keep reading to find out.
Integrating KMM Into an Existing Project
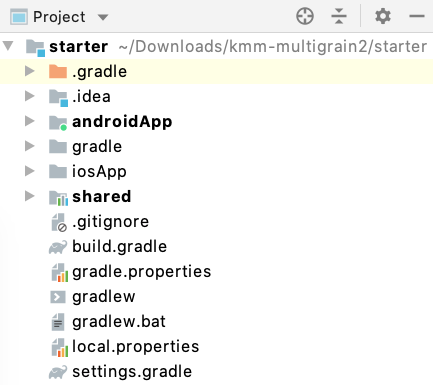
Open the starter project in Android Studio. The folder structure should look like the following.
Now you’ll begin integrating it into an existing project.
Setting Up the Common Module
Before continuing, ensure you have the KMM plugin in Android Studio. To check this, go to Preferences > Plugins in Android Studio. Then look up Kotlin Multiplatform Mobile. Install it if it isn’t already there.
Next, to add the common module, go to File > New > New Module.
Then select KMM Shared Module as shown below:

Check the Generate packForXcode Gradle task. This will be used later when you set up iOS.

Lastly, click on Finish.
To see if everything still works, build and run your project. It shouldn’t change anything visually, and it should still compile.
Integrating Into Android
First, add the following line in androidApp/build.gradle inside the dependencies structure:
implementation project(":shared")
This will allow you to use the common module in Android. Later, you’ll also add dependencies and platform-specific code.
Integrating Into iOS
Before you start integrating the common module in iOS, select iosApp as the configuration. Then build and run the project.

It should open iOS Simulator and show the screen below.

To use the common module in iOS, open iosApp/iosApp.xcodeproj in Xcode. Next, add a Run Script in Build Phases of the Xcode project by pressing the + button.

Enter the code below in the expanded Run Script area:
cd "$SRCROOT/.."
./gradlew :shared:packForXCode -PXCODE_CONFIGURATION=${CONFIGURATION}
After the build script is entered, it should look like:

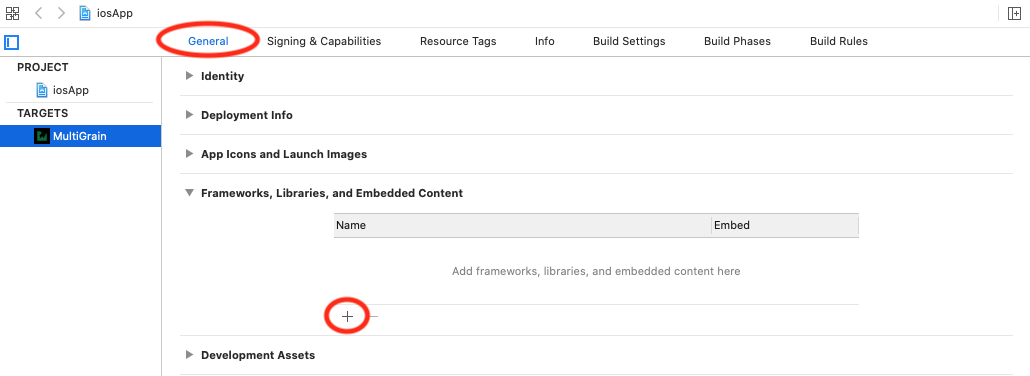
Then build the project in Xcode to create the common code as a framework. After this, select general under the MultiGrain target. In Frameworks, Libraries, and Embedded Content, click the + button.
On Choose frameworks and libraries to add, click the dropdown Add Other and select Add Files.
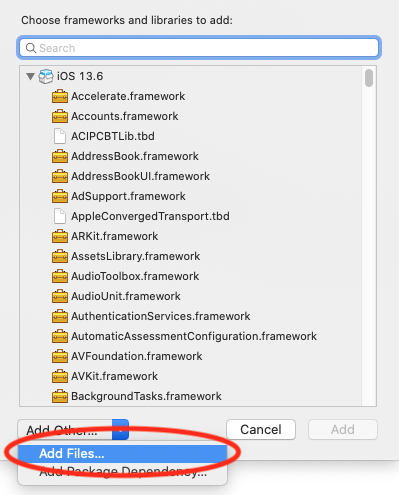
Afterward, navigate two folders up to the root starter folder, as shown below, add shared/build/xcode-frameworks/shared.framework and click Open.

After adding the framework, it should look like the image below.

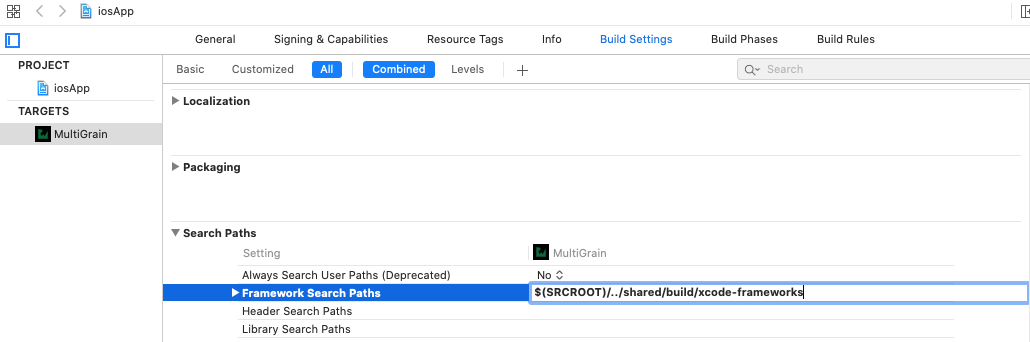
At this point, the project won’t be able to find the framework, so you have to add the file into the Framework Search Paths. To do this, go to the target’s Build Settings. Then find Framework Search Paths. Set the value of this field to:
$(SRCROOT)/../shared/build/xcode-frameworks
The change is shown in the picture below.
Build and run. There won’t be a visual change, but now you can start using the common module.
Close Xcode for now, as the next section is about fetching data from the network.