Drag and Drop Tutorial for macOS
The drag-and-drop mechanism has always been an integral part of Macs. Learn how to adopt it in your apps with this drag and drop tutorial for macOS. By Warren Burton.
Ever since the invention of the Mac, drag and drop has been a part of the user interface. The quintessential example is in Finder, where you can drag files around to organize things or drop them in the trash.
The fun doesn’t stop there.
You can drag your latest sunset panorama from Photos and drop it in Messages, or pull a file from Downloads on the dock and drop it right in an email. You get the point, right? It’s cool and an integral part of the macOS experience.
Drag and drop has come a long way from its beginnings and now you can drag almost anything anywhere. Try it and you might be pleasantly surprised by the actions and types supported by your favorite apps.
In this drag and drop tutorial for macOS, you’ll discover how to add support to your own apps, so users can get the full Mac experience with your app.
Along the way, you’ll learn how to:
- Implement core drag and drop actions on
NSViewsubclasses - Accept data dropped from other applications
- Provide data to be dragged into other views of your app
- Create custom dragged types
Getting Started
This project uses Swift 3 and requires, at a minimum, Xcode 8 beta 6. Download the starter project, open it in Xcode and build and run it.

Meet the Project App
Many kids enjoy playing with stickers and making cool collages with them, so you’re going to build an app that features this experience. You can drag images onto a surface and then you can kick things up a few notches by adding sparkles and unicorns to the view.
After all, who doesn’t like unicorns and sparkles? :]
To keep you focused on the objective — building out support for dragging and dropping — the starter project comes complete with the views you’ll require. All you need to do is learn about the mechanics of drag and drop.
There are three parts to the project window:
- The sticker view where you’ll drag images and other things
- Two smaller views that you’ll turn into different dragging sources
Take a look at the project.

You’ll edit four specific files as you work through this tutorial, and they’re in two places: Dragging Destinations and Dragging Sources:
In Dragging Destinations:
- StickerBoardViewController.swift: the main view controller
- DestinationView.swift: view that sits on top of the upper section of the window — it will be the recipient of your drag actions

In Dragging Sources:
- ImageSourceView.swift: bottom view with the unicorn image that you’ll turn into a dragging source
- AppActionSourceView.swift: view that has the label Sparkles — you’ll turn this into another type of dragging source
There are some other files in the Drawing and Other Stuff groups that provide helper methods and are essential to the project app, but you won’t need to give them any of your time. Go ahead and explore if you’d like to see how this thing is built!
Pasteboards and Dragging Sessions
Drag and drop involves a source and a destination.
You drag an item from a source, which needs to implement the NSDraggingSource protocol. Then you drop it into a destination, which must implement the NSDraggingDestination protocol in order to accept or reject the items received. NSPasteboard is the class that facilitates the exchange of data.
The whole process is known as a dragging session:

When you drag something with your mouse, e.g., a file, the following happens:
- A dragging session kicks off when you initiate a drag.
- Some data bits — often an image and URL — are chosen to represent the information placed on the dragging pasteboard.
- You drop that image on a destination, which chooses to reject or accept it and take some action — for instance, move the file to a new folder.
- The dragging session concludes.
That’s pretty much the gist of it. It’s a pretty simple concept!
First up is creating a dragging destination for receiving images from Finder or any other app.
Creating a Dragging Destination
A dragging destination is a view or window that accepts types of data from the dragging pasteboard. You create a dragging destination by adopting NSDraggingDestination.
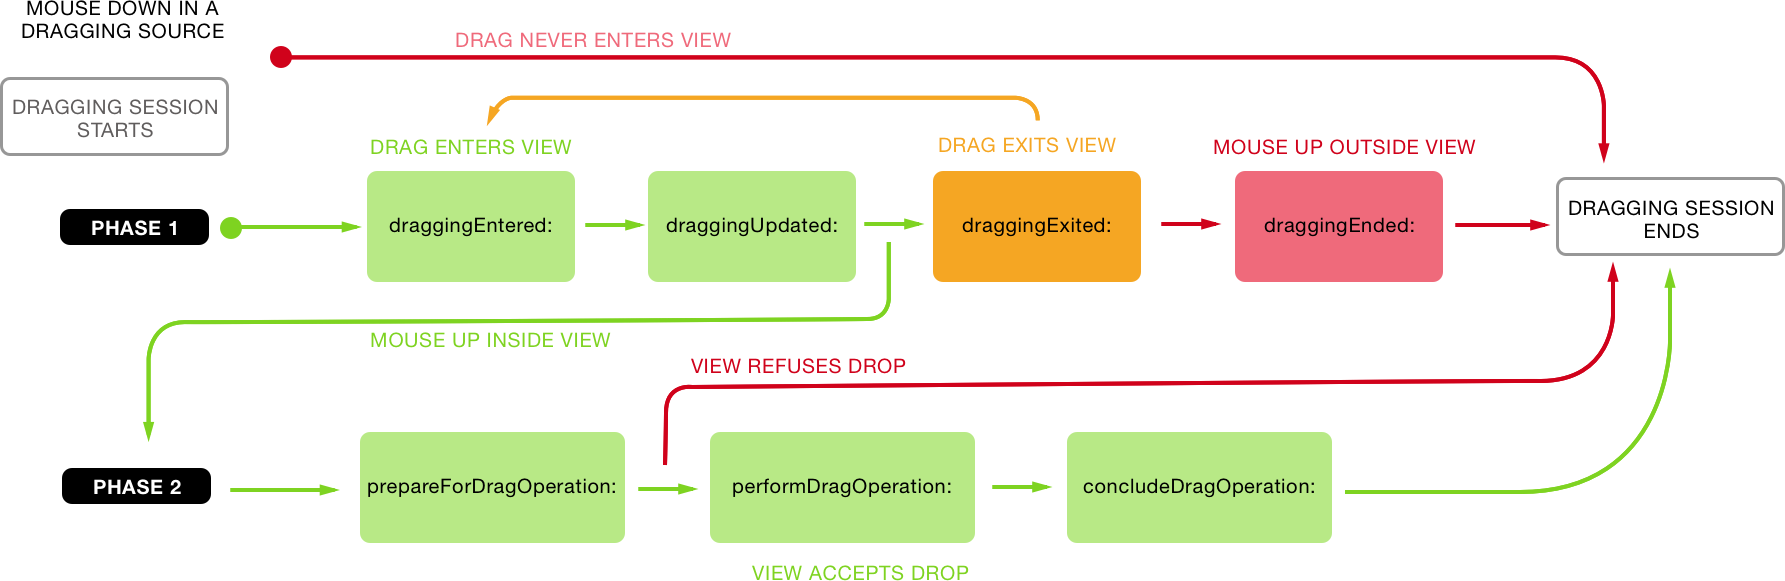
This diagram shows the anatomy of a dragging session from the point of view of a dragging destination.
There are a few steps involved in creating the destination:
- When building the view, you have to declare the types that it should receive from any dragging session.
- When a dragging image enters the view, you need to implement logic to allow the view to decide whether to use the data as well as let the dragging session know its decision.
- When the dragging image lands on the view, you use data from the dragging pasteboard to show it on your view.
Time to get down with some codeness!
Select DestinationView.swift in the project navigator and locate the following method:
func setup() {
}
Replace it with this:
var acceptableTypes: Set<String> { return [NSURLPboardType] }

func setup() {
  register(forDraggedTypes: Array(acceptableTypes))
}
This code defines a set with the supported types. In this case, URLs. Then, it calls register(forDraggedTypes:) to accept drags that contain those types.
Add the following code into DestinationView to analyze the dragging session data:
//1.
let filteringOptions = [NSPasteboardURLReadingContentsConformToTypesKey:NSImage.imageTypes()]

func shouldAllowDrag(_ draggingInfo: NSDraggingInfo) -> Bool {

  var canAccept = false

  //2.
  let pasteBoard = draggingInfo.draggingPasteboard()

  //3.
  if pasteBoard.canReadObject(forClasses: [NSURL.self], options: filteringOptions) {
    canAccept = true
  }
  return canAccept

}
You’ve done a few things in here:
- Created a dictionary to define the desired URL types (images).
- Got a reference to the dragging pasteboard from the dragging session info.
- Asked pasteboard if it has any URLs and whether those URLs are references to images. If it has images, it accepts the drag. Otherwise, it rejects it.
NSDraggingInfo is a protocol that declares methods to supply information about the dragging session. You don’t create them, nor do you store them between events. The system creates the necessary objects during the dragging session.
You can use this information to provide feedback to the dragging session when the app receives the image.
NSView conforms to NSDraggingDestination, so you need to override the draggingEntered(_:) method by adding this code inside the DestinationView class implementation:
//1.
var isReceivingDrag = false {
  didSet {
    needsDisplay = true
  }
}

//2.
override func draggingEntered(_ sender: NSDraggingInfo) -> NSDragOperation {
  let allow = shouldAllowDrag(sender)
  isReceivingDrag = allow
  return allow ? .copy : NSDragOperation()
}
This is what the code above does:
- Creates a property named
isReceivingDragto track when the dragging session is inside the view and has data that you want. It triggers a redraw on the view each time it is set. - Overrides the
draggingEntered(_:), and decides if it accepts the drag operation.
In section two, the method needs to return an NSDragOperation. You have probably noticed how the mouse pointer changes depending on the keys you hold down or the destination of a drag.
For example, if you hold down Option during a Finder drag, the pointer gains a green + symbol to show you a file copy is about to happen. This value is how you control those pointer changes.
In this config, if the dragging pasteboard has an image then it returns .copy to show the user that you’re about to copy the image. Otherwise it returns NSDragOperation() if it doesn’t accept the dragged items.