Integrating Spine with SpriteKit Tutorial
Learn how to add Spine skeletal animations into Sprite Kit in this short tutorial. By Ray Wenderlich.
Spine is a tool that allows you to easily create animated sprites for your games, in an incredibly efficient and flexible manner.
In our previous tutorial, you learned how to use Spine to create an animated elf.
In this short tutorial, you’ll learn how to take that animated elf and put it into a simple Sprite Kit game. Let’s dive right in!
Warning: The Spine-SpriteKit runtime you are going to use in this tutorial is an unofficial runtime, and is likely to be replaced with an official runtime in the future (fingers crossed).
After taking a look at the unofficial runtime, I think there are some things it’s missing, so I wouldn’t really recommend using it unless you’re an experienced coder comfortable with hacking around, etc.
For less experienced coders, I’d recommend waiting for the official runtime for SpriteKit, or using a different (official) Spine runtime at this point. You can use this tutorial just to get your feet wet with a working example for now.
Getting Started
Spine comes with a huge list of runtimes for almost every game framework, that contains all of the code you need to parse and use Spine animations in your game.
Good news for Sprite Kit fans – Sprite Kit has an (unofficial) Sprite Kit runtime, too. This project a dependency on the official spine runtime, so rather than downloading the project from github as a zip, it’s better to download it from the command line as follows:
$ git clone https://github.com/simonkim/spine-spritekit

$ cd spine-spritekit

$ git submodule init

$ git submodule update
Update 2/18/14: Michael Redig has released an alternative Sprite Kit runtime that you might want to check out.
Next, open Spine-Spritekit-Demo\Spine-SpriteKit-Demo.xcodeproj. Build and run the project, and you should see something that looks like this:
![]()
This demo project shows off some of the sample animations that come with Spine. Feel free to poke around if you’d like – but when you’re ready to make your own Sprite Kit game using your elf animation, read on!
Integrating Spine-SpriteKit
Create a new project with the iOS\Application\SpriteKit Game template. Name the project SpineTest, and save it to your Desktop.
Next, copy the spine-runtimes\spine-c and spine-spritekit folders into your SpineTest directory. At this point your directory should look like this:

Back in Xcode, drag the spine-c and spine-spritekit folders from your project directory into your project. Make sure that Create groups for any added folders is selected, that the SpineTest target is checked, and click Finish.
Open the spine-c group in your project navigator and delete everything except for include and src. Choose Remove References. At this point your project navigator should look like the following:

Next, select SpineTest in the Project Navigator, select the SpineTest target, and select the Build Settings tab. Double click Search Paths\Header Search Paths and enter the following paths:
- ./spine-c/include
- ./spine-spritekit

Finally, to test that it works open MyScene.m and add this import to the top of the file:
#import "DZSpineScene.h"
Build and run – if it compiles and runs with no errors, you have successfully integrated Spine-SpriteKit into your game!
Packing Your Art
Next, you need the artwork from the previous tutorial. If you don’t have it already, you can download it here.
Remember in Sprite Kit, it’s best to put any images you want to work with inside a texture atlas. However, at this time the Spine-SpriteKit runtime does not support Sprite Kit’s built-in texture packer format. Instead, you need to use either Spine’s (free) built-in texture packer or the paid tool TexturePacker to pack the sprites into a spritesheet (in .atlas and .json format).
If you are using the solution from the previous tutorial, we have already made the spritesheet in .atlas/.json format for you, so you can skip the rest of this section. But if you followed along with the previous tutorial and want to pack your own output from Spine to use, keep reading.
In this tutorial, you’re going to use Spine’s built-in texture packing. To do this, open your Spine project, click the Spine logo, and select the TexturePacker menu option.

Use the Browse buttons to select the directory where your Spine project and PNGs are, and enter skeleton for the name:
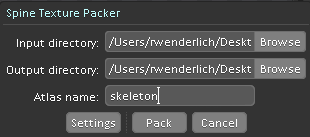
You can leave all the settings as default. Click Pack, and some text should appear that says Packing complete.
Adding Your Art
At this point you should have three files in your Spine project’s directory:
- skeleton.png: All of the pieces of the elf efficiently packed into a small image using TexturePacker.
- skeleton.atlas: A file describing the original names of each elf piece and their locations in skeleton.png, made by TexturePacker.
- skeleton.json: The file generated by Spine that describes the animations and how to move each sprite over time.

Drag these three files into your Xcode project (inside the SpineTest group). Make sure that Copy items into destination group’s folder (if needed) is checked and that the SpineTest target is checked, and click Finish.
Allright, now you finally have all the pieces in place – time to code!
Basic Animation
Open MyScene.m and add this import to the top of the file:
#import "DZSpineSceneBuilder.h"
DZSpineSceneBuilder is the main class in the Spine-SpriteKit runtime used to read the spine output and convert it into SKNodes and actions.
Next declare a few private instance variables as follows:
@implementation MyScene {
    SpineSkeleton *_skeleton;
    DZSpineSceneBuilder *_builder;
    SKNode *_elf;
    SKNode *_spineNode;
}
The first variable keeps track of the skeleton you want to work with (the elf skeleton in this case), the next keeps track of the scene builder class, and finally there are nodes for the elf node, and the spine nodes within.
Note that with Spine-SpriteKit, you need to have a “placeholder” node (i.e. _elf) to put the spine nodes within. This is so that you can position the spine nodes where the belong on the screen (otherwise they will be fixed to the bottom left).
Next, replace initWithSize: with the following:
-(id)initWithSize:(CGSize)size {
    if (self = [super initWithSize:size]) {

        // 1
        _skeleton = [DZSpineSceneBuilder loadSkeletonName:@"skeleton" scale:0.5];

        // 2
        _builder = [DZSpineSceneBuilder builder];

        // 3
        _elf = [SKNode node];
        _elf.position = CGPointMake(self.size.width/2, 0);
        [self addChild:_elf];

        // 4
        _spineNode = [_builder nodeWithSkeleton:_skeleton animationName:@"trip" loop:NO];
        [_elf addChild:_spineNode];

    }
    return self;
}
Let’s go over this bit by bit:
- Loads the skeleton that you want to work with. In the previous tutorial, you probably never changed the name so it will be the default “skeleton”. However you can have more than one skeleton in a Spine file.
- Loads the builder object, that converts Spine files to SKNodes/SKActions.
- Makes the “placeholder” object to allow you to position the el, and places it in the center bottom of the screen.
- Here’s the important part – this helper method creates the SKNode chain given a particular skeleton and an animation to run on the skeleton. It adds it as a child of the elf, and the animations start to play right away.
Note: The animation name shown here (“trip”) may be different for you if you are not using the sample files. Check in Spine what exactly you named the animation and replace this appropriately, or it will not run the animation.
That’s it – build and run, and you’ll see your animated sprite!
![]()