PaintCode Tutorial for Designers: Getting Started
In this PaintCode tutorial for designers, learn how to create a stopwatch control that can be used in an iOS app! By Victoria Wenderlich.
PaintCode is a fantastic little Mac app that turns your vector graphic designs into Core Graphics code you can easily use in your iOS apps.
Not only does it create all of the code to support your lovely vector graphics, but these graphics can be dynamic, which means you can change their color, size, layout, and more, all from within your code.
In this tutorial, you’ll learn how to create two static assets — a stopwatch image and a stopwatch hand — which you’ll export to a StyleKit that you can use in your app.
StyleKits keep track of all the things such as colors, gradients and shadows that you use in your project. If you make any changes to your assets in PaintCode, you simply have to export the StyleKit again and your project will be updated in a snap.
Here’s what you’ll make!

Getting Started
First make sure you have a paid copy of PaintCode. The free trial will not work for this tutorial; it has a number of restrictions such as the inability to copy/paste, the inability to export code, and more.
Open PaintCode; a new document should open automatically, but if not, simply select File\New.

Check out the Canvas panel on the right-hand side of the screen; this is the Inspector pane, which you can use to change the attributes of your selection:

In the Canvas section, rename the canvas to Stopwatch, change both the width and height of the canvas to 250, and change the Code Export dropdown to StyleKit Drawing & Image Method as shown below:

This generates two methods in the StyleKit class; one to perform the actual drawing, and another to return a UIImage representation of the drawing.
Creating the Stopwatch
Next, choose Oval from the Toolbar at the top of the screen:

Click and drag a circle onto the canvas – the exact shape doesn’t matter as you’ll modify the values next.
With the circle selected, head back to the Inspector and set both the width and height of your Oval to 220, the X position to 15 and the Y position to 30:
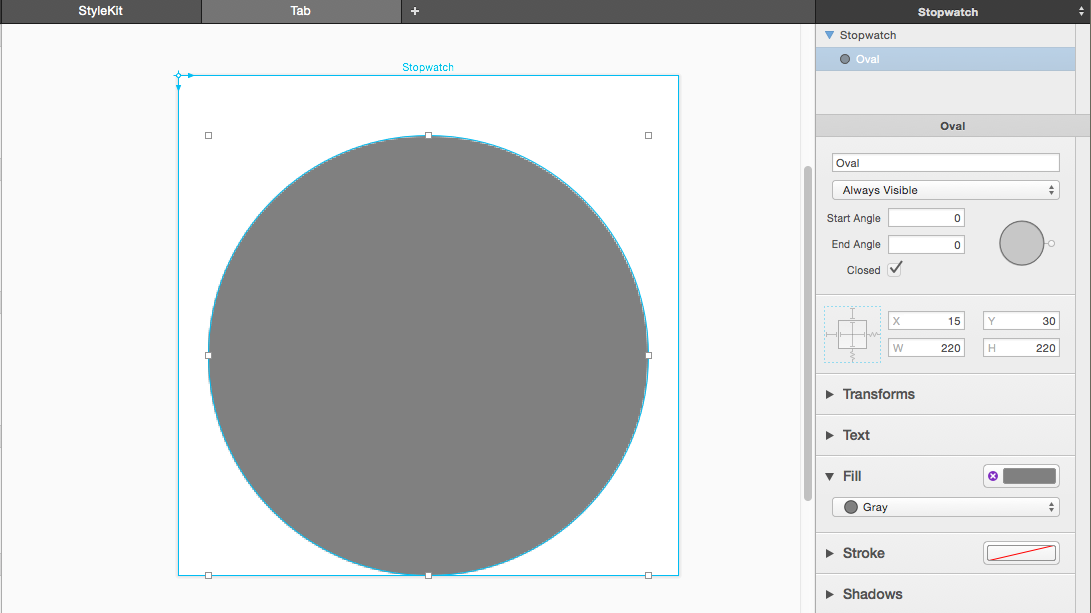
This moves your object’s origin down and over a little to (15, 30); by default the origin of your object is at (0, 0).
Click the Fill dropdown in the Inspector and select Add new Color…:

In the resulting menu, change the name of your color to Base Color and the hex value to #118DDA:

Click anywhere outside of the menu to close it.
Next, go up to the Toolbar and choose Rect. Drag out a rough rectangle at the top of the circle, and modify the position and size of your Rectangle as follows:
- X: 114
- Y: 2
- W: 22
- H: 34
Your Canvas should now look like the following:

Next, drag out another Rect on your Canvas that’s 30 wide and 20 — the exact position doesn’t matter right now. You should have something like the image below:

Now drag out another Rect, but hold down Shift to keep the aspect ratio 1:1 and drag out to a size of 10 x 10:
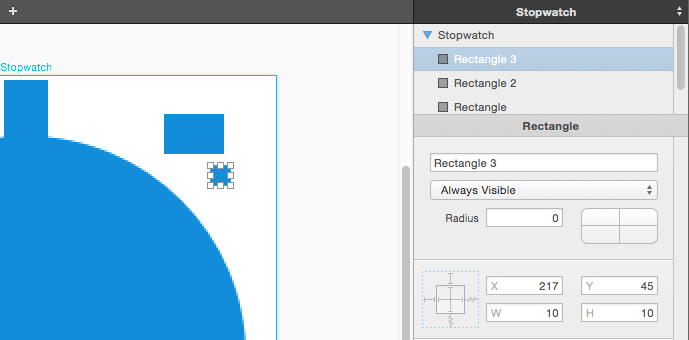
Click the + button at the bottom right of the canvas area to see your rectangles up close; you can also pan around by holding the spacebar and clicking and dragging your mouse.
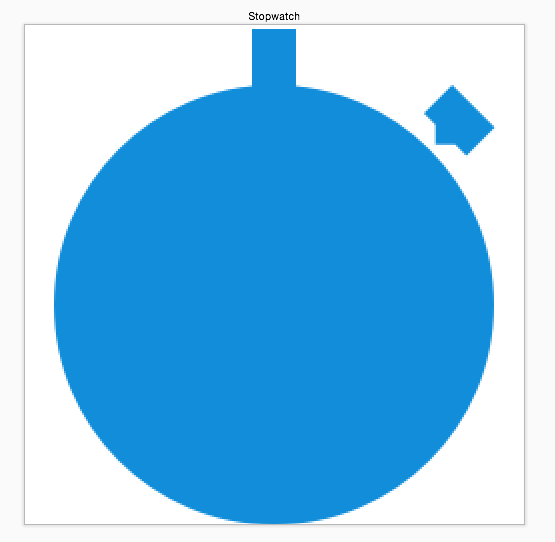
Now you need to rotate the rectangle by -45 degrees. Click on the rectangle to ensure it’s selected, then go to the Inspector and click on Transforms to expand the panel. Enter -45 for the Rotation:

Move the square so the upper right point of the square intersects the diagonal right side of the rectangle as shown below:

Hold down Shift, and click on both the rectangle and the square to select them. Now click Union in the toolbar to combine the two rectangles into a single shape like so:

Position the shape at X 200, Y 30, either manually or by setting the X and Y coordinates in the Inspector:

Okay — that takes care of the main body and buttons of your stopwatch. Zoom out so you can see the entire stopwatch; it should look something like the following:
Save your project before you move on: click File\Save or press Command-S, name your project PaintCodeTutorial and click Save.
Creating the Stopwatch Hand
You know what a stopwatch is without a second hand? Really inaccurate. :]
Creating a stopwatch hand would be the next logical step.
You’ll eventually place the second hand on a new canvas, but you’ll first create the hand on the old canvas so you can position it properly over the stopwatch.
First, create the new canvas. Right-click anywhere outside of the current canvas in the central portion of your window. Select Add New Canvas, and you’ll see a menu pop up. There are plenty of iOS device resolutions to choose from, but look at the top of the menu where you’ll see one of two things: either (200×200) Default, or (250×250) Size of Stopwatch:

If you had the Stopwatch canvas selected when you right-clicked outside the window (you’d know this as the canvas would be outlined in blue rather than grey), you’d see the (250 x 250) Size of Stopwatch option. If the Stopwatch canvas wasn’t selected, you’d see the (200 x 200) Default option instead.
In this tutorial choosing one over the other doesn’t make a lot of difference, but this demonstrates an easy way to create a new canvas with the same dimensions as another canvas: click on the canvas to select it, then right-click outside the canvas to create a new one.
In either case, select the first option in the list.
You can move the canvas around by clicking and dragging the title at the top of the canvas. The position of the canvas is not important, but if you don’t like where PaintCode chose to put the canvas, you can move it around to suit.
Change the title of the canvas to Stopwatch_Hand, the width to 250, and the height to 220. Since your stopwatch hand will be white, a darker canvas color will make it easier to see what you’re drawing. Click the white color rectangle next to Background and select black to change the background color. Leave the StyleKit option as Drawing Method.
Your canvas and Inspector should look like the following image:

Note that the actual canvas color does not affect the code at all.
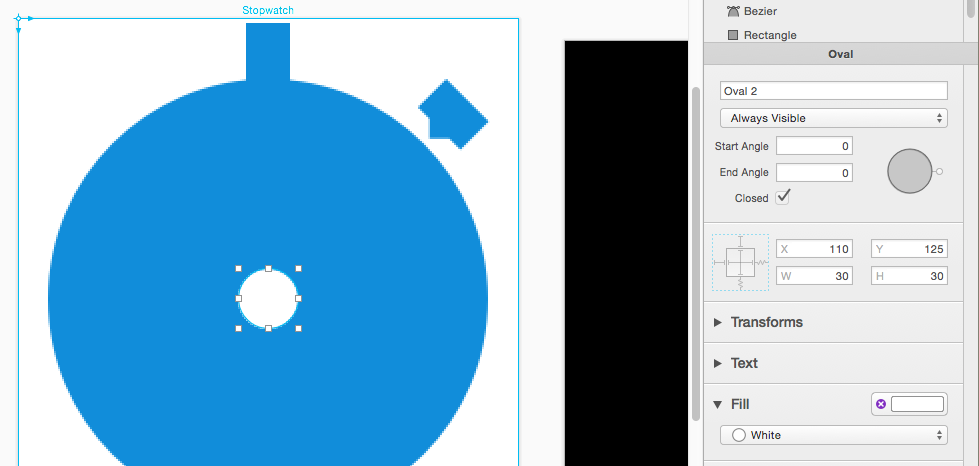
Now head back to the Stopwatch canvas, choose Oval from the Toolbar and hold down Shift while you drag out a circle like so:

Click the Fill dropdown and click the white circle from the list of selections to set the circle’s color:

Change both the Height and Width to 30, then manually center the circle on the stopwatch’s blue circle face. Purple guides will pop up to help you position the circle. When you’re done, the circle’s origin should be at X 110, Y 125:
Now for the hand itself. Click Rect in the Toolbar and drag out a white rectangle of Width 8 and Height 115. You can always tweak the rectangle’s color, width, and height in the Inspector if necessary.
Drag the rectangle over the white circle and position it as shown below:

You are going to combine the two shapes, but first you have to set the circle shape’s origin appropriately so that the hand will rotate around the center of the circle.
Shift-click both the white circle and rectangle and expand the Transforms section in the inspector to see their respective origin points:
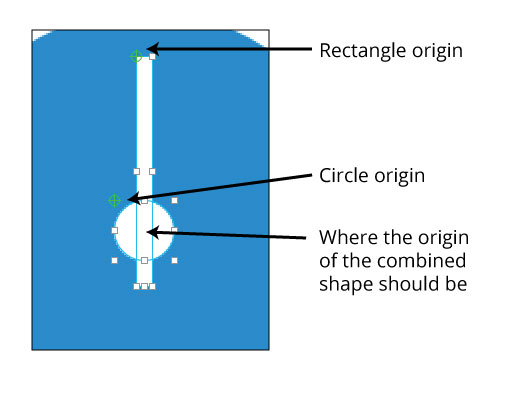
You want the origin of the combined shape to be in the center of the circle — but you need to know exactly where that point is. You can’t just guess.
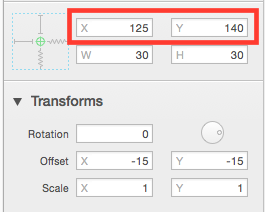
Click away from the shapes to deselect them. Click the circle to select it, then click Transforms in the Inspector. Hover over the green circle and your cursor will turn into a hand. Click and drag the green origin marker to the center of the circle; the origin marker should snap to the center. Failing that, you can manually move the origin by entering -15 into both the X and Y values of Offset in the Transforms panel:

Take note of the origin’s X and Y position: 125, 140. You’ll need to enter this later.
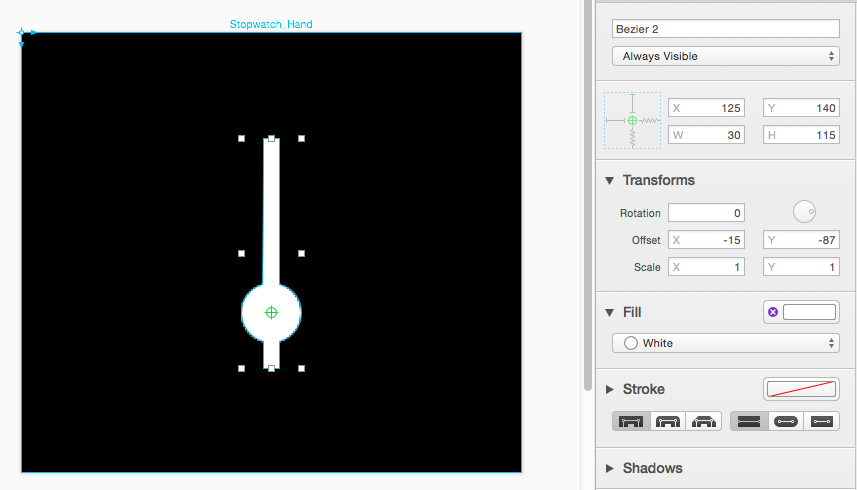
Now you’ll union the two shapes. Shift-click the white circle and the white rectangle, and click Union in the Toolbar. Now click Transforms — you’ll notice that the white shapes have been combined into a new shape with the origin at the top left:

If you left the origin in its current position, the hand would rotate around that point, rather than around the center of the circles. Click and drag the green origin circle until its X and Y values are 125 and 140 respectively:

In this case, you can’t edit these values from the Inspector or it will move the shape along with the origin — which is not what you want!
The only thing left to do is move your new stopwatch hand back to its own canvas. Select the shape and press Command-X to cut the stopwatch hand.
Click the Stopwatch_Hand canvas, then press Command-V to paste the hand shape; it will automatically place itself onto the new canvas with its origin at the same position as it was on the old canvas: X 125, Y 140.
Since the new canvas is only 220 pixels high, instead of 250 high like the Stopwatch canvas, your shape is no longer located correctly. Since the hand’s canvas is 30 pixels shorter, the hand needs to be located 30 pixels closer to the origin in the Y direction..
Select the hand shape, then use the Inspector to change the position to (125, 110) as shown below:

That’s the last bit of pixel-pushing! Time to give yourself…a hand! ;]
All that’s left to do is export this StyleKit project so you can use it in your code.