Sprite Kit Tutorial: Drag and Drop Sprites
Learn how to drag and drop sprites, both with and without gesture recognizers, in this Sprite Kit tutorial for beginners! By Riccardo D'Antoni.
Update note: Team member Riccardo D’Antoni has updated this tutorial originally by Ray Wenderlich (Cocos-2D version) and update by Jean-Pierre Distler (Objective-C version). It’s now fully up-to-date for iOS 8 and Swift!
Handling touches and swipes is right at the core of most apps – after all, it’s how your users interact with the user interface!
In Sprite Kit, there’s no UIButton equivalent to handle simple taps, and you need to implement touch handling yourself with callbacks or with gesture recognizers.
Not to worry though; in this tutorial, you’re going to learn all about handling touches and drag-and-drop:
- The basics of dragging and dropping sprites with touches
- How to scroll the view itself via touches
- How to use gesture recognizers with Sprite Kit for even more cool effects!
To make things fun, you’ll be moving some cute animals from a Game Art Guppy art pack, on a background made by gwebstock.
This tutorial assumes you at least know the basics of Sprite Kit. If you are completely new to Sprite Kit, be sure to check out our Sprite Kit Swift Tutorial for Beginners first.
So without further ado, drag your fingers over to the keyboard and let’s get started!
Getting Started
Before you implement the touch handling, first you’ll create a basic Sprite Kit scene displaying the sprites and artwork.
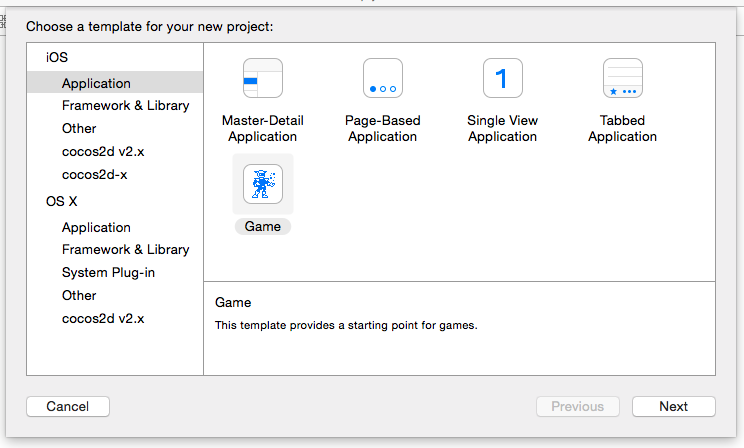
Open up Xcode, go to File\New Project, choose the iOS\Application\Game template, and click Next.
Name the project DragDropSwift, select Swift as the Language, SpriteKit as the Game Technology, and iPhone for Devices. Click Next to continue, and select a location to save the project.

For layout simplicity, you’ll limit the app to landscape only. Select your DragDropSwift project in the Project Navigator, select your DragDropSwift target, and make sure only Landscape Left and Landscape Right are checked.

Open GameViewController.swift and delete the SKNode extension as well as viewDidLoad(). You won’t be using the scene from the scene editor, but will set up things from code instead.
Add the following method to GameViewController:
override func viewWillLayoutSubviews() {
  // Configure the view.
  let skView = self.view as! SKView
  skView.showsFPS = true
  skView.showsNodeCount = true

  /* Sprite Kit applies additional optimizations to improve rendering performance */
  skView.ignoresSiblingOrder = true

  let scene = GameScene(size: skView.frame.size)

  /* Set the scale mode to scale to fit the window */
  scene.scaleMode = .AspectFill

  skView.presentScene(scene)
}
This is the standard Sprite Kit boilerplate to display the starter scene.
Open Images.xcassets. You can delete the starter Spaceship image since you’ll be dealing with friendly animals and not spaceships for this tutorial!
Next, download the resources you’ll need for this tutorial. Once you download and unzip the file, drag all of the images into the asset catalog.
![]()
Once you’ve added the images to your project, open GameScene.swift and replace the entire contents of the file with the following:
import SpriteKit

private let kAnimalNodeName = "movable"

class GameScene: SKScene {
  let background = SKSpriteNode(imageNamed: "blue-shooting-stars")
  var selectedNode = SKSpriteNode()
}
You don’t need the starter “Hello World” scene; instead, you have a constant that you’ll use later to track the currently moving sprite, and two properties to keep track of the background and image sprites.
Next, add the following initializers to the class:
required init?(coder aDecoder: NSCoder) {
  fatalError("init(coder:) has not been implemented")
}

override init(size: CGSize) {
  super.init(size: size)

  // 1
  self.background.name = "background"
  self.background.anchorPoint = CGPointZero
  // 2
  self.addChild(background)

  // 3
  let imageNames = ["bird", "cat", "dog", "turtle"]

  for i in 0..<imageNames.count {
    let imageName = imageNames[i]

    let sprite = SKSpriteNode(imageNamed: imageName)
    sprite.name = kAnimalNodeName

    let offsetFraction = (CGFloat(i) + 1.0)/(CGFloat(imageNames.count) + 1.0)

    sprite.position = CGPoint(x: size.width * offsetFraction, y: size.height / 2)

    background.addChild(sprite)
  }
}
The init(coder:) initializer is required by the compiler, but you won't actually use it. The real logic is in the overridden init(size:); let's go over it step by step.
- First, you set up the background for the scene by giving a name that will be used in the app logic later on. Next, you set the anchor poin of the image to the lower left of the image, at (0, 0). The anchor point in Sprite Kit is at the center of the node by default, which means you're usually setting the center point when you set a node's position. By setting the anchor point to the lower left corner, when you set the position of the node, you are now setting where the lower left corner is.
- You're not setting the position of the background but just adding it to the node hierarchy. That means the position of the background defaults to (0,0). Hence, the lower left corner of the image is located at (0,0), and so the image (which is about 800 points long) extends off screen to the right.
- The next part of the method loops through the list of images to load. For each image, you create a node and place it on the scene. The nodes are distributed along the length of the screen, to have a nice initial layout. Setting the name of a node avoids the need of holding a reference to a node, in case you need it later.
That's it! Build and run your code, and you should see some cute animals sitting there, just begging to be touched!
![]()
Selecting Sprites based on Touches
Now you'll work on the code to determine which sprite is selected based on the user's current touch.
Add the implementation of touchesBegan(_:withEvent:) to start handling taps:
override func touchesBegan(touches: NSSet, withEvent event: UIEvent) {
  let touch = touches.anyObject() as UITouch
  let positionInScene = touch.locationInNode(self)

  selectNodeForTouch(positionInScene)
}
First you get the touch from the set of touches, and convert the touch coordinates to the coordinate system of the scene. With this position, you call selectNodeForTouch(_:), which you'll implement next to select one of the animals.
Add the following helper methods to the class next:
func degToRad(degree: Double) -> CGFloat {
  return CGFloat(Double(degree) / 180.0 * M_PI)
}

func selectNodeForTouch(touchLocation: CGPoint) {
  // 1
  let touchedNode = self.nodeAtPoint(touchLocation)

  if touchedNode is SKSpriteNode {
    // 2
    if !selectedNode.isEqual(touchedNode) {
      selectedNode.removeAllActions()
      selectedNode.runAction(SKAction.rotateToAngle(0.0, duration: 0.1))

      selectedNode = touchedNode as! SKSpriteNode

      // 3
      if touchedNode.name! == kAnimalNodeName {
        let sequence = SKAction.sequence([SKAction.rotateByAngle(degToRad(-4.0), duration: 0.1),
          SKAction.rotateByAngle(0.0, duration: 0.1),
          SKAction.rotateByAngle(degToRad(4.0), duration: 0.1)])
        selectedNode.runAction(SKAction.repeatActionForever(sequence))
      }
    }
  }
}
Sprite Kit uses radians for rotation so the first method angle given in degree to radians.
selectNodeForTouch(_:) selects one of the animal sprites based on location, in three steps:
- First, it finds the node at the
touchLocation. - If the node found is a
SKSpriteNodeinstance, you first check if the node is the same as the previously selected node. In this case there is nothing to do and the method returns early. If this is a freshly selected node, then you first reset it by removing all actions on the node and then setting it back to its original, unrotated state. - This if-statement checks if the selected node is one of the animatable animal nodes by checking the name property that you set. If so, you create a sequence of actions for a "wiggle" animation, like the one on the home screen when rearranging/deleting apps, and then run this sequence on the selected node. To keep the level of excitement high, you run it as an action that is repeated forever.
Build and run your code, and you should now be able to tap on the animals. When you tap them they should wiggle in a particularly cute way to show that they are selected!
