Sprite Kit for Kids with Swift
Learn how to make a simple iPhone game using Sprite Kit – by a 13-year old game developer! By Ajay Venkat.

Hi! My name is Ajay, and I am a 13 year old iOS developer.
I enjoy making iOS games using Sprite Kit, Apple’s 2D game programming framework. I know a lot of kids are interested in learning how to do this too, so I thought I’d make this tutorial!
In this tutorial, I’ll show you how to make a simple game called Space Monkey. It will teach you the basics of making your own iPhone game, and hopefully get you excited ’bout learning more.
So strap on your jet boosters, and let’s get started!
Getting Started
The first thing you need to do is to install Xcode – Apple’s free tool for developing iOS and Mac apps.
If you don’t have Xcode installed already, download it from the App Store. If you already have Xcode, make sure you have the latest version installed (Xcode 6 at the time of writing this tutorial).

Once you have Xcode installed, download this starter project, unzip it, and double click SpaceMonkey.xcodeproj.
This will open the project in Xcode. Click the Play button to see what you’ve got so far:

You will see a blank black screen:

This starter project is a nice blank slate for you to start working on your game. I’ve already pre-included some art and sounds for you in the project, which you can find in the Sounds and sprites.atlas folders.
Let’s put that art to good use – starting with the space monkey!
Adding your Monkey
In Sprite Kit, to add an image (like the space monkey) to the game, you need to do three things:
-
Create the sprite. A sprite is a copy of an image that you can move around in your game. Your first step is to create one of these, using the
SKSpriteNodeclass. - Position the sprite. The second thing you need to do is set the position of your sprite somewhere on the screen. In this game, you want the space monkey to start to the left hand side of the screen, toward the middle.
- Add the sprite to the scene. Creating the sprite isn’t enough – to display the sprite, you need to add it to the scene.
Let’s try this out step by step. Open GameScene.swift and replace the contents with the following code:
import SpriteKit

class GameScene: SKScene {

  // 1 - Create the sprite
  let player = SKSpriteNode(imageNamed:"spacemonkey_fly02")

  override func didMoveToView(view: SKView) {

    // 2 - Position the sprite
    player.position = CGPoint(x:frame.size.width * 0.1, y: frame.size.height * 0.5)
    // 3 - Add the sprite to the scene
    addChild(player)

    // 4 - Set scene background color to black
    backgroundColor = SKColor.blackColor()
  }

}
Let’s go over this code step by step.
- Create your SKSpriteNode with the monkey image given in the Art Folder, using
SKSpriteNode(imageNamed:). Note you are storing the sprite in a property on the class, so you can refer to it later. -
didMoveToView(_:)is called when your scene is first presented, so it’s a good place to add initial setup code. Here you set your sprite’spositionnear the left hand side of the screen. - Add the sprite to the scene by calling
addChild()with the name of your sprite. - Set the scene’s background color to black, to give a sense that the monkey is flying in space.
Build and run, and see your space monkey flying on the screen:

Time to add some enemies!
Adding your Enemies!
Enemies will work a bit differently because you need more than one and you need them to spawn in different areas of the screen.
First, you’ll need some methods to create some random numbers. Add these new methods to GameScene.swift, right after didMoveToView(_:) (but before the final curly brace):
func random() -> CGFloat {
  return CGFloat(Float(arc4random()) / 0xFFFFFFFF)
}

func random(#min: CGFloat, max: CGFloat) -> CGFloat {
  return random() * (max - min) + min
}
random() returns a random decimal value between 0 and 1. random(min:max:) returns a random number within a specified range. For this tutorial, you don’t need to understand how these work; you can just use them as helper methods.
Next, add this new method right after random(min:max:):
// 1
func spawnEnemy() {
  // 2
  let enemy = SKSpriteNode(imageNamed: "boss_ship")
  // 3
  enemy.name = "enemy"
  // 4
  enemy.position = CGPoint(x: frame.size.width, y: frame.size.height * random(min: 0, max: 1))
  // 5
  addChild(enemy)
}
Let’s go over this line by line:
- Here you create a method named
spawnEnemy(). - Here you create a sprite like you did before when you added the monkey, by calling
SKSpriteNode(imageNamed:)and adding the image name of the image. - Here you add a name to the sprite – this will make it easy to find the sprite by name later on.
- Here you set the enemies X position to the right of the screen, but the Y position to a random value using
random(). - Lastly you just add the sprite to the parent/scene using
addChild().
Now all you need to do is call this method a bunch of times! To do this, you will create a sequence of actions to make the enemies spawn periodically over time.
Add these lines to the end of didMoveToView(_:):
runAction(SKAction.repeatActionForever(
  SKAction.sequence([
    SKAction.runBlock(spawnEnemy),
    SKAction.waitForDuration(1.0)])))
Here you create an action with a sequence which repeats itself over and over. The sequence consists of calling spawnEnemy() and a wait duration of 1 second. This makes an enemy spawns every second.
At this point, your file should look like this (with the comments deleted):
import SpriteKit

class GameScene: SKScene {

  let player = SKSpriteNode(imageNamed:"spacemonkey_fly02")

  override func didMoveToView(view: SKView) {

    player.position = CGPoint(x:frame.size.width * 0.1, y: frame.size.height * 0.5)
    addChild(player)
    backgroundColor = SKColor.blackColor()

    runAction(SKAction.repeatActionForever(
      SKAction.sequence([
        SKAction.runBlock(spawnEnemy),
        SKAction.waitForDuration(1.0)])))
  }

  func random() -> CGFloat {
    return CGFloat(Float(arc4random()) / 0xFFFFFFFF)
  }

  func random(#min: CGFloat, max: CGFloat) -> CGFloat {
    return random() * (max - min) + min
  }

  func spawnEnemy() {
    let enemy = SKSpriteNode(imageNamed: "boss_ship")
    enemy.name = "enemy"
    enemy.position = CGPoint(x: frame.size.width, y: frame.size.height * random(min: 0, max: 1))
    addChild(enemy)
  }

}
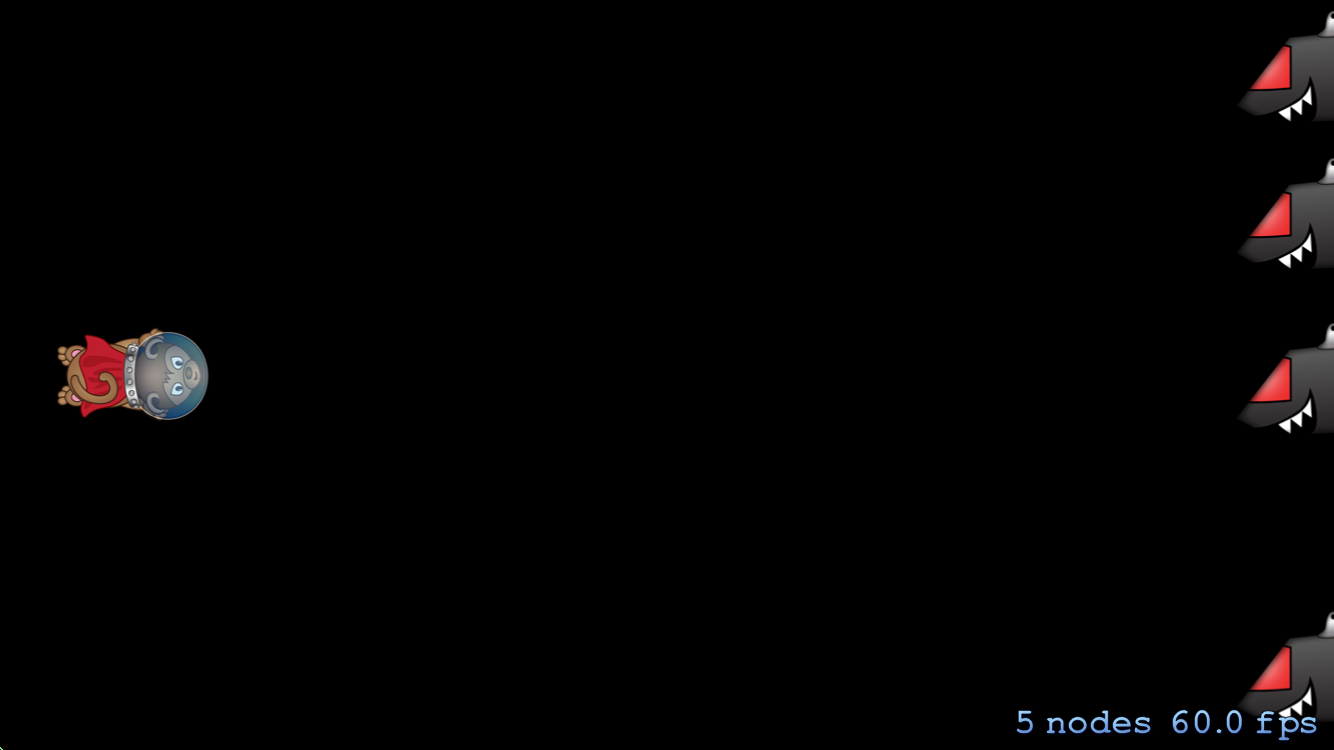
Build and run your app. You should start seeing enemies appear on the right hand side at random spots:
Now let’s make them move!