How To Secure Your App’s Passwords with Safari AutoFill in iOS 8
Learn how to use Safari AutoFill in iOS 8 to generate passwords, securely save passwords, and share and synchronize passwords between your app and website. By Matt Luedke.
Update 04/23/2015: Updated for Xcode 6.3 / Swift 1.2
Safari AutoFill in iOS 8 is a brilliant new feature, but before we get into what it does, do any of the following scenarios sound familiar?
- An app requires you to create a new password, and you proceed to type in your cat’s name, as you’ve done with every single site and app you’ve ever used.
- You already have an account with a website when you download their app. You’d like to keep your account consistent, but you can’t remember which email address you used to create it, or what the password is.
- An app requires that new passwords contain at least 99 characters, with at least one letter, five non-sequential numbers and a prime number of punctuation symbols, excluding ! and *.
Those scenarios are incredibly annoying for any user, and that’s crucial to consider as an app developer. Every insecure password is a liability, and every outlandish password requirement is motivation for a user to simply uninstall your amazing app.
Decreasing friction around passwords is not optional in regards to user-retention, yet, I would argue that you have a responsibility as a developer to help your users stay secure. Hackers and abusers are constantly staging attacks on activists, celebrities and John Q. Public. But fear not, Safari AutoFill in iOS 8 to the rescue!
In iOS 8, you can easily allow your users to:
- Save app passwords using Safari AutoFill
- Share and synchronize passwords between your website and your app
- Generate secure passwords
This article will show you how to implement these capabilities in your app, and you can follow along using a sample project that contains Swift, HTML and Python code.
Note: There are two important security-related prerequisites for linking a website to an app:
- You must own a domain with an SSL certificate. The price varies based from web host to web host, so check with your preferred choice for their pricing.
- An iOS Developer Program membership ($99 per year)
Getting Started
For this exercise, you’ll use a very simple website and corresponding iOS app called Ultra Motivator that provides an authenticated user with a motivational quote. Sadly, unauthenticated users will not find on demand inspiration through this app.
Note: This article is written in such a way that you can read through it without using the sample project if you’d prefer. The sample code is simply there as a reference :]
Clone or download the sample project from GitHub.
First, you’ll notice the code is divided into 3 directories:
- web: contains 3 simple webpages that use Python to access a MySQL database, plus a very short CSS file. These pages allow users to sign up, sign in and update a password.
- api: contains 3 API endpoints, again in Python, to expose the same database functionality to the app in JSON format.
- ios: contains a Swift project for iOS that accesses the API endpoints and makes use of Safari AutoFill features.
Once you’ve finished poking around in the sample project, the next step is to tell iOS to link the passwords from the website to the app!
The Website: Permissions
Since this whole concept is about being more secure, you must take specific steps to tell iOS to allow a specific domain and a certain app to share passwords.
On the website, you use an SSL-signed file populated with a simple JSON list of valid Bundle IDs that you want to allow AutoFill to access.
Ultra Motivator’s JSON looks like this:
{"webcredentials":{"apps":["F47X5999MK.com.upDownInteractive.UltraMotivator"]}}
You could put several Bundle IDs in the apps array if you like:
{"webcredentials":{"apps":["F47X5999MK.com.upDownInteractive.UltraMotivator","F47X5999MK.com.upDownInteractive.AnotherApp"]}}
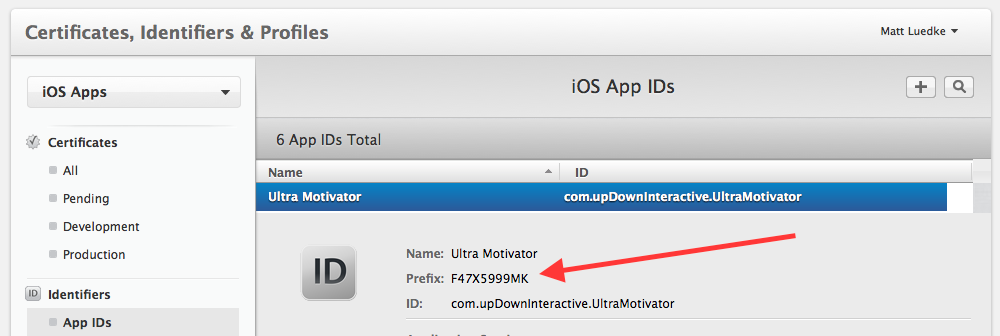
Note that each Bundle ID includes the Team ID prefix, which is provided and enforced by Apple when you enter the iOS Developer Program. You can find your prefix in the Member Center, by selecting Certificates, Identifiers & Profiles, then Identifiers, and then selecting an App ID, as shown here:
Once your Bundle ID is ready, create a file that contains only the JSON. You can do this in the Terminal by entering the following command:
echo '{"webcredentials":{"apps":["F47X5999MK.com.upDownInteractive.UltraMotivator"]}}' > json.txt
Next, you need to sign this file with your website’s SSL Certificate. Once you’ve purchased one, you can either install it yourself or ask your host to do it on your behalf.
Note: SSL Certificates are all the rage in security, and it looks like they will continue to be a big deal for some time. If you’re not already, get up to speed on how they work. Some suggested places to start are: Wikipedia, Mozilla Developer Network, the OpenSSL project, and Namecheap.
To sign your JSON file, prepare the following resources:
- Your correctly-formatted JSON in a file (Ex: json.txt)
- Your private key (Ex: mattluedke.com.key). If your web host installed your SSL certificate, check your domain’s dashboard for this key. Your private key is secret to you (don’t share it!), and ensures your identity as the domain owner. It should look something like this:
-----BEGIN RSA PRIVATE KEY-----
XXXXXXXXXXXXXXXXXXXXXXXX
XXXXXXXXXXXXXXXXXXXXXXXX
XXXXXXXXXXXXXXXXXXXXXXXX
-----END RSA PRIVATE KEY-----
-----BEGIN CERTIFICATE-----
XXXXXXXXXXXXXXXXXXXXXXXX
XXXXXXXXXXXXXXXXXXXXXXXX
XXXXXXXXXXXXXXXXXXXXXXXX
-----END CERTIFICATE-----
iOS: Permissions
AutoFill your UITextFields
Inserting, Updating and Deleting Credentials
Bonus Points: Auto-generating Secure Passwords
Optional: Autocomplete Values For Safari AutoFill
Try It Out
Where To Go From Here?
Note: At its core, the SSL signing command relies on trust. You need to provide keys that create a chain of trust linking your domain to the trusted Certificate Authority (CA) that issued your SSL certificate. Use your CA’s publicly available certificate (Ex: GeoTrust_Global_CA.pem) to signify the source of your certificate.
When ready, open up your Terminal and execute the following command (substituting your own domain name, of course):
This command ensures that this file has definitely come from you and isn’t corrupted by a “man in the middle” attack. Any Bundle IDs that the client sees listed in that JSON will be allowed to share passwords with your domain.
Note: It’s important that you use the exact filename apple-app-site-association as this is the file that iOS will be looking for.
Once you have the output, upload it directly to your domain’s root directory. For example, the associations file for my domain is located at:
https://mattluedke.com/apple-app-site-association
And that concludes the first half of the password-sharing scheme. Now onto the app itself.
With your Bundle IDs uploaded to your domain, the whole world can now see your Team ID and any apps that can share passwords. So how do you prevent someone from creating an app with one of those Bundle IDs and obtaining access?
Well, you’re going to use a provisioning process and code signature for your app to prevent such meddling.
You’ll certify who you are, via Apple, when you create your app, to prove the following:
Sign into Apple’s Developer Portal.
In Member Center, select Certificates, Identifiers & Profiles

From that screen, click on Identifiers\App IDs. If you’ve already created an App ID for this app, select the correct App ID from the list and click the Edit button, or create a new one with the Add button.
If creating a new App ID, check the box for Associated Domains under App Services like this:

If you are editing an existing App ID, the interface looks like this:

When you’re done, you’ll see Associated Domains activated for your App ID:

Then, click Provisioning Profiles, and create, download and install a new profile for that App ID (for a refresher on your way around Provisioning Profiles, check out the tutorial How to Submit Your App to Apple: From No Account to App Store, Part 1).
Once you’ve created, downloaded and installed a valid provisioning profile, you’ll tell Xcode to use the Associated Domain capability in your Swift project.
Open your Swift project in Xcode and navigate to your Target. Then click Capabilities and scroll down until you see the option for Associated Domains.
Turn the switch ON to activate the capability, and then click the + to add your domain to the list. The listing must be in the following format:
Once this is done, you’ll see the domain listed and the capability all ready to go, like this:

It’s very important that your App ID, as specified in your Xcode project, matches perfectly with the App ID in the Member Center. Otherwise, you’ll see an error like this:

You may also notice a new file has been created in your project with the .entitlements extension. Inside the file is the data you just entered, but in a slightly different form:
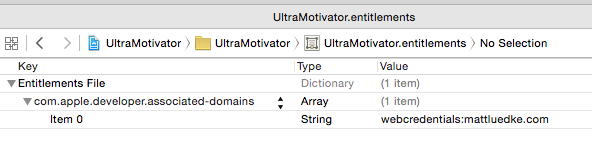
This is the Entitlements File that iOS uses as a checklist against your code signing identity and provisioning profile.
And with that, you’re all ready to move on to coding the rest in Swift.
First, you’ll address the case where the user already has an account on your website. Imagine how thrilled they’ll be when the app magically knows their account, even when they open it for the very first time.

In Ultra Motivator, this is accomplished in SafariKeychainManager. It contains the following class method that you can use in your own project:
This method centers around SecRequestSharedWebCredential, which asks the device’s store of saved passwords for any relevant credentials it might be allowed to use. It has this signature:
As you can see, this method takes three parameters:
Here are the CFError possibilities you may receive in the completion block:
Note: These errors are described in the WWDC ’14 session Your App, Your Website, and Safari, but in practice they don’t always match up with original specifications. To be safe, check the entire domain association process when you receive an error, until Apple stabilizes the API.
But if you do receive some credentials, they will come in the form of either CFArrayRef or CFDictionaryRef objects. Unfortunately, the API won’t return credential objects, so you’ll have to extract the information you need with the CFDictionaryRef keys:
Note: The keys kSecAttrServer and kSecAttrAccount are both instances of CFStringRef, but kSecSharedPassword but is a CFTypeRef.
Now that you have this information, you can call your completion block and include the username and password, wrapping the call in dispatch_async(dispatch_get_main_queue()) {} so it’s guaranteed to be called on the main thread.
This way, the AutoFill-related code stays in SafariKeychainManager, and some other class, say a view controller, will handle what comes next.
For example, in Ultra Motivator checkSafariCredentialsWithCompletion is called in LoginViewController:
This block calls checkSafariCredentialsWithCompletion to check for credentials. If you receive something valid for username and password, you fill in the relevant text fields and proceed with a sign-in request — all without the user having to type a single thing.
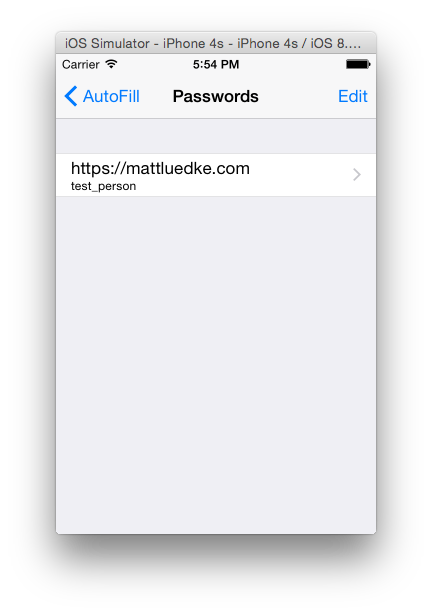
Time to try it out! In the case where you’ve already navigated to the correct website in Safari, created an account and save the password, the credentials will show up on your device in Settings\Safari\Passwords & AutoFill\Saved Passwords, as shown here:
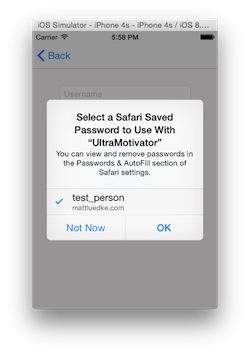
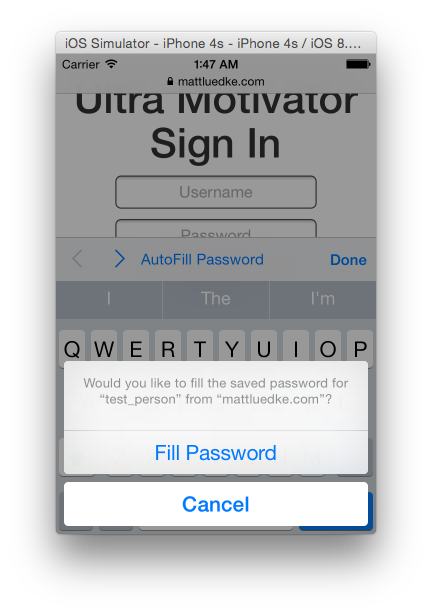
Then, you’ll see a prompt to sign in with your credentials even if you’ve never opened the app before — provided you associated the app and website as outlined earlier in this article.
Note that SecRequestSharedWebCredential constructs the alert and handles the user input for you (and your user).

For many of your lucky future users, tapping OK is the only action they’ll ever need to take in-order to authenticate. Pretty amazing stuff!
Now that you’ve added the capability to read saved credentials, it’s time to complete the suite of CRUD operations. This will be especially valuable if a user starts with your app, but then later decides to use the website, or vice-versa.
In this case, you’ll offer AutoFill in reverse. That is, they’ll be able to sign right in, even if they’ve never visited before.
In Ultra Motivator, this is again accomplished in SafariKeychainManager:
Credential creating, updating and deleting all take place in SecAddSharedWebCredential:
A break down of the parameters:
Conveniently, SecAddSharedWebCredential supplies the necessary alert based on the context, and it also handles the user input. All you need to include in your view controller is a call to updateSafariCredentials, like so:
For example, when inserting a credential for the first time, as in SignupViewController, the operation simply executes without alerting the user.
When updating an existing credential, as in UpdateViewController, you’ll see the following confirmation alert:

And when removing an existing credential, as in HomeViewController, you’ll see the following confirmation:

With your SafariKeychainManager complete, your users will have a fully synchronized and secure experience when authenticating with both your app and your website!
Instead of demanding that users perform keyboard acrobatics on what is such a small keyboard, you can generate a secure password for them with a single line by using: SecCreateSharedWebCredentialPassword.
The password generated will be 12 (uppercase or lowercase) letters and numbers, delimited with dashes, similar to this: 7nD-ft4-RCm-4M8.
Ultra Motivator offers to generate a password for the user when they create a new account in SignupViewController or update their password in UpdateViewController.
SecCreateSharedWebCredentialPassword returns an Unmanaged<CFString>!, and an example implementation would look something akin to this:
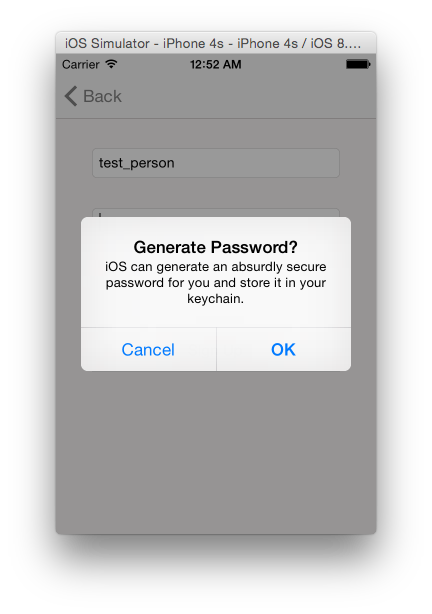
If the user chooses OK from the dialog, then they get a shiny new password. It’s then placed in the relevant text fields and a sign-up request is fired-off.
Since you already arranged for AutoFill to remember this password, it’s not a problem that most humans would grapple with memorizing it. That’s right, there’ll be no hassle for you or your users!
Time to shift gears back to the web side of things. There are a few tiny, optional updates to your HTML that make it a little easier for Safari AutoFill to determine when to save your users’ passwords.
Use these three values for the autocomplete attribute to signal your intent to Safari:
You can see the autocomplete="username" attribute in action on all three pages of Ultra Motivator: the Signup, Signin and Update pages. It directs Safari AutoFill to save that input field’s info as the username.
Ultra Motivator uses the autocomplete="current-password" attribute on the Signin and Update pages. Safari AutoFill will now always attempt to fill this field.
Finally, the Signup and the Update pages use the autocomplete="new-password" attribute. Safari AutoFill should offer to save the contents of these fields. You can use the value more than once if you want the user to confirm their password.
Note: At the time of this writing, the new-password value in particular does not work as described in the WWDC ’14 session video.
Presumably, the Safari development team is still tweaking its functionality. In the meantime, the username and current-password values work, and you should implement the new-password value now so your page will be ready the moment Safari is.
You can test out the web interface right now on an iOS device or the simulator. Use these Ultra Motivator pages as examples:
Notice how Safari offers to save your password after you sign in. Who made that a reality? Oh, yeah, YOU did that.

Save a new set of credentials for your own pages, and then try to open your associated app and signing in for the first time. As if there was a wizard inside your computer conjuring up a password spell, the credentials are waiting for you on the app.
Now try going the other direction. Create a new account in your app, and then visit your website’s sign in page. AutoFill already knows your new credentials there too.
If you used an auto-generated password, then the only typing you’ll have to do is to create a username. From there, you can generate a secure password and sign into your app and website in but a few taps.
It’s a good idea to test out both of these scenarios, as well as the password update scenario, and look for any edge cases. Things to look out for:
Note: When the user enables iCloud Keychain, the entire AutoFill process is even powerful as it enables password synchronization across all of you iCloud-enabled devices.
Feel free to use the sample code available in the Ultra Motivator repository.
If you’d like more information about sign-on services and password management on iOS, be sure to check out this WWDC 2014 session:
Also, the Ultra Motivator Swift project uses Alamofire, a popular open-source networking library. For more information on how to use it effectively, see our Beginning Alamofire Tutorial.
As always, but especially since this is a new feature and Apple’s Swift documentation for it is lacking, please make use of the comments below and our forums if you have any questions, comments or interesting new ways to use AutoFill.
Thank you for reading through this article. With your new skills, you can make using your brilliant apps easier to use and more secure than ever, and that’ll in turn lead to happier users, better reviews, and a uncanny feeling of technical awesomeness.
-
No domain provided— you don’t have to provide a domain, but if you do and there are no domains in the entitlements file, you’ll receive this. -
not found in com.apple.developer.associated-domains entitlement— if you provide a domain, but it’s not in the entitlements file, you’ll get this. -
no matching items found— if the device’s saved passwords don’t contain any credentials that match both the optional domain and account, or the user chooses not to use any of them, you will receive this. -
no matching items found— you’ll also see this if you’re trying to access a domain that has not been properly associated with the app.
-
kSecAttrServer: value is aCFStringRefthat contains the website. -
kSecAttrAccount: value is aCFStringRefthat contains the account. -
kSecSharedPassword: value is aCFStringRefthat contains the password.
-
fqdn: The fully qualified domain name for which you’d like to perform the operation. -
account: Account name. -
password: Password to be inserted or updated. Warning: passing.Nonehere deletes the credential. -
completionHandler: A completion block that passes back aCFErrorif anything goes wrong.
- That your app will be using the Associated Domains capability.
- That your Team ID is, in fact, valid.
- (Optional)
fqdn: A fully qualified domain name for which you’d like to request credentials. If you pass.Nonehere, the app simply checks all the domains listed in your entitlements file. Being explicit is not necessary here, but may help if you have different domains for development and production versions of an app. - (Optional)
account: If there is a specific account for which you’d like to request credentials, put it in here. You can also pass.Noneto make the app check for any valid credentials. -
completionHandler: A block that will deliver either aCFArray!or aCFError!after the request for credentials is done.
- The domains expected by AutoFill in both web and app contexts need to precisely match. Even a small difference can cause credentials to get lost or become out-of-sync across platforms.
- If you’re in the middle of developing your app and make changes to entitlements or AutoFill-related code, you may have to remove the app from your device and re-install.
cat json.txt | openssl smime -sign -inkey mattluedke.com.key
                              -signer mattluedke.com.pem
                              -certfile intermediate.pem
                              -noattr -nodetach
                              -outform DER > apple-app-site-association
webcredentials:mattluedke.com
class func checkSafariCredentialsWithCompletion(completion: ((username: String?, password: String?)
    -> Void)) {

  let domain: CFString = "mattluedke.com"

  SecRequestSharedWebCredential(domain, .None, {
      (credentials: CFArray!, error: CFError?) -> Void in

    if let error = error {
      println("error: \(error)")
      completion(username: nil, password: nil)
    } else if CFArrayGetCount(credentials) > 0 {
      let unsafeCred = CFArrayGetValueAtIndex(credentials, 0)
      let credential: CFDictionaryRef = unsafeBitCast(unsafeCred, CFDictionaryRef.self)
      let dict: Dictionary<String, String> = credential as! Dictionary<String, String>
      let username = dict[kSecAttrAccount as String]
      let password = dict[kSecSharedPassword.takeRetainedValue() as! String]
      dispatch_async(dispatch_get_main_queue()) {
        completion(username: username, password: password)
      }
    } else {
      dispatch_async(dispatch_get_main_queue()) {
        completion(username: nil, password: nil)
      }
    }
  });
}
func SecRequestSharedWebCredential(fqdn: CFString!, account: CFString!, completionHandler: ((CFArray!, CFError!) -> Void)!)
SafariKeychainManager.checkSafariCredentialsWithCompletion({
  (username: String?, password: String?) -> Void in
  switch(username, password) {
  case let (.Some(username), .Some(password)):
    self.userNameField.text = username
    self.passwordField.text = password
    self.makeSignInRequest(false)
  default:
    break
  }
})
class func updateSafariCredentials(username: String, password: String) {

  let domain: CFString = "mattluedke.com"

  SecAddSharedWebCredential(domain,
      username as CFString,
      count(password) > 0 ? password as CFString : .None,
      {(error: CFError!) -> Void in
        println("error: \(error)")
      }
  );
}
func SecAddSharedWebCredential(fqdn: CFString!, account: CFString!, password: CFString!,
    completionHandler: ((CFError!) -> Void)!)
SafariKeychainManager.updateSafariCredentials(username, password: password)
@IBAction private func promptForPassword(sender: AnyObject) {
  showPasswordGenerationDialog({
    let password = SecCreateSharedWebCredentialPassword().takeUnretainedValue()
    self.passwordField.text = password as String
    self.confirmPasswordField.text = password as String
    self.makeSignUpRequest()
  })
}
<input type="text" autocomplete="username">
<input type="password" autocomplete="current-password">
<input type="password" autocomplete="new-password">