Beginning Twitter in iOS 6 Tutorial
Note from Ray: This is the ninth iOS 6 tutorial in the iOS 6 Feast! In this tutorial, we’re updating one of our older tutorials to iOS 6 so it’s fully up-to-date with the latest features like the new Social Framework in iOS 6. Parts of this tutorial come from Felipe Laso Marsetti‘s “Beginning Social […] By Felipe Laso-Marsetti.
Sign up/Sign in
With a free Kodeco account you can download source code, track your progress, bookmark, personalise your learner profile and more!
Create accountAlready a member of Kodeco? Sign in
Sign up/Sign in
With a free Kodeco account you can download source code, track your progress, bookmark, personalise your learner profile and more!
Create accountAlready a member of Kodeco? Sign in
Contents
Beginning Twitter in iOS 6 Tutorial
20 mins
Note from Ray: This is the ninth iOS 6 tutorial in the iOS 6 Feast! In this tutorial, we’re updating one of our older tutorials to iOS 6 so it’s fully up-to-date with the latest features like the new Social Framework in iOS 6.
Parts of this tutorial come from Felipe Laso Marsetti‘s “Beginning Social Framework chapter” in our new book iOS 6 by Tutorials, although the book is about a different app (a “Fun Facts” app!) and takes things MUCH further than this simple example, such as creating a custom activity in the activity view controller. Enjoy!
This is a post by iOS Tutorial Team Member Felipe Laso, an iOS developer working at Lextech Global Services.
These days, social networks are a huge part of our daily lives. Not only do we access social networks via their dedicated websites like twitter.com or facebook.com, but we also find social features in apps, websites, blogs, video games, and more.
Adding some social features into your apps can help you increase the virality of your app, help you identify and retain customers, and can boost the polish and added value of your app.
In the old days, adding social features into your app was a major pain. Not only did you have to use a different API for each social network, but users have to constantly log into each one of them for every app they use
iOS 5 added support for Twitter, but there was still no support for other popular social frameworks like Facebook or Sina Weibo. Now with the new iOS 6 Social Framework, adding support for any of these frameworks is incredibly easy – and you’re all ready to go if Apple adds any more in the future!
Keep reading to see how simple it is to integrate social frameworks into your app, with an example of integrating Twitter into a simple app about tweeting your favorite tutorials! :]
How Does It Work?
iOS 6 includes several ways to interact with Twitter. The simplest, and possibly the one you will most likely implement, is the SLComposeViewController. That name is quite a handful so we will affectionately call it “Tweet Sheet” just as Apple does.
In this tutorial you will see that the tweet sheet is very easy to implement. With literally just a couple of lines you can have a full tweet composer within your app! You don’t have to worry about contacting the Twitter backend, handling user logins, or anything like that.
Here is a code snippet for creating and presenting the SLComposeViewController:
if ([SLComposeViewController isAvailableForServiceType:SLServiceTypeTwitter])
{
    SLComposeViewController *tweetSheet = [SLComposeViewController
        composeViewControllerForServiceType:SLServiceTypeTwitter];
    [tweetSheet setInitialText:@"Initial Tweet Text!"];
    [self presentViewController:tweetSheet animated:YES completion:nil];
}
All you do is determine whether the device can send tweets, create an instance of SLComposeViewController for the Twitter service, attach any links or images, put some initial text and present it modally, that’s it! All within Xcode and through the use of Objective-C.
In fact it’s so easy, that if you’re an advanced developer you can just skip the rest of this tutorial and implement it yourself! But if you want to see an example of using “simple tweet” capability in a simple project, keep reading!
Overview
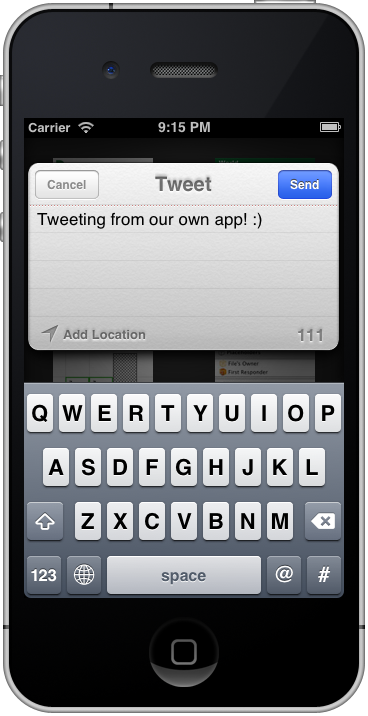
In this introductory Twitter tutorial we’ll cover the use of the SLComposeViewController (i.e. the “tweet sheet”) which will enable you to tweet any text, image or link you want from within your applications. It looks something like this:
The advantage of using the tweet sheet is that it’s built right onto iOS, this means lots of things:
- Standard interface throughout the OS
- Automatic use of the user’s system Twitter account
- Automatic check for a tweet less than 140 characters long
- Easy image and link attachments
- Easy to program, no need to implement OAuth or connect to the Twitter backend
As you can see you have lots of advantages and incentives to use this and, being that it’s so simple, there’s no excuse not to include Twitter functionality in your applications!
Getting Started
Alright fellow programmers, it’s time to get your fingers typing and creating an awesome Twitter enabled app. In this example we’re going to create a simple app that will allow the user to tweet whatever text they like, and even include images or links within their tweet.
Create a new project with Xcode with the iOS\Application\Single View Application template. Enter SimpleTweet for the product name, set the device family to iPhone, and make sure that Use Storyboards and Use Automatic Reference Counting are checked (leave the other checkbox unchecked).
Click Next, select a location where you want to save your project, and click Create.
You are only going to support Portrait orientation so you need to set that up within your project settings. In your Project Navigator select the SimpleTweet project and make sure you select the SimpleTweet target inside of it, go to the Summary tab and deselect all orientations except for Portrait:
Now that you have your project created let’s discuss a bit of what it’s going to do. You are going to have four buttons that are images from four tutorials on this site. Your app will allow the user to tap their favorite tutorial, and it will bring up a sheet so the user can tweet about it.
To do this, you’ll need some images first. So download the resources for this tutorial and drag the images into your project.
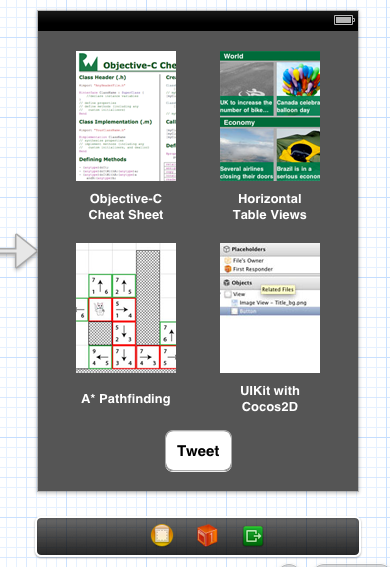
Now open up MainStoryboard.storyboard and set up some UIButtons and UILabels in the view controller as follows:
To make this interface, simply:
- Set the background image of the buttons to the appropriate images, and set the buttons type to Custom. Size the buttons to fit the images.
- Add 4 labels to show what each button corresponds to, set their Lines to 0 (unlimited), the font size to a Bold System font of size 13, and their text color to White
- Change the background color to a dark gray
- Make the Tweet button’s text black
Don’t worry too much about Auto Layout or what happens if you switch between iPhone or iPhone 5 screen sizes – it’s not important for this tutorial.
Build and run and make sure everything looks ok so far. Now onto the implementation!


