Create Your Own Level Editor: Part 3/3
In this last portion of the tutorial, you’ll add the ability to delete objects, move them around, complete the level save and reset mechanism, and implement multiple level handling to round out your level editor! By Barbara Reichart.
Welcome to the third part of a tutorial series that shows you how to make a level editor for the Cut the Verlet game that was previously covered on this site.
In the first part of this three-part tutorial, you designed the XML storage mechanism of your level files, implemented some model classes to hold your rope and pineapple data, and finished off by creating the load file functionality of your level editor.
In the second part, you added a popup menu along with a state machine to control the flow of the editor and provide a visual indicator of the current mode of the editor. Then you finished off by adding the ability to create new objects and place them on the screen.
In this last portion of the tutorial, you’ll add the ability to delete objects, move them around, complete the level save and reset mechanism, and implement multiple level handling to round out your level editor!
Ready to get started?
This project starts where you left off in the last tutorial, so make sure you have a copy of the project from part 2.
Getting Started: Removing Objects From Your Level
The ability to add objects to the screen is pretty rewarding, but your screen is getting more crowded by the second and — whoops! You anchored a rope where you didn’t mean to. Now what do you do?
Looks like you’re going to need some object deletion methods.
Think for a minute about the steps required to delete an object in your level:
- Detect which object was touched or selected by the user
- Remove the visual object from the scene
- Delete model from the level file handler
- Delete copy from the list in level editor
Most of the steps are quite straightforward, and you likely already know everything you need in order to implement these methods on your own. The tricky bit is knowing if a rope was selected; it’s not quite as straightforward as clicking on pineapples.
To understand what makes this touch detection more complicated, take a look at the following graphic:
Bounding box for a diagonal rope – much bigger than the rope itself…

When you rotate a rope sprite, the sprite’s bounding box will not rotate with it. Instead, it only adjusts the y and x coordinate, so that the whole sprite is contained in the bounding box. As a result, the bounding box is often several times bigger than the actual rope. Because of this, the bounding box alone is not enough to determine whether a user tapped a rope or not.
The solution is dead simple — analytic geometry and linear equations to the rescue!
Okay, okay — that makes it sound a LOT harder than it actually is! :]
You’re really just using a simple formula to detect the distance between the rope — which is essentially a line — and the spot the user touched on the screen.
This concept is illustrated in the image below:
Basic geometry helps you to calculate the distance between the touch location and the rope.

Calculating the Distance to a Line
To calculate the distance between a point and a line, simply construct two lines: one that goes through both anchor points of the rope, and another which is orthogonal, or perpendicular, to the first and passes through the touch location. The orthogonal line will always represent the shortest distance possible between the point and the line.
You next calculate the intersection point of the two lines, and then you calculate the distance between the intersection point and the touch location. Done!
Well, not quite. You know what they say about theory — it works perfectly, in theory. :]
The calculations above work for the general case of a rope of infinite length. But there isn’t quite enough room on your screen for a rope of that size — not even on your 27″ Thunderbolt display, sadly.
Since the rope is of finite length, you’ll need one extra check — to see if the user touched within the bounding box of the rope. Since fingers are larger than the ropes, you will want to add a little bit of buffer around the two anchor points, just to be sure.
Open RopeSprite.m and add the following method:
-(float)distanceToPoint:(CGPoint)position {
   CGPoint anchorA = [CoordinateHelper levelPositionToScreenPosition:ropeModel.anchorA];
   CGPoint anchorB = [CoordinateHelper levelPositionToScreenPosition:ropeModel.anchorB];
   float deltaX = anchorA.x-anchorB.x;
   float deltaY = anchorA.y-anchorB.y;
   float distance;
   if (deltaX == 0) {
       distance = fabs(anchorA.x - position.x);
   } else if (deltaY == 0) {
       distance = fabs(anchorA.y - position.y);
   } else {
       // calculate slope by dividing y-coordinate distance with x-coordinate distance
       float slope = deltaY/deltaX;
       // calculate y-intercept of rope t = y-m*x
       float yIntercept = anchorA.y - anchorA.x * slope;
       // construct line that is orthographic to rope and goes through point, we want to calculate distance for
       float slopeOrthogonal = -1/slope;
       // position.y = slopeOrthogonal * position.x + yInterceptOrthogonal => solve for yInterceptOrthogonal
       float yInterceptOrthogonal = position.y - slopeOrthogonal * position.x;
       // calculate interception between rope and orthogonal line
       float x = (yInterceptOrthogonal - yIntercept) / (slope - slopeOrthogonal);
       float y = slope * x + yIntercept;

       distance = ccpDistance(position, CGPointMake(x, y));
   }
   return distance;
}
Okay, there’s a fair bit of mathematical calculation going on in there, so take it step-by-step.
The method first calculates the distance between the anchors along the x and y axis. This tells you the angle of the rope. Next, there’s some code that handles two special cases.
The first special case is when deltaX is 0. This means that the rope is horizontal. You can’t use the standard calculation in this case, as you need to calculate the slope by dividing deltaY with deltaX — and the compiler gets a little cranky when you try to divide by zero. :]
However, you can easily calculate the distance between a horizontal line and a point as the absolute value of the difference between the y-coordinate of line and point. Luckily, Objective-C has a method called fabs, that calculates the absolute value of a variable for you.
The second exception is when deltaY is 0. Pop quiz: what orientation does a rope with a deltaY value of 0 have?
[spoiler]
The rope is vertical.
[/spoiler]
When deltaY is zero, you could calculate the slope of the rope; however you can’t calculate the slope of the orthogonal line due that whole division by zero problem. In this case you can calculate the distance for ropes with deltaY alone — very similar to how you handled the first special case.
If the distance calculation is not a special case, you need to create a line equation that represents the rope in the form y = mx + t; m is the slope of the line, while t point where the line intersects with the y-axis.
The slope m is calculated by dividing deltaY by deltaX. Then you insert the x- and y-coordinates of one anchor point into the above equation and solve for t.
Next you construct the equation of the orthogonal another line, which is perpendicular to the first line and passes through the touch point. The slope of the perpendicular line is the negative multiplicative inverse of the slope of the original line: that is, -1/slope.
Now that you have the slope, you again need to calculate the y-intersect. As before, insert the x- and y-coordinates of the touch point and solve for t.
Next, you need to calculate the intersection point of the two lines. You know that the (x,y) coordinate pair of both lines is exactly the same at the point where the two lines intersect. Therefore you can take the right part of both equations (the mx + t portion), and write them as being equal to each other, as below:
![]()
Then move the constants to one side and collect the slope calculations on the other:
![]()
Then divide both sides by the same equation to leave x by itself on the left hand side:
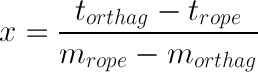
Now all you need to do is enter the known slopes and intercepts to get the x component of the coordinate.
Then to get the y-coordinate, simply use your original equation y = mx + t to solve for y. The code uses the orthogonal slope and intercept, but you could have easily used the rope slope and intercept to get the same answer.
You then simply call ccpDistance to calculate the distance between the touch location and the intersection point.
After all that math, you now have the distance to the rope! However, don’t forget that you also need to know the bounding box of the rope!
Oh no — will this mean another round of mathematical derivation?
No. It’s quite simple, in fact. (Did you just breathe a sigh of relief?)
Add the following code to RopeSprite.m:
-(CGRect)getBoundingBox {
   return ropeSprite.boundingBox;
}
Oh — that wasn’t so hard! :]
You’ll need a clean-up method as well to truly remove the rope.
Add the following code to RopeSprite.m as well:
-(void)cleanupSprite {
   [ropeSprite removeFromParentAndCleanup:YES];
}
The above code removes the rope sprite from the scene.
Now add the following method prototypes to RopeSprite.h:
-(float)distanceToPoint:(CGPoint)position;
-(CGRect)getBoundingBox;
-(void)cleanupSprite;
It’s time to pull it all together. Switch back to LevelEditor.mm and the following method:
-(RopeSprite*)ropeAtPosition:(CGPoint)position {
   float minDistanceToRope = 5;
   RopeSprite* closestRope;
   for (RopeSprite* ropeSprite in ropes) {
       if (CGRectContainsPoint([ropeSprite getBoundingBox], position) && [ropeSprite distanceToPoint:position] < minDistanceToRope) {
           closestRope = ropeSprite;
           minDistanceToRope = [ropeSprite distanceToPoint:position];
       }
   }
   return closestRope;
}
The above method determines if a user touched a rope.
First, you define a small distance from the rope for a touch that will still count as a touch on the rope; in this case, 5 pixels.
Next, you iterate over all the ropes and determine whether the touch position is within the bounding box of the rect and also within the minimal distance. If so, take the current rope to be the one closest to the touch location.
As well, update the minDistanceToRope variable so that you can match it against the next touch distance. This ensures that if there are multiple ropes in the touch area that you return the rope closest to the touch location.
You now have the methods for detecting the touched rope and a way to remove the rope from the scene. But don't forget that you need to save your changes, or else next time the ropes will still be in your level!
Add the following method prototype to LevelFileHandler.h:
-(void)removeRopeWithID:(int)id;
Now switch to LevelFileHandler.m and add the following method implementation:
-(void)removeRopeWithID:(int)id {
   RopeModel* ropeToBeRemoved;
   for (RopeModel* rope in self.ropes) {
       if (rope.id == id) {
           ropeToBeRemoved = rope;
           break;
       }
   }
   [self.ropes removeObject:ropeToBeRemoved];
}
This is pretty straightforward code. Simply iterate over all of the ropes, and check the ID of each rope. If it matches the rope you should remove, store it in ropeToBeRemoved. Since there's only one rope with a given ID, exit the loop and remove the ropeToBeRemoved instance from the array that contains all the ropes.
Now you can add the code that detects a rope at a given position on screen and removes it.
Switch to LevelEditor.mm and add the following method:
-(void)removeRopeAtPosition:(CGPoint)position {
   RopeSprite* selectedRope = [self ropeAtPosition:position];
   if (selectedRope) {
       // remove rope (from ropes, ropesSpriteSheet, fileHandler
       [selectedRope cleanupSprite];
       [fileHandler removeRopeWithID:selectedRope.id];
       [ropes removeObject:selectedRope];
       return;
   }
}
The above code looks up the rope that is at the given position. It then removes this rope from the scene, from the file handler, and from the array in the level editor. At that point, the rope is gone from the level — at least, it would be if you actually called this new method! :]
Since a long press handles removal of items, that's where you need to add the call to this new method.
Replace the existing method stub for longPress: in LevelEditor.mm with the following code:
-(void)longPress:(UILongPressGestureRecognizer*)longPressGestureRecognizer {
   if (mode == kEditMode && longPressGestureRecognizer.state == UIGestureRecognizerStateBegan) {
       NSLog(@"longpress began");
       NSValue* locationObject = [longPressGestureRecognizer valueForKey:@"_startPointScreen"];
       CGPoint touchLocation = [locationObject CGPointValue];
       touchLocation = [[CCDirector sharedDirector] convertToGL:touchLocation];

       [self removeRopeAtPosition:touchLocation];
   }
}
The new code simply adds some lines that calculate the location of the point the user touched on the screen. Then it calls removeRopeAtPosition: with the touch location.
Build and run your project, and switch to editing mode. Use a long press to remove a rope from the level, as shown in the before and after screenshots below:

You've solved the harder problem first — removing ropes. Implementing the logic to remove a pineapple from the screen will be child's play in comparison!