Swift Tutorial Part 1: Expressions, Variables and Constants
Welcome to our mini-series on getting started with programming in Swift! In this series, you’ll learn some Swift programming basics using playgrounds. By Lorenzo Boaro.
Welcome to our mini-series on getting started with programming in Swift!
In this series, you’ll learn some of the basics of programming while working in a modern, friendly environment with the Swift programming language.
Instead of us boring you with a lot of theory, you’ll get to coding right away by using Swift Playgrounds, which are sandbox-type environments wherein you can run code directly without having to code an entire app.
For this tutorial, you’ll need Xcode 10, the standard development environment for macOS, available here. If you have Xcode version 9 or below, some of the code in this tutorial won’t work as expected.
Getting Started
The set of tools that you use to write software is often referred to as the tool chain. The part of the tool chain into which you write your code is known as the Integrated Development Environment (IDE). Xcode is your IDE, which includes playgrounds.
You’ll use playgrounds throughout this series to practice coding, so it’s important to understand how they work. That’s what you’ll learn during the rest of this tutorial.
Creating a Playground
When you open Xcode, it will greet you with the following welcome screen:

If you don’t see this screen, it’s most likely because the Show this window when Xcode launches option was unchecked. You can also open the screen by pressing Command-Shift-1. You can also click Window ▸ Welcome to Xcode from the menu bar.
From the Welcome screen, you can jump quickly into a playground by clicking on Get started with a playground. Click on that now and Xcode will present you with a choice of templates.

The platform you choose simply defines which version of the template Xcode will use to create the playground. Currently, your options are iOS, macOS or tvOS. Each platform comes with its own environment set up and ready for you to begin playing around inside with code. For the purposes of this tutorial, choose whichever platform you wish. You won’t be write any platform-specific code; instead, you’ll learn the core principles of the Swift language.
Select the Blank template and click Next. Xcode will now ask you to name the playground and select a location to save it. The name is merely cosmetic and for your own use; when you create your playgrounds, feel free to choose names that will help you remember what they’re about.
Click Create to create and save the playground. Xcode then presents you with the playground, like so:

New playgrounds don’t start entirely empty but have some basic starter code to get you going. Don’t worry — you’ll soon learn what this code means.
Playgrounds Overview
At first glance, a playground may look like a rather fancy text editor. Well, here’s some news for you: It’s essentially just that!
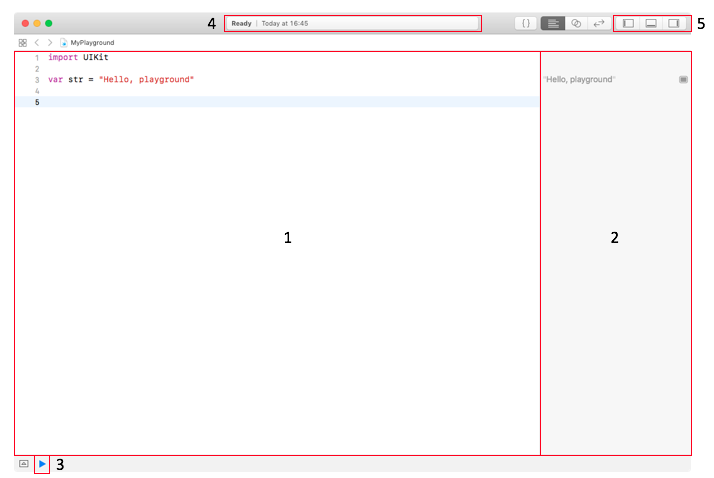
The screenshot above highlights the first and most important things to know about the following:
- Source editor: This is the area in which you’ll write your Swift code. It’s much like a text editor such as Notepad or TextEdit. You’ll notice that it uses what’s known as a monospace font, which means all characters are the same width. This makes the code much easier to read and format.
- Results sidebar: This area shows the results when you execute your code. You’ll learn more about how code is executed as you read through the series. The results sidebar is the main place that you’ll look to confirm your code is working as expected.
- Execution control: Playgrounds execute automatically by default, meaning you can write code and immediately see the output. This control allows you to execute the playground again. Holding down the ▶︎ (Execute) button allows you to switch between automatic execution and manual execution modes.
- Activity viewer: This shows the status of the playground. In the screenshot above, it shows that the playground has finished executing and is ready to handle more code in the source editor. When the playground is executing, the viewer will indicate this with a spinner.
- Panel controls: These toggle switches show and hide three panels, one that appears on the left, one on the bottom and one on the right. The panels each display extra information that you may need to access from time to time. You’ll usually keep them hidden, as they are in the screenshot. You’ll learn more about each of these panels as you move through the series.
Playgrounds execute the code in the source editor from top to bottom. Every time you change the code, the playground will re-execute everything. You can also force a re-execution by clicking Editor ▸ Run Playground in the menu bar. Alternatively, you can use the execution control.
You can turn on line numbers on the left side of the source editor by clicking Xcode ▸ Preferences… ▸ Text Editing ▸ Line Numbers in the menu bar. Line numbers can be very useful when you want to refer to parts of your code.
Once the playground finishes execution, Xcode updates the results sidebar to show the results of the corresponding lines in the source editor. You’ll see how to interpret the results of your code as you work through the examples in this series.
Code comments, arithmetic operations, constants and variables are some of the fundamental building blocks of any language, and Swift is no different.
Code Comments
The Swift compiler generates executable code from your source code. To accomplish this, it uses a detailed set of rules. Sometimes these details can obscure the bigger picture of why you wrote your code a certain way or even what problem you are solving. To prevent this, it’s good to document what you wrote so that the next human who passes by will be able to make sense of your work. That next human, after all, may be future you! :]
Swift, like most other programming languages, allows you to document your code through the use of what are called comments. These allow you to write any text directly alongside your code, which is ignored by the compiler.
The first way to write a comment is like so:
// This is a comment. It is not executed.
This is a single line comment. You could stack these up like so to allow you to write paragraphs:
// This is also a comment.
// Over multiple lines.
However, there is a better way to write comments that span multiple lines. Like so:
/* This is also a comment.
   Over many...
   many...
   many lines. */
This is a multi-line comment. The start is denoted by /* and the end is denoted by */. Simple!
You should use code comments where necessary to document your code, explain your reasoning or simply to leave jokes for your colleagues. :]