Travis CI Tutorial: Getting Started
In this Travis CI tutorial, learn how to set up the popular continuous integration service, and integrate with GitHub so your tests are run automatically. By Ellen Shapiro.
Automate tests with Travis CI

You’ve got 99 problems, and testing is one of ’em!
Developers know that testing an application thoroughly is necessary to catch problems before they affect users. Forgetting to test can result in complications like annoyed clients, ranting one-star reviews in the App Store, and bruises from smacking yourself in the head for letting simple mistakes slip through the net.
But remembering to run tests before each commit or merge can be tough if you have to do it manually. What’s a time-crunched developer to do?
Continuous Integration
Thankfully, Continuous Integration can save the day. Continuous Integration, often abbreviated to just CI, is the process of automatically building and running tests whenever a change is committed.
Now, Apple has their own solution for this with Xcode Bots, which are designed to run on OS X Server. But the downside of Apple’s solution is that you, yes you have to manage the entire process. You have to set up and maintain OS X Server and Xcode versions on the server, figure out access control for viewing results, and handle provisioning and signing issues. Sounds like a lot of work, right? You don’t have time for this; you have code to write, apps to design, and happy hour to get to – that beer isn’t going to drink itself.
Shout it to the cosmos with me: there must be an easier way!
Travis CI
Luckily, the cosmos heard us, and responded with Travis CI.
What is Travis CI?
Usually simply called Travis, it’s a Continuous Integration service that is free for open-source projects and has a monthly fee for closed-source projects based on how many simultaneous builds you want to run.
What does it do?
Travis sets up “hooks” with GitHub to automatically run tests at specified times. By default, these are set up to run after a pull request is created or when code is pushed up to GitHub.
In this Travis CI tutorial, you’ll use a public GitHub repo and the free version of Travis to set up tests that run every time you try to merge new changes into that repo.
- You already have a GitHub account. If you don’t, sign up for a free one here.
- Git is installed on your system. You can check this by opening up Terminal and typing which git. If there’s a result – typically /usr/bin/git – then you’re good to go. If not, you can download an installer from the Git website here.
Getting Started
Let’s do this! Download the starter project, then open up the zip file and put the resulting MovingHelper folder on your Desktop so you can find it easily. MovingHelper is a to-do list app which, as you might suspect from the name, helps manage tasks related to moving.
Build and run your project in Xcode; you’ll see the following:

Use the picker to choose a date a little less than a month from the current date, then tap the Create Tasks button. You’ll see the following:

The app has created a list of tasks. The red sections are past-due tasks, while the green sections are upcoming tasks.
Looking through the code, you’ll see that a few tests have been set up. Execute the tests by using the Command-U shortcut, and they will quickly run and pass:

So far so good, right? Now that you know the tests are passing, you’re ready to get GitHub and Travis set up to run them automatically.
Setting Up Git and GitHub
First, you’ll create a local Git repo with the files in the starter project. Fire up Terminal, then change the directory to your desktop folder:
cd ~/Desktop/MovingHelper
Next, initialize a local repository on your computer:
git init
Next, add everything in the MovingHelper folder – since you’re already in it, just type:
git add --all
Finally, commit all the code:
git commit -m "Starter project from raywenderlich.com"
Now that everything is committed locally, it’s time to create a public repository on GitHub. This is what Travis will watch for changes.
Head over to github.com and make sure you’re logged in to your account. In the top right corner of the page, there’s a plus sign with a little down arrow next to it – click it and select New repository:

You will see a page to set up the new repository:
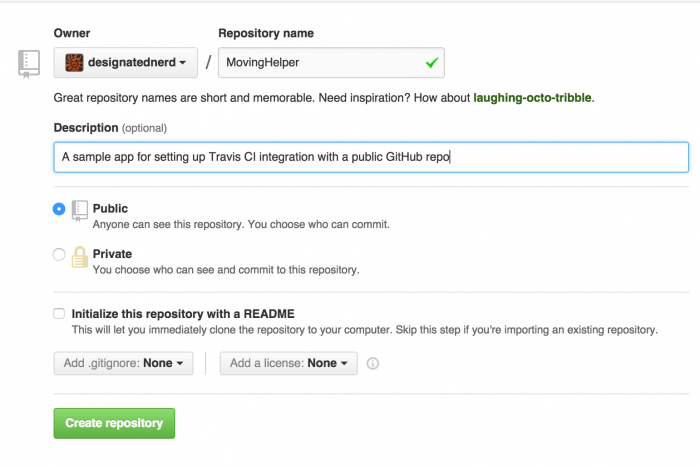
The owner will be you. Name the repo MovingHelper, give it a brief description, make sure it’s public, and don’t add a README, license, or .gitignore as these are all included in the sample project. Next, click the big green Create repository button. You’ll see a page explaining how to get your code to GitHub.

Leave this page open in a tab of your browser – you’ll want to come back to it shortly.
Set Up Travis
Open a new tab in your browser and go to travis-ci.org to get started using the free version of Travis. In the upper right corner is a button which allows you to sign in using your GitHub account:

Use this button to sign up for Travis. Since you’re already signed in to GitHub, you should not need to sign in again. If you haven’t already signed up for Travis, you’ll need to agree to the permissions they request:
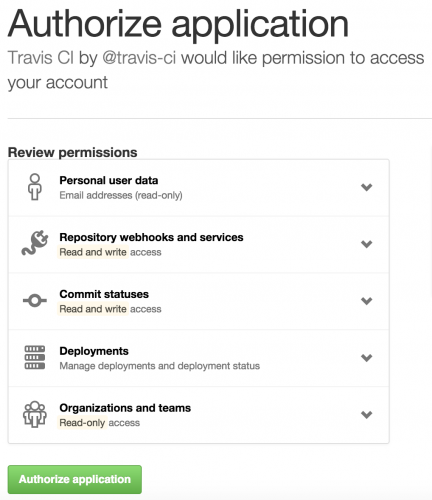
Travis needs access to read and write webhooks, services, and commit statuses. That way that it can create the automated “hooks” it needs to automatically run when you want it to.
Click the green Authorize Application button. GitHub will ask you to verify your password:

Enter your password and click Confirm password. Now you’re on the Travis “getting-started” page.
Your avatar and GitHub username are in the upper right hand corner:
![]()
Click that to be taken to your Travis profile page. You’ll see an alphabetical list of all your public repos. If you haven’t set up Travis previously, they should all be unchecked.
Scroll down to MovingHelper:

Flick the switch to turn it on:

There! Travis is now watching for changes to your MovingHelper repository.